Administration
After you have successfully started the Axon.ivy Engine, you can start the engine administration tool. This tool allows you to create and manage all your applications on the engine and in addition to set some further configuration properties.
To do so, launch your preferred web browser and point it at the following the address:
http://ServerName:Port/ivy.
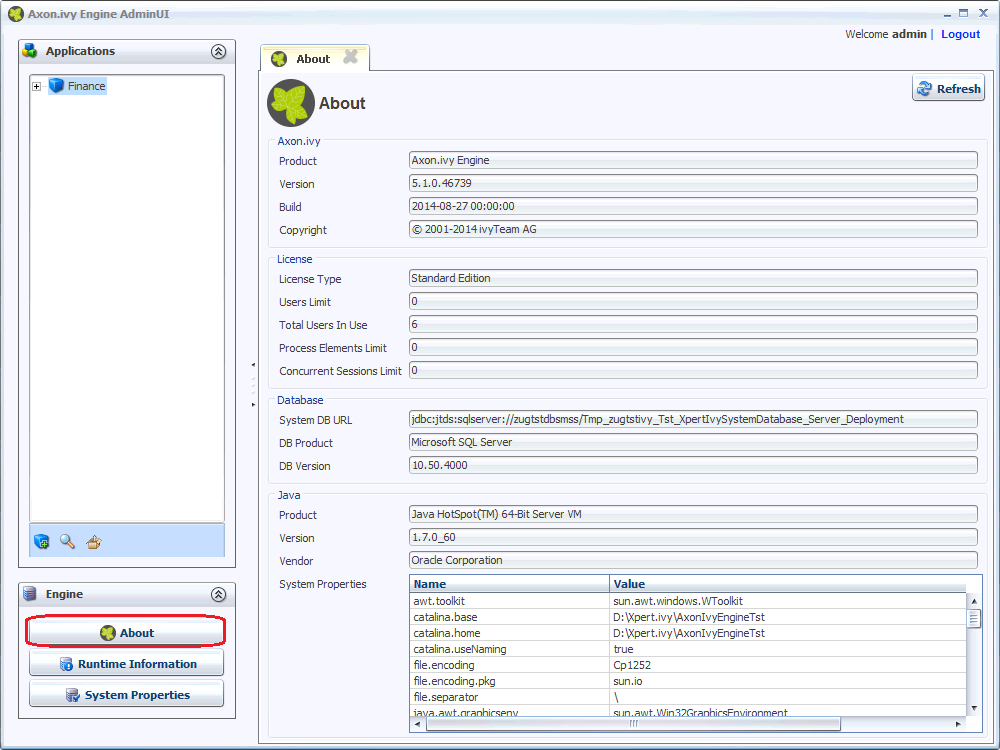
You should be directed to the Axon.ivy Engine info page:
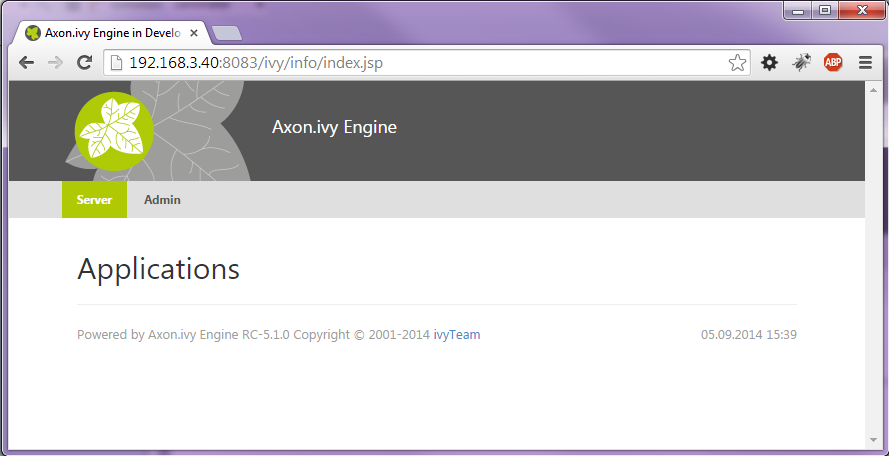
This page displays all your applications and their process models with all contained process starts. When you haven't set up any applications yet, this page will be empty, just like in the screenshot above.
Click the Admin link to open the administration tool. Depending on your computer's settings, you may be asked if you'd like to open or save a JNLP file. Choose to open the file directly and wait for the Java Web Start application to load.
Note
Loading of the administration tool may take a few minutes the first time, because some application data needs to be deployed first internally. Please be patient.
Applications are environments for process models (projects). Applications are strictly separated from each other and do not share anything. Every application has its own process models (and -versions), roles, users, external databases and so on. Projects may only use libraries that are deployed within the same application.
To create a new application, press the new application icon ( ) in the Applications section. A dialog will prompt you to enter
the following information:
) in the Applications section. A dialog will prompt you to enter
the following information:
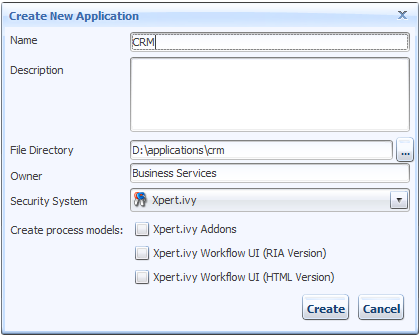
- Name
-
The name of the application to create.
- Description
-
An optional description of the application.
- File Directory
-
The directory on the file system where all the files of this application and its process models will be stored. You can specify an absolute directory (e.g. C:/Data/IvyApps/App1 or /var/ivy/apps/app1) or a directory relative to the engine's installation directory (e.g. apps/App1). The directory may already exist, but it must be empty.
Tip
We recommend to configure an absolute directory outside of the installation directory of the engine because the data in the directory has a much longer life time than the current version of the engine. E.g. if you upgrade your engine you have to choose a new installation directory and may want to delete the installation directory of the old version, which is not possible if the file directory is located inside the installation directory.
Warning
When using an Axon.ivy Engine Enterprise Edition, the file directory must be located on a shared file system which is accessable by all nodes of the cluster with the same file path. This path must be configured here.
- Owner
-
The owner of the application. This field is used for documentation purposes only.
- Security System
-
The security system from which the users are imported. By default this is Axon.ivy which means that all users and roles are completely managed by the Axon.ivy Engine. You can change this to Microsoft Active Directory or Novell eDirectory in which case the users come from the selected directory service. See section Configuring an External Security System for more details about the integration of external security systems.
- Create process models
-
Check the process models, that should automatically be created and deployed into the new application.
Axon.ivy Addons: Contains some Rich Dialog functionality such as some common dialogs simple questions or messages, document factories to create Office documents and many more. All these features can be used freely. Please read more about the Axon.ivy Addons in the documentation of the Axon.ivy Designer.
Axon.ivy Workflow UI (RIA and HTML Version): Both process models contains a default Workflow UI, which provide process and task lists. Furthermore it is possible to browse through history of already finished tasks. Even more, the RIA version provides functionality for administrating all cases and tasks of the application. More information can be found in the Workflow UI guide.
Click Create to create the application. If you have chosen a security system other that Axon.ivy, a dialog will appear to configure it (see next section).
When you choose an external security system (e.g. Microsoft Active Directory) for a new application, you have to configure the connection to the directory server, to specify which users should be synchronized and how the attributes of these users should be mapped.
Users are synchronized as follows:
-
Users that exists in the external security system but not in the Axon.ivy Engine are imported to the Axon.ivy Engine if they match the filter criteria.
-
Users that exists in the Axon.ivy Engine but not in the external security system or do not match the filter criteria are deleted from the Axon.ivy Engine.
-
Axon.ivy user attributes that are mapped to exernal security system attributes are updated with the latest values from the external security system.
The user synchronisation is executed:
-
Once a day (see synchronization time).
-
If one click the Synchronize button on the Security System section of the application configuration screen.
-
If a user tries to login himself. This means that a user can login even if he is not yet imported to the Axon.ivy Engine.
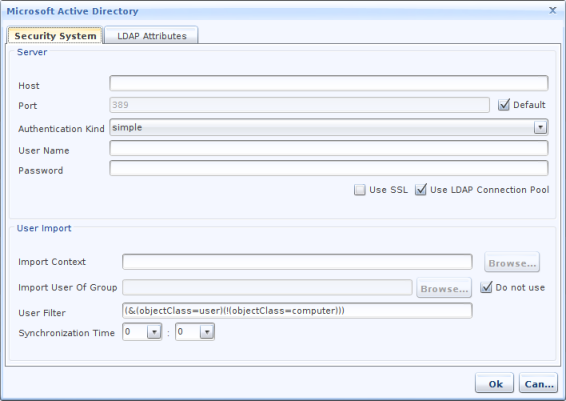
- Host / Port
-
The hostname (or IP address) and port of the directory server
- Authentication kind
-
The authentication method. Use none if your server does not require authentication to connect or simple if authentication by username and password is required
- Username / Password
-
The username and corresponding password to use for connecting to the server. The format of the username can be one of the following (examples):
-
connectionuser@fully.qualified.domain.name -
cn=Connection User, ou=Service Accounts,
                                        dc=fully, dc=qualified, domain,
                                        dc=name
-
- Use SSL
-
Activates Secure Sockets Layer (SSL) connection to the Active Directory server.
The SSL connection to the Active Directory Server will only work if the JRE of the Axon.ivy Engine has the certificate of the Active Directory Server in its trust store. The certificate import into the JREs system trust store can be done with the JRE keytool:
bin/keytool.exe -importcert -file
yourCertificateFile-keystore lib/security/cacerts -storepasschangeit-aliasmyCertificateAliasEnsure that the System trust store is activated within the “System Properties” table. The System Property 'SSL.Client.UseSystemTrustStore' must be set to 'true'.
- Use LDAP connection pool
-
If selected, the server will try to reuse connections and not open a new connection each time.
- Import context
-
The import context is a global filter. This filter is applied to every query made to the external security system. Every user and user group located below this context can bee seen. Everything outside the context cannot be seen and will be ignored. In most cases the import context is set to a root object (e.g. for the domain soreco.ch to dc=soreco, dc=ch).
In some cases you may want to set the import context to a organization unit so that only the users located below the organization unit are synchronized.
Use the Browse button to select the import context from the server specified above (if the connection fails, check the connection data).
- Import users of group
-
Limit the synchronization of users to a specific user group. Only users that are located below the import context and are members of the specified user group are synchronized.
Use the Browse button to select the user group from the server specified above (if the connection fails, check the connection data).
- User Filter
-
LDAP filter expression to make sure only user objects are synchronized.
- Synchronization time
-
Enter the time of day when synchronization should take place. Format is HH:MM (24h format).
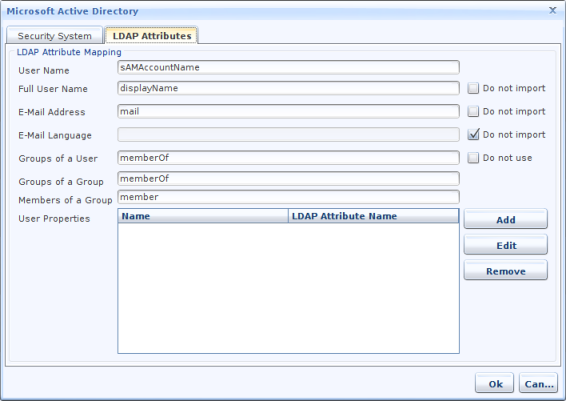
- LDAP attribute mapping
-
Default attribute mappings can be adjusted.
Further LDAP attributes can be mapped to additional user properties. Enter the LDAP attribute name in the first column and the name of the additional user attribute in Axon.ivy into the second column.
The external security system configuration can be changed by using the Edit button on Security System section of the application configuration screen.
Warning
If you change the security system configuration then some users that where imported before may now no longer match the import filter criteria. This means that those users are deleted from the system and all their tasks will be changed to state UNASSIGNED. All tasks in state UNASSIGNED have to be reassigned manually to other users.
The button configure default settings on the application configuration screen leads to the Application Default Settings.

This section contains the default settings for notification emails. The settings are used when a new user is created.
It is possible to be notified if a new task is created that is related to you (either by direct assignment or by assignment to a role you own). Furthermore, a daily digest mail with a summary of all open tasks can be sent to you by Axon.ivy.
- Which language should be used for the emails
-
Choose in which language you would like to receive the emails. If your preferred language is not contained, please contact your Axon.ivy administrator.
- Never (disable email notification)
-
You can switch off the sending of all notification mails by ticking this checkbox. If you do so, you cannot set the other options.
- When a new task for me or one of my roles is created
-
If this is set, you will receive a notification email whenever a new task is created that is assigned either directly to you or to one of the roles you own.
- Daily Summary on
-
Choose the days on which you want to receive an email with a summary of all your open tasks.
Tip
If you want that temporary no mails are sent (e.g. for holidays), then just tick the Never checkbox. The email sending is now switched off, but the previous settings are still stored. As soon as you untick the Never check box, your standard configuration is back again.
In this area of the Application Default User Settings dialog, you can select a deployed process model that contains notification processes for Daily Summary or for New Task notification respectively. Before you see any available processes in the combo box you have to deploy at least one PMV library including an Email Notification Process. Notification processes start elements has to conform the criteria described in the section Email Notification.
Tip
Choose <System Default> to use the built-in notification mails of the Axon.ivy Engine.
This section allows you to override the default pages (Application Home, Task List, Process Start List, Login and End) of an Axon.ivy web application.
You can create your own process model to display these pages or you can use the Axon.ivy Workflow UI (HTML Version). See section create new application to learn how to use the "Axon.ivy Workflow UI (Html Version)".
- Default Pages Implementor
-
<System Default> will show the default Axon.ivy pages.
HtmlWfUi will show up, if you have deployed the "Axon.ivy Workflow UI (Html Version)".
Any process model deployed, which contains a request start with a signature for at least one page will be shown in the dropdown. Instead of showing the default pages, the corresponding process of the selected process model is started. If the process start signature of the default page is not available in the selected project, the default page from Axon.ivy will be used.
An application can have multiple process models. Each process model can have different versions. A process model corresponds to the concept of a project on the Axon.ivy Designer. A process model version corresponds to a versioned snapshot of that project at some point of time.
A process model can exist in multiple versions called process model versions. These versions allow you to make changes in a project and deploy it again without having to worry about the compatibility of currently running cases. If the new version is not working as expected, you can always go back to a previous working version.
To create a new process model, you have to select the application in which you
would like to create it. Press the new process model button in
the toolbar ( ). You will be asked for a name (typically you chose the name to
be the same as the name of the project you intend to deploy within this process
model) and an optional description.
). You will be asked for a name (typically you chose the name to
be the same as the name of the project you intend to deploy within this process
model) and an optional description.
Once you have created the process model, you can continue with adding a first
process model version. To do so, select the process model from the tree on the left
hand side and press the new process model version button
( ). You will be prompted to enter a name and an optional
description again.
). You will be prompted to enter a name and an optional
description again.
Tip
It is recommended to use the description field of the new process model version to document the major changes from the previous version.
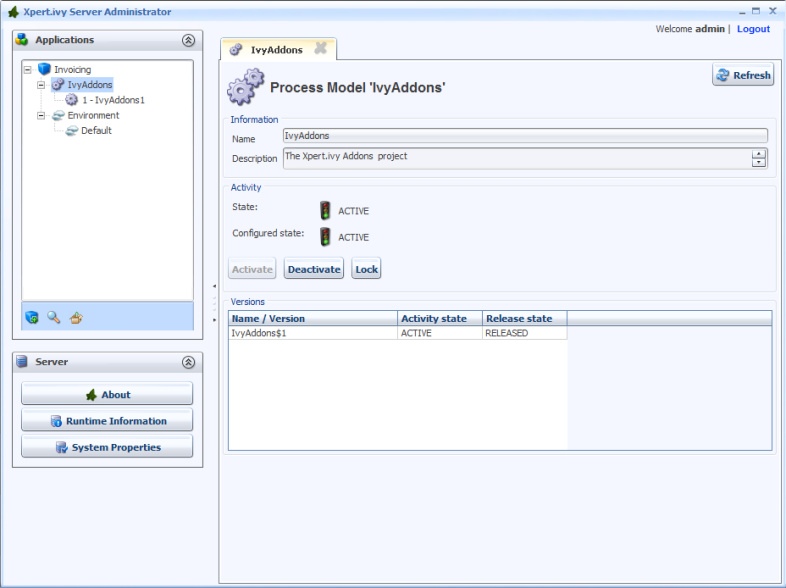
Applications, process models and process model versions all have an activation state. The process model version additionally has a release state.

To bring a process model version into the Active state, the process model version itself, the parent process model and the parent application have to be in the state Active. Furthermore, the release state of the process model version has to be in RELEASED or DEPRECATED. The same is necessary for all required libraries of that process model version.
When looking at the details of an application, process model or process model version you will always see a Configured state and a State. The Configured state is the one you can freely change and the State is the actual state that depends on the states of the parent process model and application and of the release state.

| Name | Description |
|---|---|
| PREPARED | The process model version has been created and a project may already be deployed. However, the process model version is not used yet. |
| RELEASED | The process model version is the currently released version. This means that all new cases will be started within this version. Only one version in a process model may be in this state. |
| DEPRECATED | The process model version has previously been in state RELEASED. But another process model version was released and activated recently. All cases that were started in this process model version will finish in this version. As soon as there are no more running cases in this version and all process model versions that are using it are not in state RELEASED nor DEPRECATED, the state will change to ARCHIVED automatically. |
| ARCHIVED | The process model version has previously been in state RELEASED or DEPRECATED. There are now no more cases that are running in this version, it is safe to delete it. Process model versions in this state are not started and therefore only use minimal resources. You may set it back again to RELEASED. |
| DELETED | The process model version has been deleted. All data that belong to this version are deleted too. |
Table 6.1. Release states
| Name | Description |
|---|---|
| INACTIVE | No new process in this process model version can be started and all running cases and tasks have been suspended. |
| ACTIVE | New processes in this version can be started and all tasks are active. |
| LOCKED | No new process can be started, but the currently running tasks can continue to their next savepoint. |
| DEACTIVATING | The state is changing to INACTIVE. |
| ACTIVATING | The state is changing to ACTIVE. |
| LOCKING | The state is changing to LOCKED. |
Table 6.2. Activation states
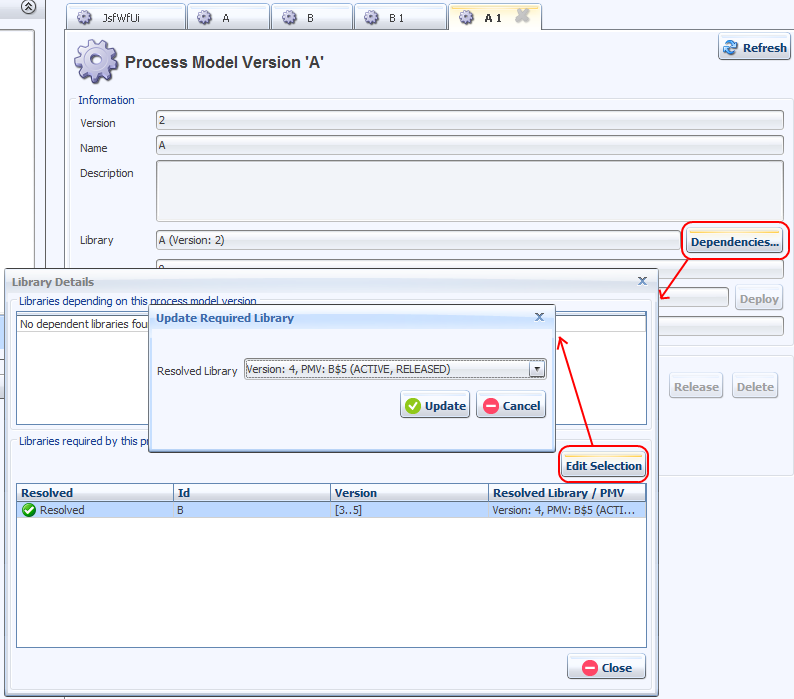
Projects can depend on each other. The dependencies are configured in the deployement descriptor of the project. This dependencies are evaluated and resolved during the deployment of a project. On the process model version detail page you can press Dependencies... to see the resolved dependencies of the project deployed to the process model version. You see the process model versions that the current process model version requires. And also vice versa which process model versions require the current process model version.
To change a resolved dependency select the dependency and press Edit Selection. You can then select another version that fullfils the dependency requirements.
Project deployment means to take a project created in the Axon.ivy Designer and to load it into a process model version, so that you can execute the project on the engine.
Before you begin with the deployment of a project make sure that you also have all required projects either already deployed to the engine or available in the same folder or in the same *.zip file as the major project.
Warning
It is highly recommended that you increase the version of your project each time you want to deploy a new version of your project on the engine. This ensures that you will not break currently running cases, and you have the possibility to go back to the previous version if the new version does not work as expected.
Even though overwriting an already deployed project version (process model version) with running cases is possible. It is at your own risk and should only be done if you are aware of the possible consequences and ready to accept them.
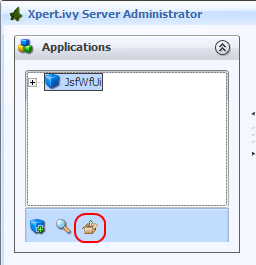
The deployment wizard can be started on the toolbar.
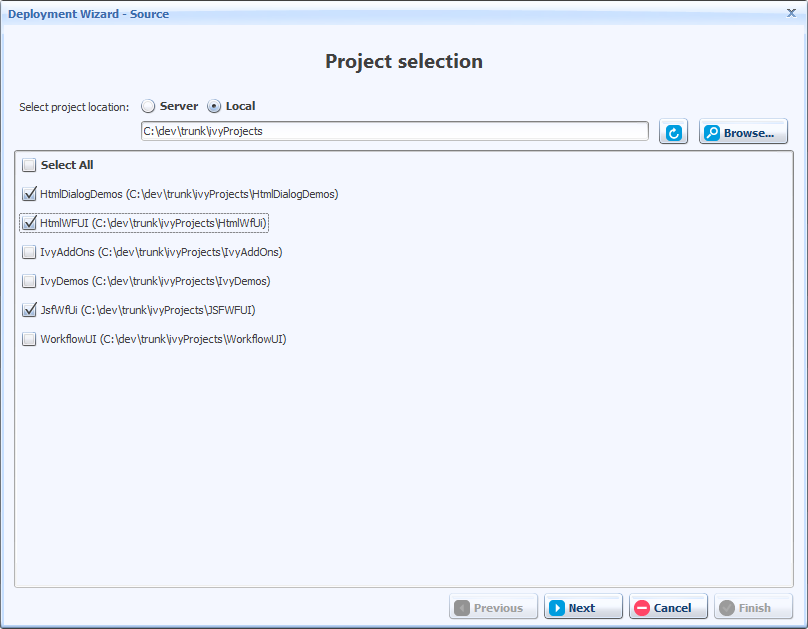
On the first page of the wizard select the projects that you want deploy. The projects can either be located on the server or on the client. If you select a folder then the wizard searches all packed (ivy archive) or unpacked projects located below that folders. If you select a *.zip file then the wizard searches all projects located inside the *.zip file. The found projects will be displayed. Select the projects you want to deployed and press Next.
Tip
Read the chapter Deployment in the Axon.ivy Designer Guide to find out how to create a zip file that contains all files of a project.
Tip
Read the chapter Projects in the Axon.ivy Designer Guide to find information about ivy archives and how to export them.
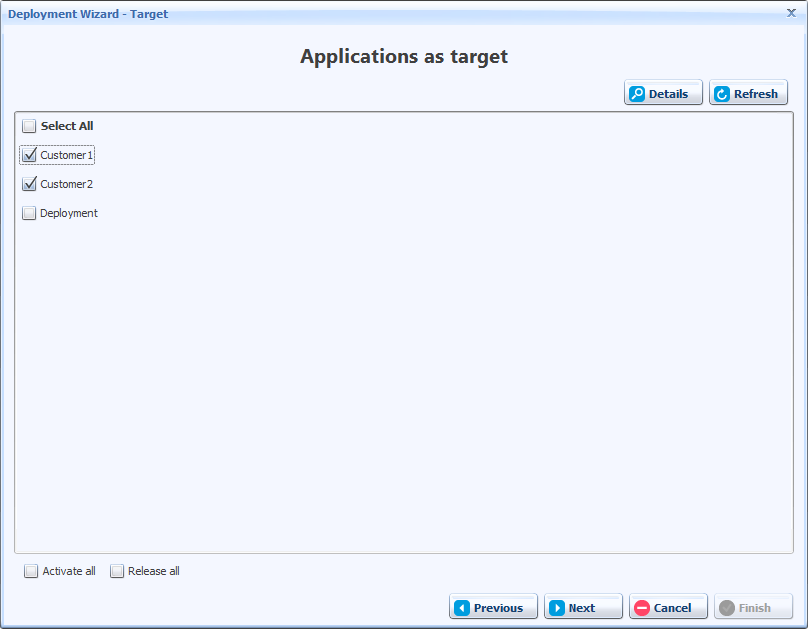
On the second page of the wizard select the applications to which you want to deploy your projects and press Next.
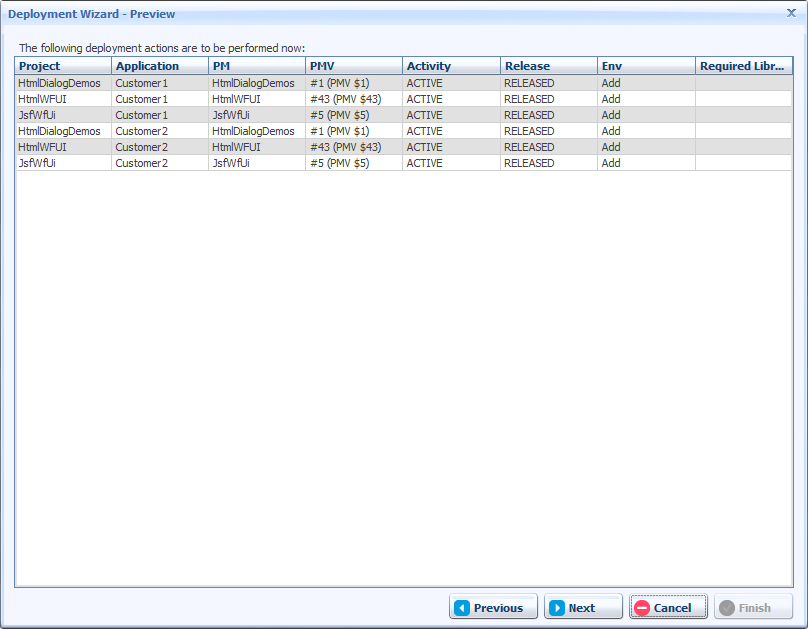
On the third page of the wizard you see a preview of the actions the wizard will perform. Note, that the wizard automatically choose the process model and process model version where it deploys a project to. If everything is as you expect press Next. If you do not like the automatically default behaviour press Previous and then on the previous page Details to choose another configuration. More information about process model and process model version can be found in the previous chapter.
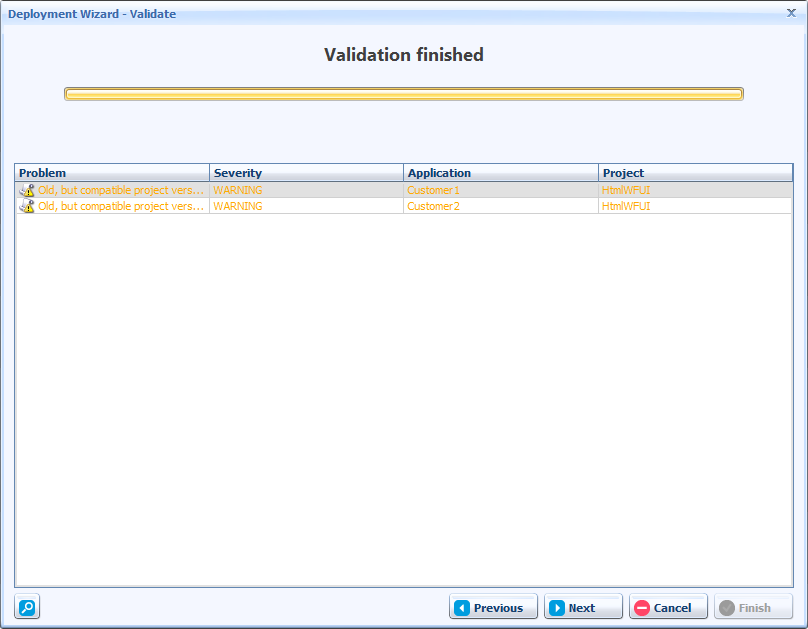
On the fourth page of the wizard the projects are validated. If no errors are found you can press Next. If you get warnings please read them carefully and then decide if you want to proceed or not.
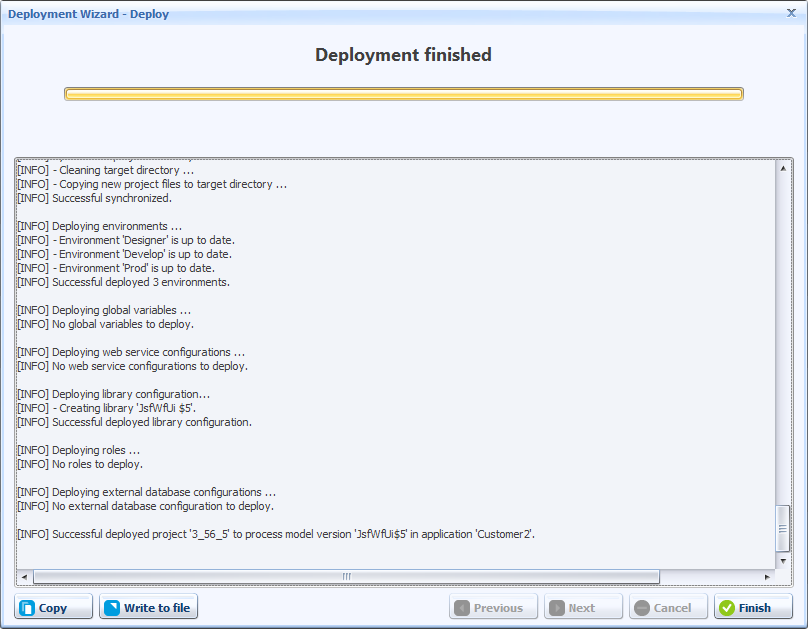
On the last page of the wizard the projects are deployed. During the deployment a log is written which contains information about the tasks that are executed. Press Finish to close the wizard.
Makes simple deployment of Axon.ivy projects to an Axon.ivy Engine possible by copying the project into the deployment directory.
The deployment directory is by default the directory with the name 'deploy' in the Axon.ivy Engine root directory. It can be altered trough the system property 'Deployment.Directory'.
-
Ensure that the Axon.ivy Engine, to which the Axon.ivy project should be deployed, is up and running.
-
Navigate to the sub directory in the deployment directory which matches the name of an already created Application on the Axon.ivy Engine.
-
Copy an Axon.ivy project to deploy into the created application directory. The project must either be packed as ivy-archive (IAR) or ZIP or be contained in a file directory.
-
Initialize the deployment by creating a new empty file with the name of the project file or directory plus the suffix '.doDeploy'. E.g. If you the project /deploy/MyApp/JsfWorkflowUi.iar has been copied in the previous step, the creation of the file /deploy/MyApp/JsfWorkflowUi.iar.doDeploy initializes the deployment.
-
Wait until the file with the suffix '.doDeploy' disappears, it indicates that the deployment has finished.
-
Determine whether the deployment was successful. If no file with suffix '.deploymentError' was created, the deployment has finished successfully. The detailed log is available in the file with suffix '.deploymentLog'.
File suffix Description .doDeploy Initializes the deployment and is deleted when the deployment process has finished .deploymentLog Contains the log output which is written during the deployment .deploymentError Contains the error cause and is only written when the deployment fails Table 6.3. Deployment marker files
The Maven project-build-plugin makes automated continuous deployment to an Axon.ivy Engine possible.
An Axon.ivy project can be deployed by invoking Maven with the deploy-iar goal of the project-build-plugin.
To customize the deployment parameters, consult the goal documentation.
The 'deploy-iar' goal can be execute on the command line. The following example deploys the project 'myProject.iar' to the application 'Portal' of the Engine location under 'c:/axonivy/engine':
mvn com.axonivy.ivy.ci:project-build-plugin:6.1.0-SNAPSHOT:deploy-iar -Divy.deploy.iarFile=myProject.iar -Divy.deploy.engine.dir=c:/axonviy/engine -Divy.deploy.engine.app=Portal
To deploy an ivy-archive (IAR) during it's Maven build lifecycle configured an execution which binds the 'deploy-iar' goal to a phase in the projects pom.xml.
The following POM snippet deploys the current project to the application 'Portal' of the Axon.ivy Engine under 'c:/axonivy/engine'.
<plugin>
	<groupId>com.axonivy.ivy.ci</groupId>
	<artifactId>project-build-plugin</artifactId>
	<extensions>true</extensions>
	<executions>
		<execution>
			<id>deploy.to.engine</id>
			<goals><goal>deploy-iar</goal></goals>
			<phase>deploy</phase>
			<configuration>
				<deployToEngineApplication>Portal</deployToEngineApplication>
				<deployEngineDirectory>c:/axonivy/engine</deployEngineDirectory>
			</configuration>
		</execution>
	</executions>
</plugin>
Further examples are documented on Github in the project-build-examples repository.
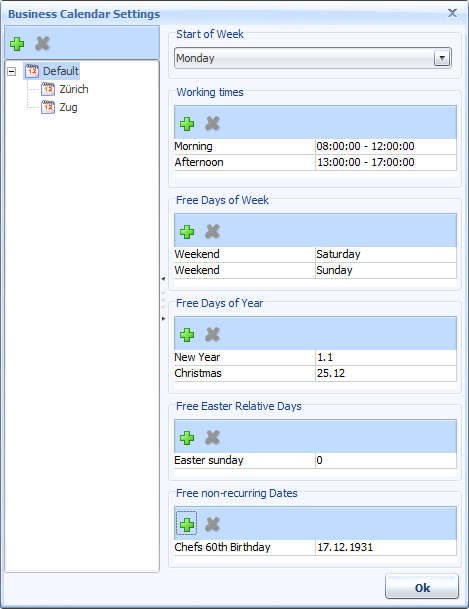
A business calendar defines the following three things:
-
Days which are free of work. E.g. 25. December.
-
Period in a Day which is working time. E.g. 08:00-17:00
-
First Day of the Week. E.g. Monday
Business calendars are used to calculate time periods in working time. For example a period of 3 working days starting on Friday would end on Tuesday if Saturday and Sunday are defined as free days. For more information consult the documentation of ch.ivyteam.ivy.application.calendar.IBusinessCalendar in the Public API.
Every application has at least one business calendar. The business calendars can be configured using the Configure Calendar Settings Button on the Application Configuration screen.
Every environment can have its own default business calendar (see chapter Environment Business Calendar ).
Business calendars are defined in a hierarchy. The children inherit all definitions of all its parents. All business calendars must directly or indirectly inherit from the Default business calendar.
The Start of Week defines the first day of a week. In Switzerland and its neighbour countries this is Monday. In other countries like Great Britain the week starts on Sunday.
The Working Time defines which time of a day is working time. E.g. 08:00-12:00, 13:00-17:00
The working time applies to all days which are not defined as free days. It is not possible to define different Working Times for different days.
The Free Days of Week define at which days of the week no work is done. E.g. Saturday, Sunday
The Free Days of Year define at which days of the year no work is done. These free days of the year will be free every year at the same day. E.g. 1.1. (New Years Day), 25.12 (Christmas).
The Free Easter Relative Days define days of the year no work is done. These free easter relative days will be free every year at another day depending on the easter day. E.g. 0 (Easter Day), 1 (Easter Monday), -2 (Good Friday).
This section briefly discusses the usage of environments in your projects .Developers should have the possibility to configure multiple environments (pointing to an infrastructure) and decide at runtime which environment should be used for the application. For instance you can have a development environment, a test environment and a productive environment. Here are some examples where environments can be used
-
Companies provide different environments for their software products, like Development, Test and Productive. Each environment has its own infrastructure including databases, web services and other connections used by the project.
-
Multi Client Capability. When the user logged into the system he can choose the mandant (e.g. Company 1, Company 2, etc.) and works with the data of the selected company. In the background the right databases connections, web services and other services for the selected environment will be used.
If your projects use environments, you have to configure the respective environment configurations on the engine. The first time you deploy an application that uses environments, the environments of the project will automatically be added on the engine as well. Each application manages his own environments. If you already define your different environments in your project on the designer, you don't need to reconfigure these environments on the engine again. This has the advantage that you can already test different environments at design time, before you deploy your projects on the engine. Each application contains a Default environment where all default values of the global variables and default database configurations are defined. In addition to the default environment, each application has one ore more user defined environments.
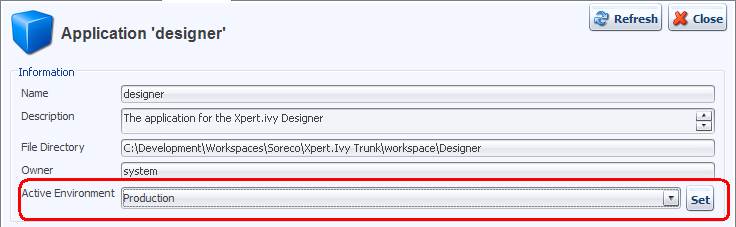
In order to change the environment for an application at runtime you must go to the details of an application and change the active environment for that application and press Set
Environments acts as a container for
-
Global Variables
-
External Database Configurations
-
Web Service Configurations
-
REST Client Configurations
-
Business Calendar Configurations
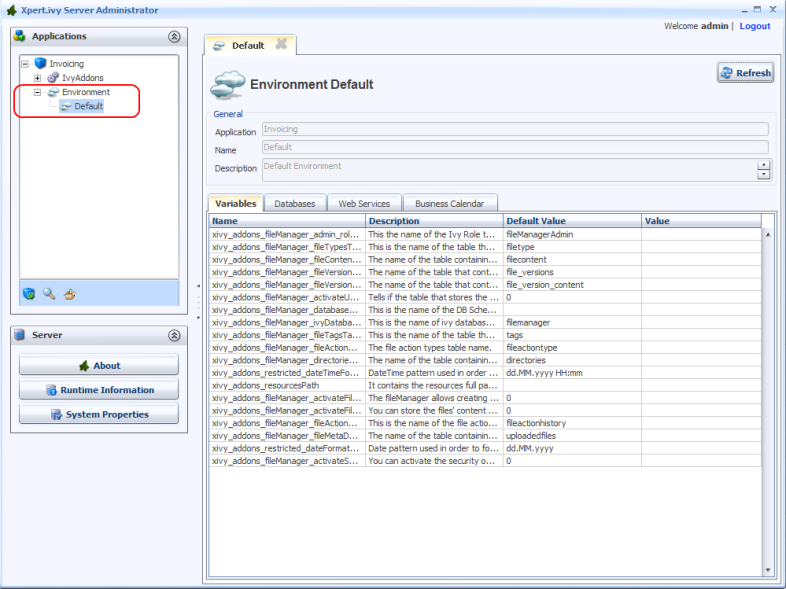
Environment configurations can be changed by double-click on the environment entry in the list. You will see that the environment acts as a container for global variables and external database configurations. The description of the environment can be used to provide important infrastructure information about the server, databases and other stuff, which can be relevant to other users.
Global Variables acts as global constants which can be used in your application. Global Variables are simple Key/Value pairs which can be specified by the developer. Some examples for global variables are:
-
Company data (name, address, contacts)
-
Simple Rule Values (e.g. credit account)
-
Path values for saving files
-
Path values for 3rd party systems and some other variables
Global variables must be defined at design time. It is not possible to create new variables on the engine. Each variable has a default value, configured at design time or in the default environment. In order to override the values of global variables for a environment just double-click the variable entry and override the values in the detail dialog. The default value of a global variable must be set in the Default environment.

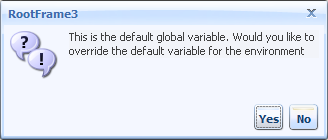
If the global variable is a default one, the system asks you to override the value for the environment. If you press "yes" the value of the global variable is overridden for the environment. You can always reset the global variable, by pressing Reset to Default.
If your projects use external databases, you have to configure the respective database
connections on the engine. The first time you deploy a project that uses external
databases, the database configurations of the project will automatically be added on
the engine as well. Also available environment configurations which already done at
design time, will be added. Since you probably use a test database during
development and you want to use your production database on the engine, you can use
the different environments to set a different configurations. Overridden Database
configurations for an environment will be displayed with the icon  . Default database configurations or database configurations
which are not overridden for the environment will be displayed with the icon
. Default database configurations or database configurations
which are not overridden for the environment will be displayed with the icon  .
.
To change the connection settings, select on the entry for a database in the list. You will see the connection URL used to connect to the database in the selected environment, the maximum number of connections, all currently open connections and the last executed statements.
If the selected environment is not the default environment, and you select a database configuration, which has no environment connection settings, you only can configure it. If you press Configure, the system asks you to override the database configuration for the selected environment. Press Yes to override the database configuration for the environment. You can always reset the database configuration to the default one, by pressing the button Restore to Default in the detail dialog, or right click on the database in the list and use the Menu item Restore to Default.
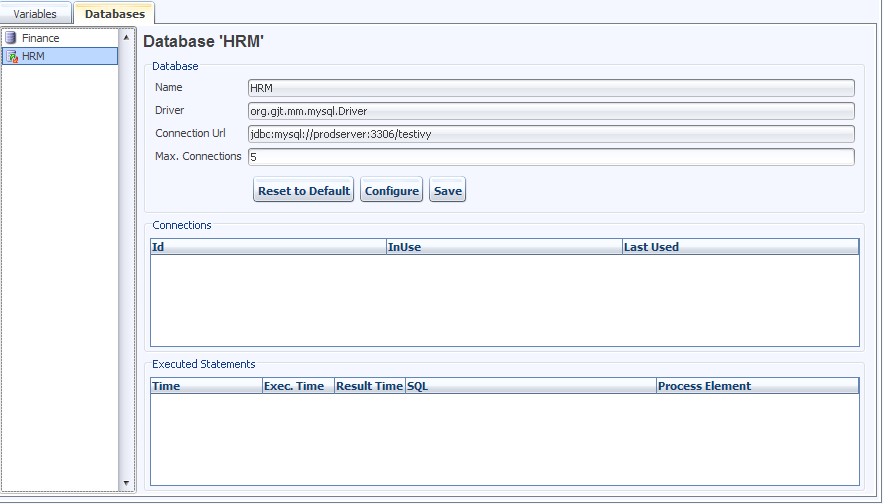
You can directly edit the maximum number of connections that may be simultaneously used.
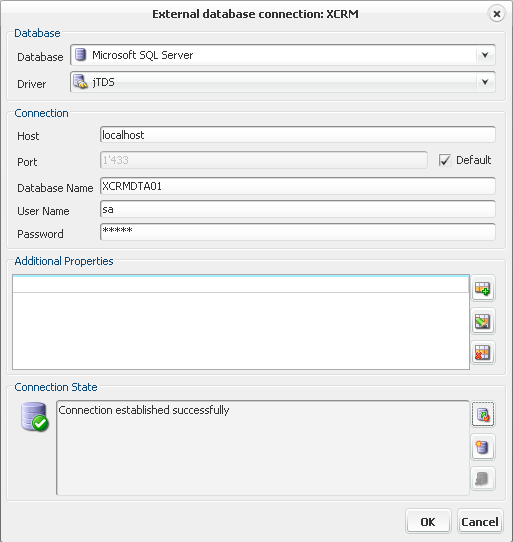
To change the connection settings, press the Configure button next to the driver and connection URL fields. This will bring up a dialog in which you can configure the database product, driver, hostname, database, username, password and additional connection properties.
If your projects use web services, you have to configure the respective Web Service on the
engine. The first time you deploy a project that uses Web Services, the Web Service
configurations of the project will automatically be added on the engine as well. Also
available environment configurations which already done at design time, will be added.
Since you probably use a test environment during development and you want to use your
production environment on the engine, you can use the different environments to set a
different configurations. Overridden Web Service configurations for an environment will
be displayed with the icon:  . Default Web Service configurations or Web Service configurations
which are not overridden for the environment will be displayed with the icon
. Default Web Service configurations or Web Service configurations
which are not overridden for the environment will be displayed with the icon  .
.
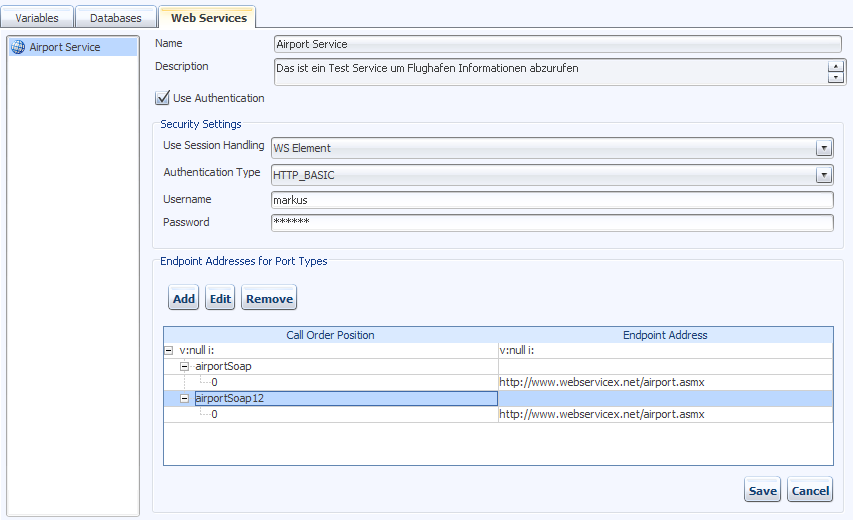
In order to edit a Web Service configuration just select the Web Service from the list and the details of the selected Web Service will be displayed in the detail panel.
- Name
-
The name of the Web Service. This attribute can not be modified on the engine.
- Description
-
An optional description of the Web Service. This attribute can note be modified on the engine
- Use Authentication
-
The directory on the file system where all the files of this application and its process models will be stored. You can specify an absolute directory (e.g. C:/Data/IvyApps/App1 or /var/ivy/apps/app1) or a directory relative to the engine's installation directory (e.g. apps/App1). The directory may already exist, but it must be empty.
- Session Handling Mode
-
You can chose session handling mode for current configuration. There are 3 modes available now:
-
NO there will be no session handling when you use this configuration
-
WSELEMENT invoking the same service from the same "WS step" process entry existing sessions will be reused
-
APPLICATION Within ivy applications whenever you invoke the same service existing session will be reused
-
- Authentication Type
-
You can chose a authentication Mode for current configuration. There are 3 types available now:
-
HTTP BASIC Use the HTTP basic authentication for the Web Service call
-
HTTPS Use HTTPS transport
-
DIGEST Use DIGEST authentication
-
- Username
-
When authentication is used, this username will be applied to get access to this web service. You can use IvyScripts in this field.
Tip
When you specify authentication in "WS step" process element, these settings (Username and Password) will be overridden. Use Scripts like "in.user" carefully, since you might use this WS entry in multiple processes with different data types.
- Password
-
When authentication is used, the username above and this password will be applied to get access to web service. IvyScript is also interpreted in this field.
- Endpoint Addresses for Port Types
-
The name of the Web Service. This attribute can not be modified on the engine.
If your projects use REST Clients, you have to configure the respective REST Clients on the
engine. The first time you deploy a project that uses REST Clients, the REST Client
configurations of the project will automatically be added on the engine as well. Also
available environment configurations which already done at design time, will be added.
Since you probably use a test environment during development and you want to use your
production environment on the engine, you can use the different environments to set a
different configurations. Overridden REST Client configurations for an environment will
be displayed with the icon:  . Default REST Client configurations or REST Client configurations
which are not overridden for the environment will be displayed with the icon
. Default REST Client configurations or REST Client configurations
which are not overridden for the environment will be displayed with the icon  .
.

In order to edit a REST Client configuration just select the REST Client from the list and the details of the selected REST Client will be displayed in the detail panel.
- UUID
-
Universal unique identifier of the REST Client. The REST Client can be referenced by this uuid. Cannot be modified.
- Name
-
The name of the REST Client. The REST Client can be referenced by this name. Can be modified. Note that references using the name will break if you change it.
- Description
-
Description of the REST Client.
- URI
-
The base URI under which the remote service publishes its resources (e.g. https://api.twitter.com/1.1).
The URI can contain template placeholders which are resolved later by the client user (e.g. https://api.twitter.com/{version}).
ivy.rest.client("twitter").resolveTemplate("version", "1.1").get()Tip
To consume a REST service running in the same Axon.ivy Engine / Application as the client a set of Axon.ivy placeholders can be used. These placeholders are automatically resolved: {ivy.engine.host}, {ivy.engine.http.port}, {ivy.engine.context}, {ivy.request.application}.
E.g.
http://{ivy.engine.host}:}{ivy.engine.http.port}/{ivy.engine.context}/api/{ivy.request.application}/my/service - Authentication
-
- HTTP Basic
-
Adds support for HTTP Basic authentication.
- HTTP Digest
-
Adds support for HTTP Digest authentication.
- Username
-
The name of the user used to authenticate the client.
- Password
-
The password of the user used to authenticate the client.
- Features
-
- JSON
-
Adds a feature so that responses in JSON are mapped to Java Objects and Java Objects in requests are mapped to JSON.
- Features List
-
Shows the configured "features" classes. The classes configured here are registered in the WebTarget using the method
register(Class). The classes needs to implement a JAX-RS contract interface and must have a default constructor. - Add
-
Adds a new feature class.
- Remove
-
Removes the selected feature.
- Properties
-
- Properties Table
-
Properties can customize the settings of the REST Client or one of its features. Well known properties of the client are documented here: org.glassfish.jersey.client.ClientProperties.
The properties configured here are registered in the WebTarget using the method
property(String,
												Object)
. - Add
-
Adds a new property.
- Add Password
-
Adds a new password property. The value of a password property is not visible in the table and is stored decrypted in the configuration file.
- Remove
-
Removes the selected property.
Each environment can define its own default business calendar which is going to be used to calculate time periods in working time if the environment is active. By default the global default business calendar is set.
Business calendars are defined on the Application (see chapter Application Business Calendar)

One or multiple environments can be exported into or be imported from a XML file. All configurations that belong to the selected environments will be exported or imported (see previous sub chapters). This can be used to transfer environment configurations from one Axon.ivy Engine installation to another. It is even possible to modify the exported XML before it is re-imported on the same or another engine.
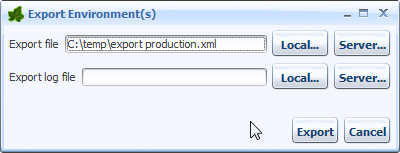
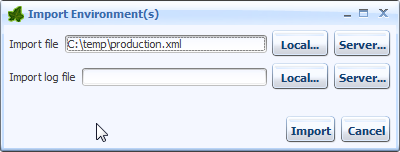
The files can be chosen from the local computer that the user is working on or from the server.
Note, that the export/import log file does not have to be set. In any case, you will see an graphical log of the results during the export or import.
Note
The imported environment data has always precedence over the data in any existing environments. Exactly speaking, the following rules apply:
-
If a configuration exists both in the import file and in the target environment, then the data for this configuration will be taken from the import file.
-
If a configuration exists in the import file but in the target environment, then the configuration from the import file will be created in the target environment.
-
If a configuration does not exist in the import file but exists in the target environment, then the configuration in the target environment will be deleted.
-
If a configuration is defined in the import file but does not have a corresponding default configuration in the target application then nothing happens.
-
If the import file contains an environment that does not exist in the target application, this environment is not imported.
Roles and users are always configured per application. On the application details panel, you will find a group Security System. There the number of all existing users and roles are shown.
If you are using an external security system such as Microsoft Active Directory you can force a synchronization with the directory using the Synchronize button. To change the connection and import configuration, press the Edit... button.

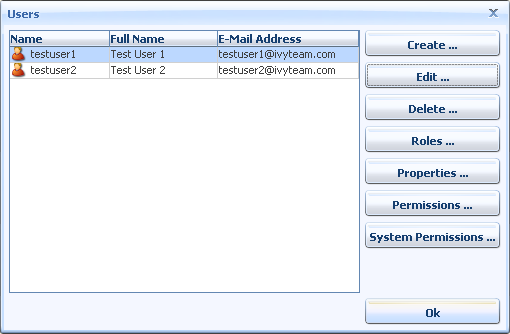
When clicking the Show... button next to number of users, you will be presented with a list of all existing users. You can create, edit and delete users. You can also set roles and permissions of any users individually.
Note
When using Microsoft Active Directory or Novell eDirectory as security system, you will not be able to create, edit or delete users. All these tasks need to be performed on the Active Directory or eDirectory directly and will then be synchronized with Axon.ivy.
To create a new user press the Create... button. Enter the information for the new user (the username must be unique within the application). All other fields are optional.
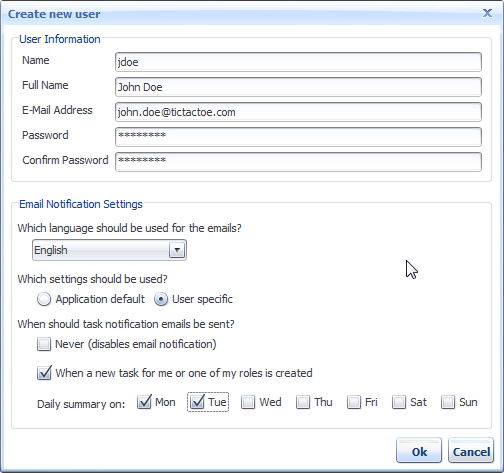
For the email notification settings you can decide whether the user uses the defaults defined by the application (they are shown in light gray if you choose so) or whether you want to define specific settings for the user. Note that each user can manipulate these settings in the Workflow UI.
It is possible to be notified if a new task is created that is related to you (either by direct assignment or by assignment to a role you own). Furthermore, a daily digest mail with a summary of all open tasks can be sent to you by Axon.ivy.
- Which language should be used for the emails
-
Choose in which language you would like to receive the emails. If your preferred language is not contained, please contact your Axon.ivy administrator.
- Never (disable email notification)
-
You can switch off the sending of all notification mails by ticking this checkbox. If you do so, you cannot set the other options.
- When a new task for me or one of my roles is created
-
If this is set, you will receive a notification email whenever a new task is created that is assigned either directly to you or to one of the roles you own.
- Daily Summary on
-
Choose the days on which you want to receive an email with a summary of all your open tasks.
Tip
If you want that temporary no mails are sent (e.g. for holidays), then just tick the Never checkbox. The email sending is now switched off, but the previous settings are still stored. As soon as you untick the Never check box, your standard configuration is back again.
You can change the details of an existing user by pressing the Edit... button. You can change all fields except the username. If the password field is left blank, it will not be changed. Otherwise the password of the user will be overwritten with the new value of the password field.
To delete a user, press the Delete... button and confirm the deletion.
Warning
Deleting a user will change the state of all tasks, for which the user is currently responsible, to UNASSIGNED!
All those tasks must be reassigned to another user or role by a workflow administrator or they will never be finished.
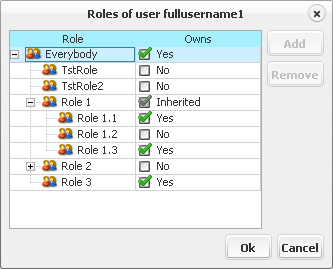
Click the Roles... button to change the roles of a user.
You can add a role to a user by selecting the role from the list and then pressing Add. To remove a role, select it and press Remove.
Some roles may not be editable. This can have multiple reasons:
-
The role may be inherited (indicated by a grey checkbox and the text Inherited). A role is inherited if it is not explicitly set, but the user owns a sub role (see example: Role 1 is inherited because user owns Role 1.1 and Role 1.3).
-
You are using an external security system (e.g. ADS). In this case, you can not edit roles that are linked to a group on the directory server. To add such a role, add the user to the corresponding group on the directory server.
In this dialog it is possible to manipulate the properties of all users. Properties are key/value pairs that can be accessed at runtime trough IvyScript. If using the internal security system of Axon.ivy (see Configuring an External Security System for more information), then creation, editing and deletion are supported for all properties. If the users are synchronized with an external data source such as an MS Active Directory and a mapping between attributes from the corresponding user in the external system to the properties of the Axon.ivy user is configured, then editing and deletion of such properties is usually prohibited by the external security system and therefore not possible within Axon.ivy. Just use the interface to the external security system to manipulate the attributes directly there.

Just use the Add button to create new properties, the Edit button to manipulate the property value and the Delete button to remove the property again. Note, that editing of the value can be done directly in the table.
You can edit the permissions of a user by selecting the user and clicking Permissions... or System Permissions... respectively.
See section Permissions for more information.
Press the Show... button next to the number of roles on the Security System section of an application to see a list of all existing roles.
The roles are defined in the projects that you deploy in your application. You can not add or delete roles on the engine!
The list shows the roles with their name plus, if available, the external security name in square brackets.
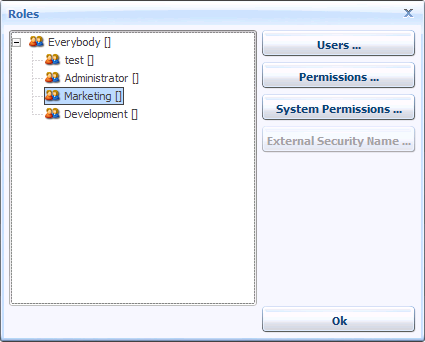
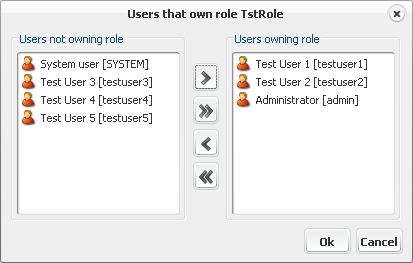
To add or remove users of a role, click the Users... button. You should now see a list of users not owning the role on the left and a list of user that do own the role on the right. You can move users with the buttons in the middle from one list to another.
Note
When a user only inherits a role by owning a sub role thereof, the user will appear in the list of users not owning the role.
When a role is linked to a group in an external security system, you will not be able to edit the users of a role.
You can edit the permissions of a role by selecting a role and clicking Permissions... or System Permissions... respectively.
See section Permissions for more information.
If you are using an external security system (e.g. Microsoft Active Directory) then you can link an Axon.ivy role to a group or another structural node (e.g. Organisation Unit) on the directory server. If a group is selected then all users that are members of this group will automatically receive the associated Axon.ivy role. If a structural node is selected then all users located below the structural node will automatically receive the associated Axon.ivy role.
Press External security name to edit or browse the name of the group or structural node whose users should receive the selected Axon.ivy role.
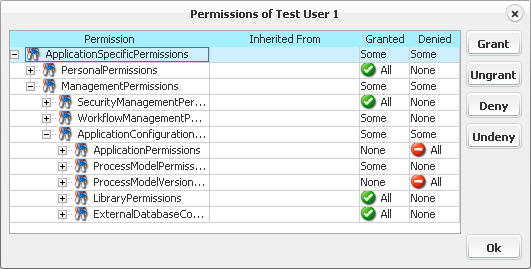
There are two kinds of permissions:
- System Permissions
-
System permissions are valid system wide, e.g. on the whole engine.
- Permissions
-
Regular permissions are valid only within the application for which they are defined.
You can assign different permissions and system permissions to each user or role.
A permission can either be granted, denied or unspecified (not granted). The actual permissions of an user depend on the permissions set on the user itself and the permissions set on all roles that the user owns.
Grant permissions take precedence over Deny permissions, if set on the same level. On a user, inherited permissions can be overridden with an explicit Grant or Deny.
Warning
Inherited Deny permissions have no effect if the user has an explicit Grant permission or another role on which the permission is Granted. Explicit permissions always take precedence over inherited permissions.
System properties are engine wide settings and are therefore valid for all applications. Be careful when changing those settings, since some particular combinations of settings may stop the engine from working properly.
The system properties can be accessed through the button System Properties in the Engine section of the left navigation bar.
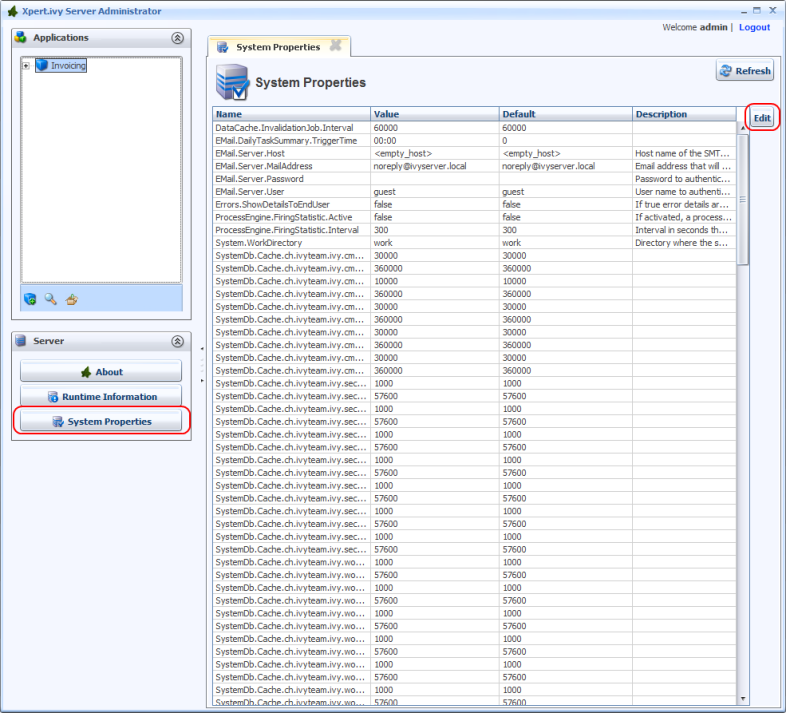
To change any properties, select the corresponding row in the table and press the Edit button or simply double-click on the row.
Note
Some settings may not take effect until you restart the engine.
Use the system property DataCache.InvalidationJob.Interval to configure the
time in seconds between two executions of the job that invalidates expired data
cache entries.
Use the system properties EMail.Server.* to configure a SMTP mail
server that is used to send mails. The available properties are similar to the Email
preferences of the designer. For more information see Designer Guide > Introduction
> Axon.ivy Preferences (Workspace Preferences) > Email Settings.
Use the system property Errors.ShowDetailsToEndUser to configure wether
details about an error should be shown to an end user. For security reasons no
details should be shown. For debugging reasons this option could be turned on
temporary. For more information see Show Error Details to End
Users.
Use the system properties ProcessEngine.FiringStatistic.* to configure the
process element performance statistic. For more details see Process Element Performance Statistic
and Analysis.
Use the system properties SSL.Client.* to configure the key and trust
store used for the client side of SSL connections. The available properties are
similar to the SSL Client preferences of the designer. For more information see
Designer Guide > Introduction > Axon.ivy Preferences (Workspace Preferences) > SSL
Client Settings.
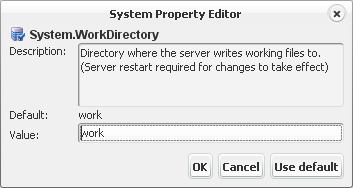
Use the system property System.WorkDirectory to configure the
directory where temporary work files are stored.
Use the system properties SystemDb.Cache.* to configure how many and how long
entities from the system database are cached in memory.
Use the system property SystemTask.SearchJob.Interval to configure
the time in seconds between two executions of the System Task Search Job. The job
searches system tasks that were not executed because of failures and initiate their
execution.
Use the system property SystemTask.Failure.Behaviour to configure the
behaviour in case a System Task execution fails. A system task is a task that is
executed by the system.
Use the system property ThreadPool.*.CorePoolSize to configure the
number of threads that are at least used in the thread pool.
Use the system property ThreadPool.*.MaximumPoolSize to configure the
maximum number of threads that are used in the thread pool. This property is not
available for fixed sized thread pools.
Use the system property UpdateChecker.Enabled to configure if the update
checker is enabled or disabled. The update checker checks if a new update release is
available. It also sends some statistic information to the vendor. For more details
see Update Notification.
Use the system properties WebServer.AJP.* to configure the AJP
protocol used for the communication between IIS or Apache web server and the
Axon.ivy Engine. For more information see Integration.
Use the system properties WebServer.HTTP.* to configure the HTTP
protocol used for the communication with Web Browsers and Rich Dialog
clients.
Use the system properties WebServer.HTTPS.* to configure the HTTPS
protocol used for the communication with Web Browsers and Rich Dialog
clients.
Use the system properties WebServer.External* and
WebServer.IvyContextName to configure the external host name, port
and protocol used to provide links in mails. For more information see Update external base URL.
Use the system property WebServer.WellKnownServerPorts to configure
additionally well known external web servers that forwards requests to Axon.ivy
engine. Format is host:protocol=port, host:protocol=port, ... .
Example: developer.axonivy.com:http=80,
developer.axonivy.com:https=443.
Use the system properties Elasticsearch.* to configure the bundled or external
Elasticsearch server installation. For more details, see Elasticsearch installation.
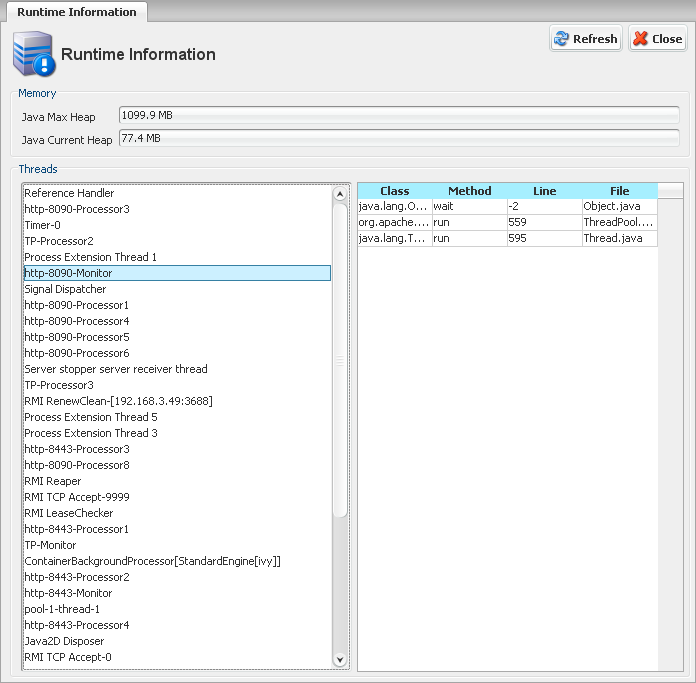
Pressing the button Information in the Engine section of the left navigation bar will provide you with runtime information about the engine. This includes memory usage and stack-traces for all running threads.
Axon.ivy does not provide a User Interface to manage tasks. There are APIs to access and manipulate the tasks of an application. But the user interface to access the tasks must be implemented according to the needs of the application.
This chapter describes the possibilities which can be used in a HTML based Axon.ivy web application. For RIA based task management please consult the RIA Workflow UI documentation.
In a HTML based workflow application there are certain pages displayed depending on the state of your application and/or workflow. You can override these default pages for each of your applications, to adopt it to your needs.
For each kind of page there is a predefined process start signature, which allows you to render the page in your own process instead of using the default page. The following table shows which signature is needed to override each type of page.
| Page | Description | Process Start Signature |
|---|---|---|
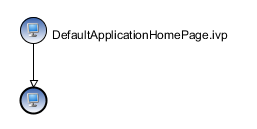
| Application Home | Home Page of the application. | DefaultApplicationHomePage() |
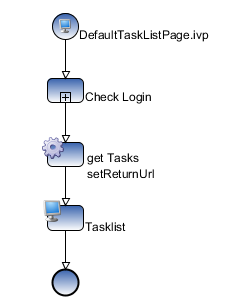
| Task List | Contains a list of all Tasks the currently logged in user can work on. | DefaultTaskListPage() |
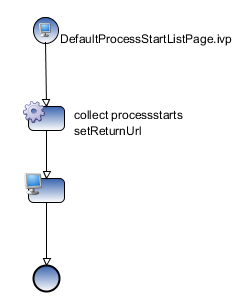
| Process Start List | Contains a list of all Processes the currently logged in user can work on. | DefaultProcessStartListPage() |
| End | Is displayed whenever a Task or Process ends | DefaultEndPage(Number endedTaskId) |
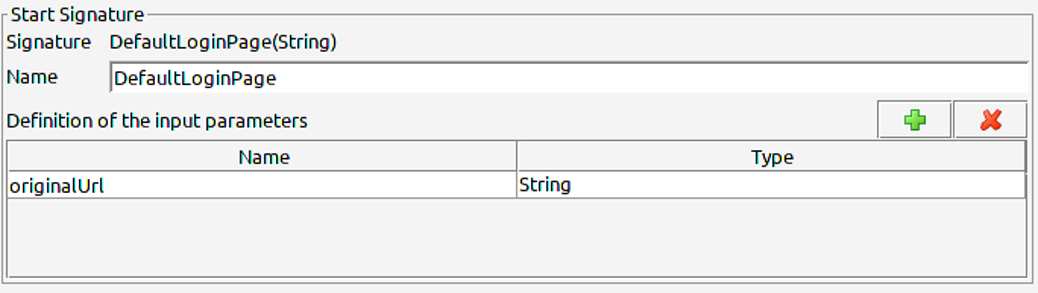
| Login | Is displayed whenever an authenticated user is required and none is available | DefaultLoginPage(String originalUrl) |
Table 6.4. Default Pages
How to override the default pages:
-
To override the pages create one project containing all processes with the overriding signatures.
-
Deploy this project to the application for which you want to override the behaviour.
-
Configure the application to use the deployed project to override the default pages. For more details see Application Default Settings.
By default Axon.ivy shows a page which simply says hello to the user.
Use a Request Start with the signature DefaultApplicationHomePage() to overwrite this behaviour.
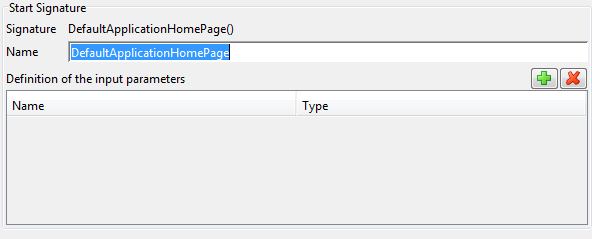
This Request Start must either lead to an Web Page Element or an End Page Element.
By default this page displays all tasks the currently logged in user can work on. You can override this page to adopt it to your look and feel or to display your own list of tasks.
Use a Request Start with the signature DefaultTaskListPage() to overwrite this behaviour.

This Request Start must either lead to an Web Page Element or an End Page Element.
By default this page displays all Processes the currently logged in user can work on. You can override this page to adopt it to your look and feel or to display your own list of process starts.
Use a Request Start with the signature DefaultProcessStartListPage() to overwrite this behaviour.
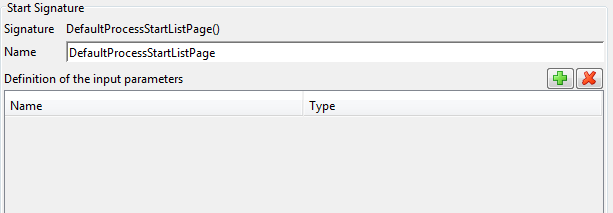
This Request Start must either lead to an Web Page Element or an End Page Element.
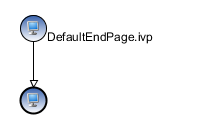
By default Axon.ivy will show a page which says "You have successfully finished the task", when a task is finished and the process does not define a specific End Page.
Use a Request Start with the signature DefaultEndPage(Number endedTaskId) to overwrite this behaviour
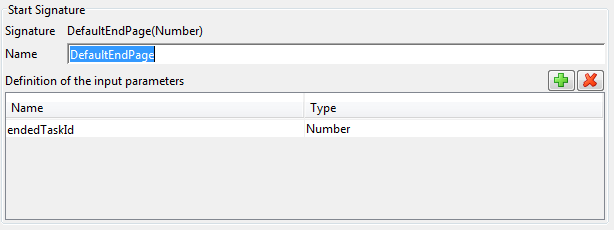
This Request Start must either lead to an Web Page Element or an End Page Element.
By default Axon.ivy will show a simple login page, whenever a login is required. The page allows you to login with username and password and then redirects you to the original URL requested.
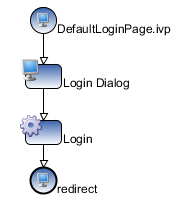
Use a Request Start with the Signature DefaultLoginPage(String originalUrl) to overwrite this behaviour
This Request Start must lead to an activity which does login a user. Normally this is done using a dialog which asks for username and password. But you are free to do anything to identify the user.
Normally the process should lead to an End Page which redirects to the original requested url. But you are free to do anything after the user is logged in.
Axon.ivy Engine is delivered with a sample HTML Workflow UI project. You can find it in the installation directory in the folder projects/HtmlWfUi.
Tip
We suggest to adopt the sample project to your needs and use it as described above instead of creating a new project from scratch.
If you want to use the sample project as it is, consult the section create a new application.
Axon.ivy Engine can send out email notifications on user task changes. These emails contain information on tasks that are available for users to work on. Notification subscriptions are configurable and the email content can be highly customized. In order to understand how it generally works it is recommended to read this section. This feature works only on engine versions, not in the Axon.ivy Designer. There are two types of notification emails:
- New Task
-
One email is sent when a new task is available (created, inherited, assigned) for a given user
- Daily Summary
-
One email is sent daily with a summary of all open tasks are available (created, inherited, assigned) for given user
Whether a user receives email notifications or not depends on application and user configurations. Engine administrators can set up initial settings for both notification types at user creation (see Application Default Settings). Later, users can specify their own notification settings using WorkflowUI (see WorkflowUI documentation). Email notification messages are created by the system and sent as email messages. Therefore make sure, that SMTP settings are set up correctly, check it in the System properties of your application.
Axon.ivy supports own email notification processes to influence the content of the emails. In case you set up such a notification process, then this process will be executed before the notification email is sent. There are two types of email notification processes:
- New Task Mail Notification Process
-
This process provides the email content for new task notification emails.
- Daily Summary Mail Notification Process
-
This process provides the email content for daily summary notification emails.
Mentioned notification processes will be executed, and their HTML result will be used as email content.
Email Notification Process are used to customize the design and contnet of the mails sent if the standard mail notification is not proper for your company. It is advised to prepare the important details you want to display in the notification mails and prepare some screen designs as well.
Quick overview how to create notification processes:
- Open designer
-
Start Axon.ivy designer
- Create mail notification process
-
Create new process(-es) which provide email content for your notification mail.
- Deploy
-
Deploy project library as process model and PMV on your Axon.ivy Engine
- Configure notification
-
Configure Axon.ivy Engine to use notification process(-es) for mail notification. For more details see Application Default Settings.
- Backup
-
Make sure that your process models and PMV-s are backuped, just like your System DB, so that in case of some hardware failure your Axon.ivy Engine can be restored easily.
More detailed description of non trivial steps are documented in the following section.
Create mail notification process
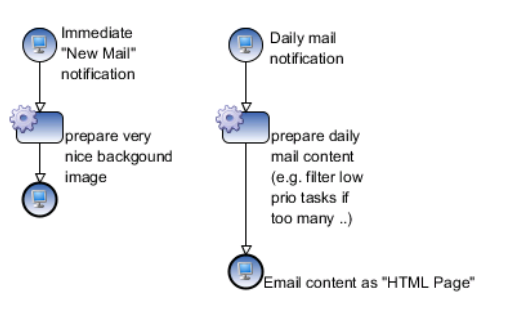
Create a normal process within your fresh Axon.ivy project. Place some process start element(-s), and put a simple process together. This process should display an HTML page, preferably using an Endpage process element to save engine resources. The HTML page defines the content of the notification mail while the <title> tag in the <header> section will be used as mail subject.
Notification process start elements must follow some naming and parameter
conventions in order to be recognised by Axon.ivy Engine as potential email notification
processes. Please create process starts as follows:
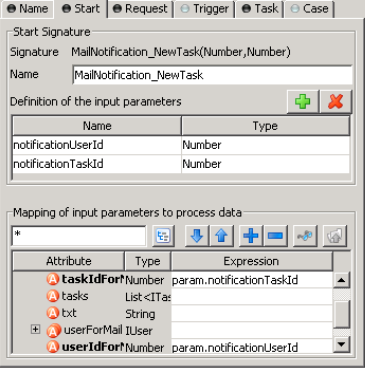
- New Task Mail Notification Process Start
-
This process has to accept the new task you want to notify about and the user to which the notification will be sent to.
The name of the Process start must be:
-
MailNotification_NewTask
Process start parameters:
-
notificationUserId : Number (java.lang.Number) - The ID of the recipient that the new task notification is created for
-
notificationTaskId : Number (java.lang.Number) - The ID of the task that is ready to be processed by the user
Tip
You can get a user object (
IUser) using auserIDcalling the methodfindUser(int)onivy.session.getSecurityContext()(seeISecurityContextinterface in the PublicAPI documentation for more details)Tip
You can get a task object (
ITask) using ataskIDusing the methodfindTask(int)onivy.wf(seeIWorkflowContextinterface in the PublicAPI documentation for more details) -
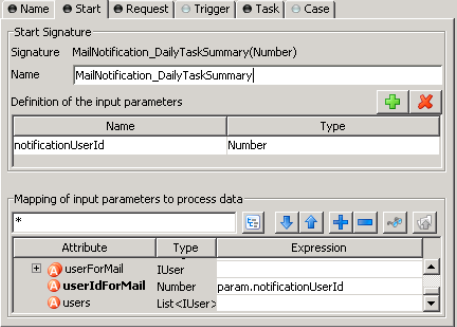
- Daily Summary Mail Notification Process Start
-
This process has to accept only the user we want to send the daily summary to, therefore define the process start element as follows:
The name of the Process start must be:
-
MailNotification_DailyTaskSummary
Process start parameters:
-
notificationUserId : Number (java.lang.Number) - The ID of the recipient that the new task notification is created for
-
It is not supported to create multiple processes or process starts within the same project (PMV) for the same notification type (daily/new task). In case you create multiple matching process starts then it cannot be forecasted which process start will be used within the project (PMV library).
Created notification processes will be executed, and their HTML result - the page they display - will be used as content in the notification email.
Deploy
Start the Engine Administrator, deploy your project library as a process model and a PMV. It is important to deploy your notification project within the application you want to use it for.
Configure notification
Having deployed your notification process model in the application where you want to customize the notification make sure that the PMV is active. Go to the Application Default Settings, refresh GUI if necessary, and select the library ID of the PMV that implements the notification process you want to use for email notification. In case you implemented the process start properly, and the project including the notification process is deployed properly, you should see the library ID.
Tip
Should you have difficulties implementing an email notification process, open a WorkflowUI project. It contains two example email notification processes.
Tip
In a Daily notification mail you might need a task list for a user that she may
activate and work on. The method findWorkTasks(..) on ivy.wf
does this job. It uses even substitutions and absences to collect the correct task list
(see IWorkflowContext interface in the PublicAPI documentation for more details)
Having customized your email notification process(-es) users of specific application should receive their email notification prepared by your notification process.
You might still have some questions left:
- How can a process provide email content?
-
Defined process should look like a simple process with an HTML dialog end. This process will be executed and the HTML dialog will be taken as content for notification email. In case you use normal HTML Page Step process element(s), then the process will be executed only up to the first HTML Page and this page will be sent as notification email.
- What can be customized exactly?
-
These processes going to "display" an HTML page. Whatever is included in this HTML page, will be sent as content of the specific notification email.
- How often is this process executed?
-
Processes for "new task" notification are executed whenever a new task is created (e.g. with a trigger), an existing task expires and needs to be escalated, or the creator of an existing task is changed. On mentioned events the process is executed separately for each user that is responsible for the given task directly, indirectly by his roles or by substitutions (e.g. if a task is created for the role secretary, then the process is executed for each user that own the role secretary, or substitutes an absent secretary over her role).
Processes for "daily summary" notification are executed once a day for each user that is subscribed for notification on that day.
- When is the daily summary process executed?
-
You can setup the execution time in the engine's System properties, under the property:
EMail.DailyTaskSummary.TriggerTime - What happens with images of the HTML page used for email notification?
-
In case this page includes some local images (e.g. CMS, ivy file), then they will be downloaded by Axon.ivy Engine, attached as MIME parts, and re-linked to the email to look just like the HTML page would look in an Internet browser.
You may also include images from remote hosts. If you do so, then Axon.ivy does not download and attach these images, but leaves the links as they are. Some Email clients will block these images (protecting their user from phishing attacks) until the user explicitly says to download external images.
- How notification processes can be set?
-
Notification processes can be set for each application independently. First of all you have to deploy a notification process, then select notification process in the Application Default Settings dialog.
- Can I cancel a notification?
-
Yes, in case your process terminates normally without displaying any HTML page.
Tip
Use EndPage process element to reduce resource usage of your email notification process(-es).