Introduction
Axon.ivy is a Digital Business Platform that simplifies and automates the interaction of humans with their digital systems. The platform typically is in charge in the most precious business cases where companies produces value. Here is how we do it:
-
Visualize: Our platform allows you to document business processes fast and intuitive. A shared view on users, roles, departments and technical systems that are involved in a business process improves your work. HR recruitment profiles become clearer, bottle necks become obvious, ideas for effective improvements arise by anyone who is involved in the process.
-
Automate: Documented processes are good. But what you really want is to drive your highly valuable processes automatically. Often the daily work of employees that are involved is distracted into searching and filtering data from various tools and feed these data into other technical systems. Even tough value is produced in a well-known business case, there is a lack of a clear interface which guides the involved users through the process. Highly valuable data is often divided and stored in various dedicated technical systems. With Axon.ivy you can drive your process automatically. People, data and technical systems can easily be orchestrated by our platform. An initial application that leads users through the process can be generated without the need to hire a software engineer. People can contribute to the process by using their favourite device such as a smartphone or workstation.
-
Improve: The digitalization of your company can evolve over time, we favour small predictable improvements over big bang solutions. The Axon.ivy Digital Business Platform allows you to start simple and fast with your existing environment. You may just start by task notifications that are sent to users that should contribute to a running process. And eventually the Platform becomes your single interface for all your business interactions. You will be able to measure KPIs based on the highly valuable data that is produced during the execution of your business processes. Based on these insights, you can advance your business constantly and effective. The cost of business transformations become reasonable and predictable.
The Axon.ivy Digital Business Platform consists of:
-
The Axon.ivy Designer - where you draw, simulate and implement automated business processes.
-
The Axon.ivy Engine - an application server that executes your business cases and provides a shared interface to process users.
Axon.ivy is exciting for everyone that partakes on your digital transformation journey.
-
Business: we enable you to start your personal digital transformation journey and make new business opportunities possible. You are still the captain of your ship, start with simple automations and transform essential parts of your business when you gain trust and confidence.
-
Business Analysts: it has never been easier to document processes fast and intuitive. The process simulation allows you to verify that you have a shared view how processes should be executed. Setup a simple structure for the data of a processes and you even get a simple executable application with generated front ends that are meaningful. No software engineer is required to create an already powerful application from scratch.
-
Developers: develop your application on a rich stack of Java frameworks that stood the test of time. We minimize your technology evaluation effort by giving you a set of libraries and an IDE that match perfectly together. This allows you to quickly jump into projects and deliver value. While you always have the ability to break out of our predefined tooling and use advanced features of Tomcat, JPA, JSF, JAX-RS or whatever you require.
-
Operations: we deliver packages for popular Platforms (Linux, Windows). No big change, we orchestrate your existing systems. We support many DB vendors (Oracle, Microsoft SQL Server, MySQL, PostgreSQL). Effective monitoring and logging interfaces are provided to give you a safety that the application is healthy and accessible.
You are now reading Axon.ivy Designer documentation. In case you want to know more on
-
Getting the latest Axon.ivy version: Go to http://developer.axonivy.com/download/
-
System requirements: Please read Readme.html in the installation directory
-
Working with Axon.ivy Designer: Start with the Quick Start Tutorial (see next section)
-
Demo projects: The Axon.ivy Designer ships with several demo projects, which can be imported.
-
Axon.ivy Engine administration: Please read the Engine Guide (in the installation folder of an Axon.ivy Engine)
-
Upgrading an existing installation: Please read MigrationNotes.html (located in the installation folder).
All above mentioned documentations are brief and tend to describe only necessary functionality. We highly encourage reading these documentations to speed up your development, to get to know new features or to eliminate potential problems.
Tip
Do not forget, anytime you find some unknown feature, hitting F1 will show you a context sensitive compact help!
Axon.ivy is based on the Eclipse platform. So when you start Axon.ivy Designer you launch an Eclipse workbench.
The first thing you see after starting Axon.ivy Designer is a dialog that allows you to select the location of the workspace. The workspace is the root directory where your work will be stored.
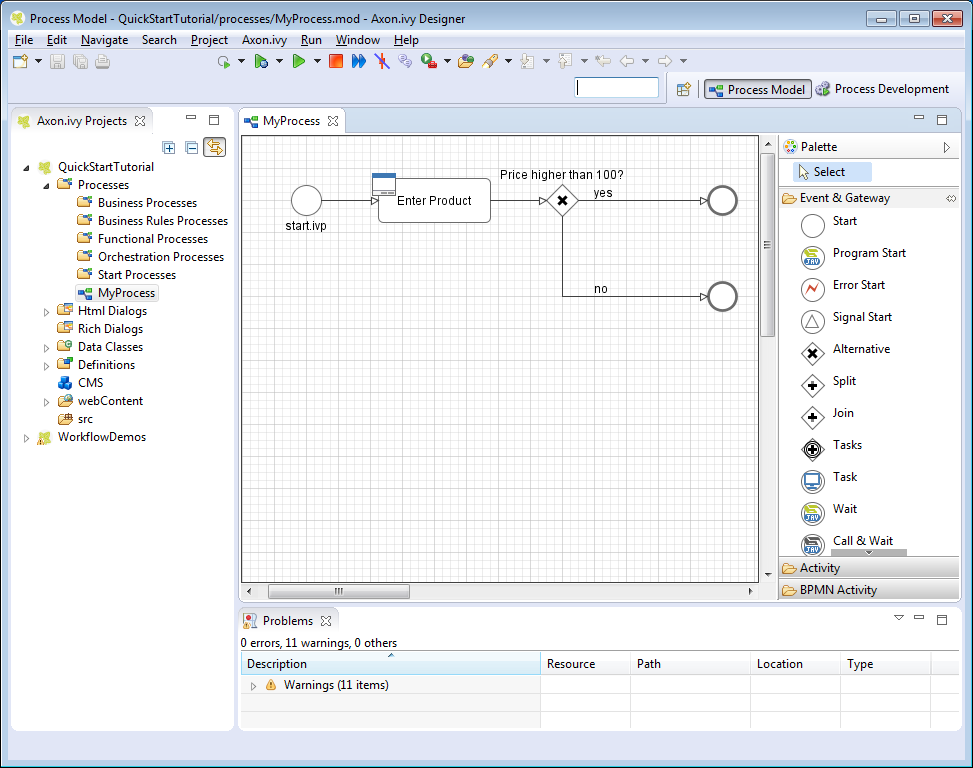
After the workspace location is chosen, the Workbench window is displayed. Initially, at the first start the Welcome Screen is displayed. On this screen different links to tutorials and documents are displayed. New users should click on the Quick Start Tutorial to learn how to use Axon.ivy Designer.
You can get the Welcome Screen back at any time by selecting Help > Welcome.
Editors and views are visual components in the workbench. They are the tools to work with.
A view is typically used to display properties for an active editor or to navigate through a hierarchy of information. Modifications made in a view are saved immediately.
An editor is used to edit a certain type of a resource like a process model diagram or a dialog panel. Modifications made in an editor follow the open-save-close life cycle model. Multiple instances of an editor can be open within a workbench window.
The name of the resource that is shown in the editor appears in the editor's tab label. If an asterisk (*) appears at the left side of the label this indicates that the editor has unsaved changes. When an attempt is made to close the editor or exit the Workbench with unsaved changes a prompt to save the editor's changes will appear.
Double clicking the tab of an editor or view will expand the part to full size of the workbench window. Double click the tab of an expanded part again to toggle back to default size and location.
See the section Axon.ivy Views for a summary of the ivy specific views.
In the section Axon.ivy Editors you find a summary of the ivy editors.
A perspective defines a set and layout of views and editors in the workbench window. The current perspective is displayed on the title bar of the window and it is highlighted at the upper right corner in the shortcut bar. You can open and switch to a specific perspective using the Window menu or the buttons in the shortcut bar at the upper right corner.
You can change the perspectives as you like. Editors and views can be rearranged in a perspective by just moving them around. It's also possible to close views or display additional ones (via Window -> Show View). Furthermore there is a functionality to reset a perspective to its default definition (via Window -> Reset Perspective).

Axon.ivy provides following perspectives:
-
Process Model: Create and edit business process diagrams.
-
Process Development: Simulate and debug processes or design Html Dialogs .
-
Rich Dialog: Design Rich Dialogs.
There are further perspectives provided by the Eclipse platform that you may use for specific development tasks:
-
Resources: Explore and manipulate resources of the project at file system level.
-
Team Synchronization: Browse through the changes between your local working copy and the base revision on the Subversion server.
-
Java: Edit Java source files.
Warning
Work carefully with these perspectives, since you might get direct access to Axon.ivy resource files that lets corrupt their content.
The main window of Axon.ivy contains multiple menus. This section explains the most important menus and menu items for Axon.ivy users.
Note
The availability and enablement of many menu items is dependent on the current selection and the currently active editor. They may therefore slightly vary and not exactly correspond to the screenshots below.
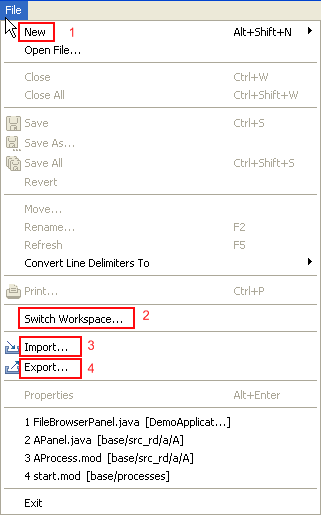
- 1 - New ...
-
This menu item opens a sub menu with all available new wizards to create new resources for editing. Some of the shown wizards are contributed by the Eclipse system and are not Axon.ivy specific.
To create new Axon.ivy resources it is recommended to use the menu entry Axon.ivy > New... or to use the context menu in the Axon.ivy project tree...
- 2 - Switch Workspace...
-
Allows you to switch to a different workspace. A workspace is a directory that contains a collection of projects that are related to each other in some way.
In the opening dialog simply select a different workspace directory. If you've switched workspaces before, you can also chose from a list of previously used workspaces.
- 3 - Import...
-
Use this menu to import General > Existing Projects into Workspace or to import Other > Checkout Projects from SVN.
Existing projects (that can be located anywhere on your machine, also in a different workspace) can be chosen to be imported by reference only or by copying the whole project.
Warning
There are currently some unsolved problems importing multiple projects from SVN directly. Please import projects one by one, or check out projects from a file explorer first, and then import them into your workspace.
- 4 - Export...
-
This menu can be used to export projects or parts of projects from the current workspace. Use General > Archive File or General > File System.
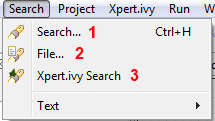
- 1 - Search...
-
Opens the Search dialog. Where search tabs allows you to search for instance Axon.ivy artifacts or File contents.
- 2 - File...
-
Same as Search... but opens directly on the File tab of the Search dialog, where search queries for any text within any resource of the current project or even in the whole workspace can be started.
- 3 - Axon.ivy Search
-
Same as Search... but opens directly on the Axon.ivy Search tab of the Search dialog, where a search for Processes, CMS Objects, Data Classes or Rich Dialogs can be started.
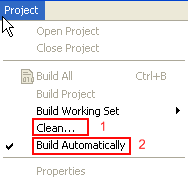
- 1 - Clean...
-
Deletes all temporary and generated files (such as compiled Java class files, compiled Data class files, etc.) from your project or workspace and rebuilds them.
This may help to resolve building problems.
- 2 - Build Automatically
-
Enables / disables automatic building (i.e. compiling) of project resources such as Java classes (also for Rich Dialogs) or Data classes. This means that all the necessary resources are automatically built and updated if changes are made in a project.
Warning
You should never turn this option off! It may lead to seemingly erroneous behavior of Axon.ivy (chances are that most things don't work anymore as expected until the option is turned on again or until you build the workspace / projects manually again).
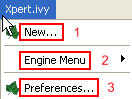
- 1 - New ...
-
This menu item opens a sub menu with all available new wizards to create new Axon.ivy specific resources (such as User Dialogs or Data classes or Axon.ivy projects).
- 2 - Engine Menu
-
Offers the operations Start Engine And Show Start Page, Start Engine, Stop Engine, Engine Speed and Enable/Disable Animation.
See also Toolbar section.
- 3 - Preferences
-
Opens the Preferences editor for the Axon.ivy specific preferences only.
See also Preferences section.
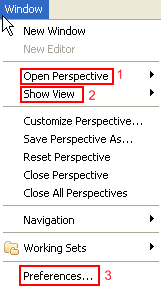
- 1 - Open Perspective
-
Opens a sub menu with the available perspectives. Non-standard perspectives can be selected from the sub menu Other....
- 2 - Show View
-
Opens a sub menu with the available views for the current perspective. Non-standard views can be selected from the sub menu Other.... The complete set of Axon.ivy specific views is available below the Axon.ivy folder.
- 3 - Preferences...
-
Opens the Preferences editor for the all settings that are available on the Eclipse platform. The Axon.ivy specific preferences are available under the Axon.ivy branch of the preferences tree.
For convenience use the menu Axon.ivy > Preferences... to open the preference editor for the Axon.ivy specific settings only.
See also Preferences section.
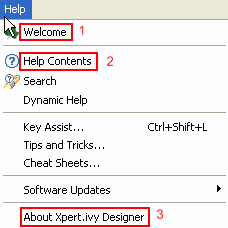
- 1 - Welcome
-
Opens the welcome screen as shown on the first start of Axon.ivy after installation.
- 2 - Help Contents
-
Opens the Help browser. Select Axon.ivy Designer Guide to access this documentation here. Many other help documents that may be relevant for Axon.ivy users are also available (e.g. Workbench User Guide for an introduction to the Eclipse workbench or ULC Visual Editor Help for a general introduction to the Visual Editor).
- 3 - About Axon.ivy Designer
-
Shows system information about the used Axon.ivy Designer application (e.g. version and build number). This might be helpful when seeking support.
The main window of Axon.ivy shows a toolbar with various buttons which is situated right below the menu bar of the application. This section explains the most important actions for Axon.ivy users that can be found on the toolbar.
Note
The number and activity state of the buttons that are shown in the toolbar depend on the current selection and the currently active editor. They may therefore slightly vary and not exactly correspond to the screenshot below.

-
 - New Wizard Selector
 -
This button opens a drop down list with all available new wizards to create new resources for editing. Some of the shown wizards are contributed by the Eclipse system and are not Axon.ivy specific.
To create new Axon.ivy resources it is recommended to use the menu entry Axon.ivy > New... or to use the context menu in the Axon.ivy project tree...
-
 - Save
 -
Saves the contents of the currently active editor.
-
 - Pause / Restart Visual Editor
 -
Only available if a Rich Dialog Visual Editor is active. Pauses / restarts the Visual Editor. This may help to restore a consistent state if for some reason, the visual editor has lost it's internal model (i.e. visual parts are not rendered correctly).
Pause / restart is usually faster than closing and reopening of the editor. When the Visual Editor is paused the contents of a panel can no longer be edited until it is restarted again.
Tip
In case you think your Visual Editor somehow does not work as expected, close all Visual Editor instances, and clear its cache using Axon.ivy > Debug > Clear Visual Editor Cache
-
 - Start Process Engine And Show Start Page
 -
Starts the process engine, switches to the Process Development Perspective and displays the start page.
-
 - Start Process Engine
 -
Starts the process engine (start page is shown only if browser view is already opened).
-
 - Stop Process Engine
 -
Stops the process engine and terminates all currently running processes (including User Dialogs).
-
 - Set Animation Speed
 -
Configure the animation speed for process simulation. Other animation settings you find in Engine/Simulation Settings
-
 - Enable / Disable Animation
 -
Globally enables / disables animation during process simulation. Other animation settings you find in Engine/Simulation Settings
-
 - Insert Rich Dialog
 -
Only available if a Rich Dialog Visual Editor is active. Opens a dialog for Rich Dialog selection and inserts the selected Rich Dialog as an embedded widget if mouse is clicked on the panel of the currently active Visual Editor.
-
 - Select Content and Formatting Language
 -
See Content and Formatting Language Dialog for more details.
-
 - Search
 -
Opens the Search dialog. Allows you to search for any text within any resource of the current project or even in the whole workspace (use the File Search tab of the dialog).
-
 - Goto Previous Modification
 -
Goes back to the editor and location where the last modification was made (if available).
-
 - Goto Next Modification
 -
Goes to the editor and location where the next modification was made (if available).
-
 - Open Perspective
 -
Opens a drop-down list with perspectives to select for opening. Non-standard perspectives can be chosen from the Other... menu entry.
This section explains important global available commands and their shortcuts.
- Open Ivy Process Ctrl+Shift+P
-
Opens a dialog which allows you to browse for a Process to open in an editor.
- Open Ivy User Dialog Ctrl+Shift+D
-
Opens a dialog which allows you to browse for a User Dialog to open in an editor.
- Open Type Ctrl+Shift+T
-
Opens a dialog which allows you to browse for a java type to open in an editor.
- Open Resource Ctrl+Shift+R
-
Opens a dialog which allows you to browse for a resource file to open in an editor.
- Navigate Back Alt+Left
-
Navigates to the previous resource that was viewed in an editor. Analogous to the back button on a web browser.
- Navigate Forward Alt+Right
-
Navigates to undo the effect of the previous back command. Analogous to the forward button on a web browser.
We recommend that you learn and use shortcuts as much as possible because you work more efficiently when you switch between keyboard and mouse as less as possible. You can find more useful shortcuts here: https://shortcutworld.com/en/Eclipse/win/all.
In the preferences, you can configure some settings of Axon.ivy Designer to adapt to your personal working style. Open the Preferences.
Note
Most of these settings (and some more settings) you can overwrite in the properties of project
Some features are deprecated but still supported. These settings allows you to enable deprecated features.
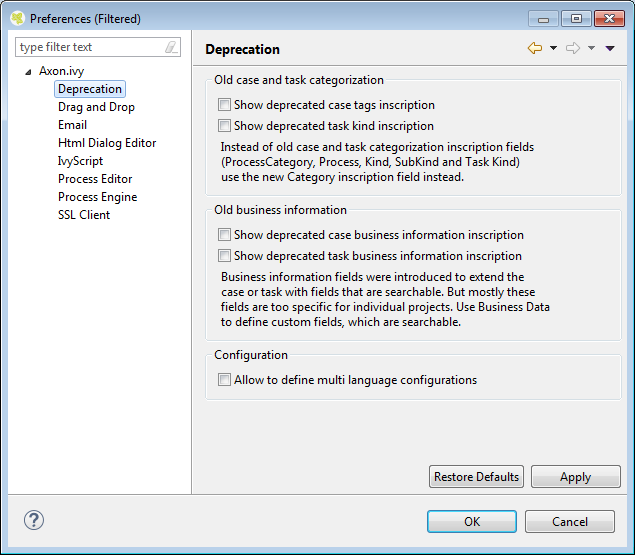
- Show deprecated case tags inscription
-
If you enable this checkbox the sub-tab Tags in the tab Case on inscription masks will be available again.
- Show deprecated task kind inscription
-
If you enable this checkbox the Task kind input fields on inscription masks will be available again.
- Show deprecated case business information inscription
-
If you enable this checkbox the sub-tab Business information in the tab Case on inscription masks will be available again.
- Show deprecated task business information inscription
-
If you enable this checkbox the sub-tab Business information in the tab Task and Tasks on inscription masks will be available again.
- Allow to define multi language configurations
-
If you enable this checkbox some Configurations can be made language dependent.
Drag and Drop (DnD) is one way to define data binding between instances of Ivy Data Classes and widgets members in Rich Dialogs and to define event mappings between ULC widget events and RD Logic Event Steps.
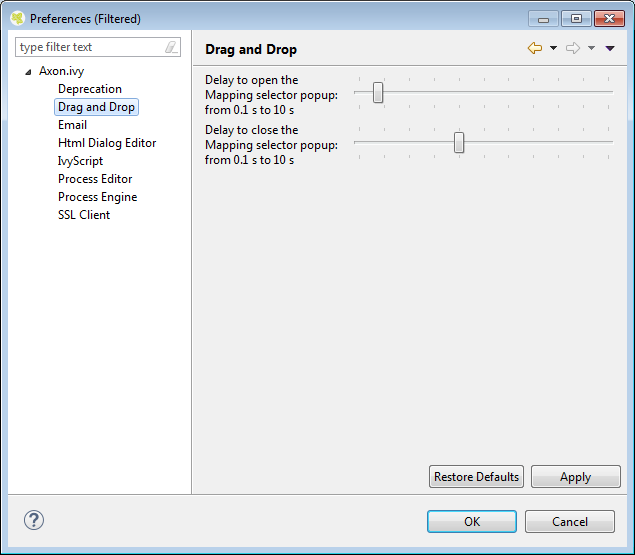
Open the Drag and Drop preference page
- Open Popup Delay
-
Specify how many seconds that the DnD drop dialog should wait until it shows.
- Close Popup Delay
-
Specify how many seconds that the DnD drop dialog should stay open until it closes.
These settings define the configuration for the Email Process Element on the designer.
Note
On the Engine you need to specifically set the EMail.Server.* system
properties in the Engine Administration Tool. Therefore you can choose different
configurations for the designer and testing purposes than in your production
environment
- SMTP host name
-
The name of your outgoing email server (the SMTP server). Please refer to your system administrator to get this name.
- Use default SMTP port
-
If selected the default SMTP port depending on the encryption method is used.
- SMTP port
-
The port your SMTP server is listening. Please refer to your system administrator to get the correct port.
- SMTP user name
-
A valid user name for your outgoing email server to authenticate on it (if this feature is used). Please refer to your system administrator to get this name.
- SMTP password
-
The password for the given user name above. Please refer to your system administrator to get this name.
- Test email address (from)
-
In the designer, this email address overwrites the sender setting in the inscription mask of the Email Step. Mails are not sent to the address that is configured in the inscription mask but to this address. Therefore you can test the functioning of your processes without sending email's to the real addresses (which perhaps are only intended for production messages).
- Test email address (to)
-
The same principle as above but for the recipient.
- Encryption method
-
The encryption method used for the communication with your mail server.
- Use SSL client key
-
Only select this option if the SMTP server requires a client certificate to authenticate the client. The key (certificate) will be read from a key store. See section SSL Client Settings for more information.
- SSL client key alias
-
The name (alias) of the key to send to the SMTP server. If empty the first key found in the key store is used.
- Send Test Email
-
Sends a test mail with the current settings. With the default preferences you should instantly see the sent mail in the 'Email Messages' view which is provided by the developer SMTP.
Note
All email settings are also available as project-specific settings.
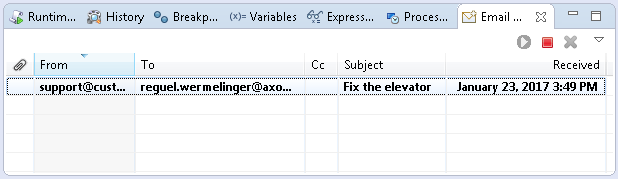
During process development mails generated by the Axon.ivy Digital Business Platform are preferably not sent to a real SMTP server. Normally you just need to quickly inspect the contents of theses generated mails. A real remote SMTP will increase the round-trip to read these message. Therefore the Designer comes pre-configured with a simple SMTP mail server.
With the default E-Mail preferences every mail will be sent to the development SMTP. You can inspect the mail inbox by opening the view 'Email Messages'.
With this preferences you can choose the default inscription on the action table and the visibility level of the completer.
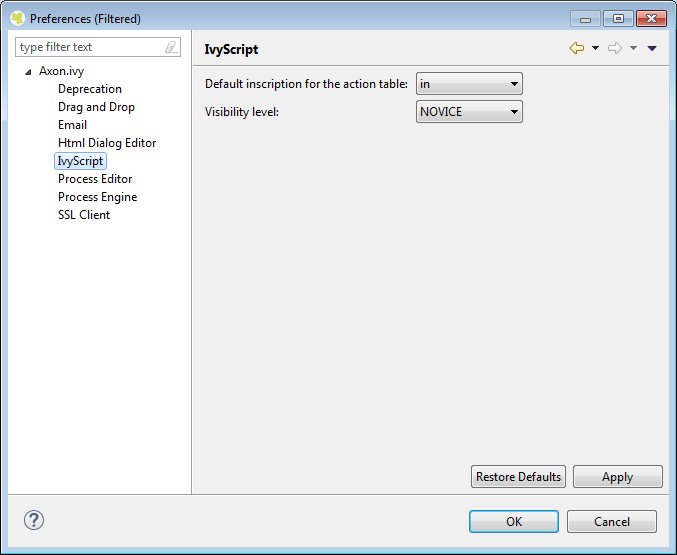
- Default Inscription on action table
-
Before the action table (or any other output code) are executed on an element, the input process data is copied from the out object is assigned from the out object. Use this combo box to specify the copy behavior. The default behavior is to copy by reference (i.e. the out variable will point to the same object as the in variable).
- Default IvyScript visibility level
-
The default visibility level of the IvyScript completer and the function browser can be configured here.
The process editor settings are used to configure the behavior and look of the process editor as well as some settings that are related to the use of processes.
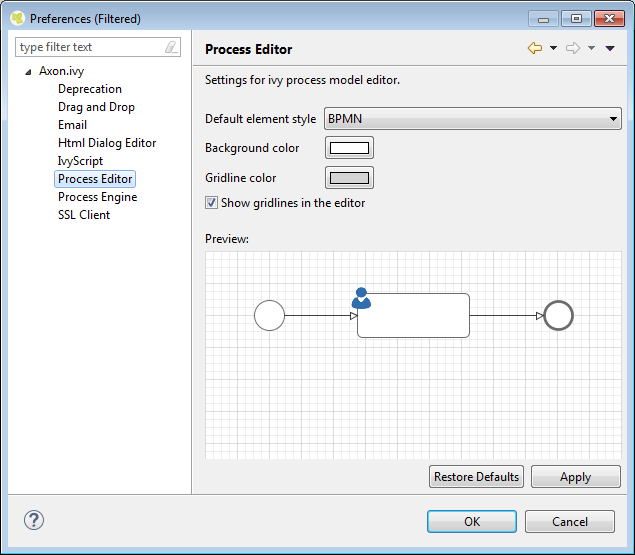
- Default element style
-
The style for newly added process elements.
- Background color
-
Specify the background color of the process editor area.
- Gridline color
-
Specify the color of the grid lines in the process editor.
- Show grid lines in the editor
-
Specify whether the grid lines in the process editor are shown.
Note
The process editor settings are also available as project-specific settings.
Here you can set whether the internal Browser view of Eclipse or an external Browser is used to show the Process Start Overview and you can configure all the settings related to the animation.
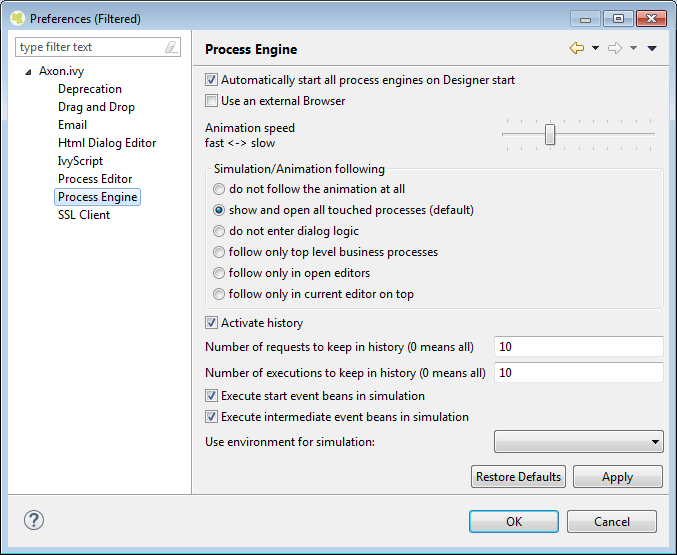
- Automatically start all process engines on Designer start
-
If the check box is selected, all process engines are automatically started on Designer start. It can be disabled to prevent performance issues on large workspaces.
- Use an external browser
-
If the check box is selected, the system Browser is used to display the Process Start Overview otherwise the internal Browser view of Eclipse will be used.
- Animation speed fast < - > slow
-
Sets the default speed of the animation. Setting the slider to a low value lets you observe the process flow easily as the animation speed is decreased.
Tip
As the animation is very slow with low slider values adjust this setting only when you need to debug a process in its lowest details and increase the speed as soon you have finished.
- Simulation/Animation follow
-
Here you can set in which mode the execution is animated. You can choose between the following values:
-
Do not follow the animation at all - does nothing
-
Show and open all touched processes (default) - Default setting, this opens a process editor window for every process (or User Dialog logic in case of inner User Dialogs) that is used within the started process
-
Follow only top level business processes - Simulates and opens only top level business processes. Does not enter User Dialogs, embedded subs or callable subs.
-
Do not enter dialog logic - Does not simulate User Dialogs
-
Follow only in open editors - You can choose which process are animated by opening them in a process editor window. Note that the focus switches always the window displaying the currently executed process
-
Follow only in current editor on top - If you are only interested to debug one specific process. Note, that this is not imperatively the top-level process
-
- History
-
Here you can configure how many process data snapshots are histories in the process engine history (See also History View).
-
Activate history - If ticked process data is histories, if not ticked no process data is histories.
-
Number of requests to keep in history (0 means all) - Here you can configure the number of requests per process element for which snapshots of the process data are stored in the history. If you configure 0 the process data snapshots for all requests are stored in the history.
-
Number of executions to keep in history (0 means all) - Here you can configure the number of executions per requests and process element for which snapshots of the process data are stored in the history. If you configure 0 the process data snapshots for all executions are stored in the history. A value of 10 means that the process data snapshots of the five oldest and youngest executions of a process element per request are stored in the history.
Note
In case of memory shortage during simulation the settings of history preferences may be ignored (resulting in less snapshots shown in the history).
-
- Event Bean Simulation
-
Switch off the simulation of Process Start or Intermediate Event Beans when you do to focus on simulations of other elements (Event Bean simulation may pop up process editors with the corresponding process and may overflow the Runtime Log View. In order to apply changes, the Engine must be restarted.
-
Execute Start Event Beans in Simulation - If ticked, the Process Start Event Beans are executed, otherwise not.
-
Execute Intermediate Event Beans in Simulation - If ticked, the Intermediate Start Event Beans are executed, otherwise not.
-
Note
All engine settings are also available as project-specific settings.
These settings define the key and trust store to use for the client side of SSL connections.
Note
On the Axon.ivy Engine you need to specifically set the SSL.Client.*
system properties in the Engine Administration Tool. Therefore you can choose
different configurations for the designer and testing purposes than in your
production environment.
A key store is used to read client keys (certificates). This is only required if a server requests a client certificate so that the server can authenticate the client.
A trust store is used to read server certificates or certificates of certification authorities. The client can validate a server by using the certificates in a trust store. If the server provides a certificate that is signed by a certification authority known by Java then the system trust store can be used. If the server uses a certificate that is self signed or signed by a unknown certification authority then a custom trust store can be used. The custom trust store must contain the server certificate or the certificate of the unknown certification authority.
Key and trust stores can be created and modified (import of certificates, keys) by the keytool delivered with the Java Development Kit (JDK). More information can be found in the documentation of the JDK.
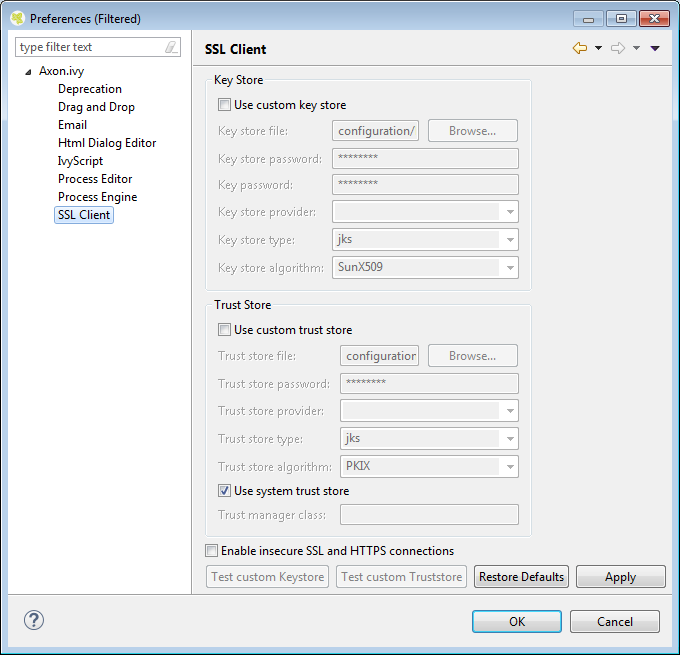
- Use custom key store
-
If selected the key store configured below is used to read the client's key. A client key is only necessary if the server requests a SSL client authentication. If not selected the system keystore is used. The system keystore can be configured by setting the Java system property
javax.net.ssl.keyStore. - Key store file
-
The file that contains the client keys.
- Key store password
-
Password needed to read the key store file.
- Key password
-
Password needed to decrypt the key. If empty the key store password is used instead.
- Key store type
-
The type of the key store. If empty the system default type is used.
- Key store provider
-
The provider used to read the key store. If empty the system default provider is used.
- Key store algorithm
-
The algorithm used to read the key store. If empty the system default algorithm is used.
- Use custom trust store
-
If selected the trust store configured below is used to read trusted server certificates and/or certificates of certification authorities. It is possible to use both the system and custom trust store.
- Trust store file
-
The file that contains the trusted server certificates and/or certificates of certification authorities.
- Trust store password
-
Password needed to read the trust store file.
- Trust store type
-
The type of the trust store. If empty the system default type is used.
- Trust store provider
-
The provider used to read the trust store. If empty the system default provider is used.
- Trust store algorithm
-
The algorithm used to read the trust store. If emtpy the system default algorithm is used.
- Use system trust store
-
If selected the system default trust store is used. It is possible to use both the system and custom trust store. The system trust store can be configured by setting the Java system property
javax.net.ssl.trustStore. If this property is not set then the file jre/lib/security/jssecacerts is used as trust store. If this file is also not available the file jre/lib/security/cacerts is used. - Trust manager class
-
The full qualified class name of a trust manager class that is used to validate server certificates. This setting is only considered if no custom and system trust store is used.
- Test custom Keystore/Truststore
-
Tests if the specified Keystore/Truststore can be opened and read with the given configuration.
- Enable insecure SSL and HTTPS connections
-
Manipulates the JVMs default SSLSocketFactory, so that untrusted (self signed or outdated) certificates are silently accepted. This could for instance be useful to generate a Webservice stub from an insecure WSDL location.
Note
The SSL Client Trust- and Keystore settings are at the moment only considered for sending mails and the rest client feature.
Axon.ivy uses some UI components that are widely used in the UI panels of the product. This chapter introduces these components.
IvyScript Editors are enhanced text fields or text areas where IvyScript code can be entered. For more information about IvyScript please read the chapter IvyScript. IvyScript Editors have a yellow background to help you identify them visually. On the right side some buttons are visible. These buttons are called Smart Buttons. If you click on them different Dialogs appear which provide context information that you may want to insert into the editor.

An ivyScript Editor will validate the code you enter into it. If the entered code is not valid the editor will change it's background color to red. The invalid part of the entered text will be underlined with a red line. The tool tip of the editor will show a message with a description of the problem.

An IvyScript Editor has a completer that shows context relevant information in
a popup window while you are typing into the editor. You can select any of the proposals
to be inserted into the editor. If you don't want to select a proposal simply continue
typing. The provided information will be filtered by your input. The popup window will
disappear if none proposal exists for the current input. You can enforce the appearance
of the popup window by pressing CTRL+SPACE. Pressing
CTRL+SPACE on a open completer popup window will cycle the
visibility level. The visibility level controls how much information is displayed in the
completer popup window. Pressing ALT+h will switch the help
text of the selected information on and off. Pressing ESC will close the
completer popup window.

Like IvyScript Editors, Macro Text Editors are enhanced text fields or text areas with
Smart Buttons. Macro Text Editors have a blue background to identify them visually. They
are used to specify texts. Inside the texts IvyScript Macros can be used. IvyScript
Macros start with <%= and end with %>. Between these two
tags any IvyScript code can be written. IvyScript Macros are place holders which are
replaced with the evaluated value of the ivyScript Macro before the text is used.

Smart Buttons are small buttons associated with other UI components. A Smart Button opens a dialog that shows context sensitive information which can be inserted into or used to configure the associated UI component. The following table shows the various Smart Buttons and explains their function.
| Smart Button | Description |
|---|---|

| Opens an Attribute or and Attribute and Method Browser that shows the current process data structure and the methods that are available on the process data entries. Use this Smart Button if you want to insert process data into the associated UI component. More information about the Attribute and Method Browser can be found in the chapter Attribute and Method Browser |

| Opens a Function Browser that shows the structure of the currently available ivy environment variable and the methods that they provide. Moreover it shows all available global functions. Use this Smart Button if you want to insert the ivy environment variable or a global function. More information about the Function Browser can be found in chapter Function Browser. |

| Opens a Data Type Browser that shows all available process data classes and Java classes. Use this Smart Button if you want to insert a process data or Java class into the associated UI component. Import statements for the selected class will be created on the fly. More information about the Data Type Browser can be found in the chapter Data Type Browser |
 | Opens the New Bean Class Wizard. Use this Smart Button if you want to create and configure a new Java bean class. |
 | Opens a Java editor with the class configured in the associated UI component. Use this Smart Button if you want to edit the configured Java class. |

| Opens a Content Browser that shows all available content objects. Use this Smart Button if you want to insert the content or a reference to a content object into the associated UI component. More information about the Content Browser can be found in chapter Content Editor |

| Opens a Database Field Browser that shows all available database fields. Use this Smart Button if you want to insert a database field into the associated UI component. More information about the databases can be found in chapter Db Step. |

| Opens an Operator Browser that shows all available operators. Use this Smart Button if you want to insert an operator (e.g. a SQL operator) into the associated UI components. More information about operators can be found in chapter Db Step. |

| Opens an Web Service Configuration Browser that shows all available Web Service configurations. Use this Smart Button if you want to insert a reference to a web service configuration into the associated UI components. More information about Web Service configurations can be found in chapter Web Service Call Step. |

| Opens a HTML Tag/Attribute Browser that shows available html tags and attributes. Use this Smart Button if you want to configure html tags or attributes of the associated UI component. |

| Opens a Link Browser that shows available link types. Use this Smart Button if you
want to insert HTML references (e.g. <a href="...">)
or URIs to certain artifacts. More information can be found in
chapter Link
Browser |

| Opens a Color Browser that shows available colors. Use this Smart Button if you want to insert a color definition into the associated UI component. |

| Opens a Font Browser that shows available fonts. Use this Smart Button if you want to insert a font definition into the associated UI component. |

| Cancels the current editing operation and resets the value in the associated UI component to the value it has before the editing was started. |
Table 1.1. Smart Buttons
Refactoring wizards appear when you rename, move, delete or copy/paste Axon.ivy artifacts.
The wizards allow you to specify the new name/namespace/location of the artifacts that should be refactored and will give you an overview of the result of the operation before it is actually executed, so that you can estimate the consequences.
All refactoring wizards have the same structure:
-
On the first page you enter the parameters of the operation (e.g. new name and/or namespace, target project, etc.) if any are required. Also you may chose whether any existing references to the refactored artifact should be updated automatically (e.g. if you rename a sub process then all callers to that sub process will be updated, so that they point to the renamed instance). This is the default behavior.
-
On the second page you will be presented with a list of references that will be broken after the operation is executed. This page is not displayed, if no broken references are detected. This page is only displayed for delete or move refactorings, i.e. if the artifact will no longer exist in the scope of any callers that referred to it before the operation.
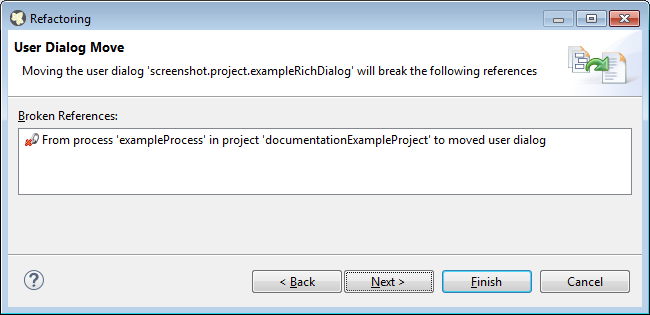
-
On the third page, you will eventually be presented with a detailed list of operations that will be performed as a result of the selected refactoring and possibly a preview of any old and new resources that will be created. You may individually de-select any operations, they will then not be executed when you press Finish.
Warning
It is recommended that you don't uncheck any of the scheduled operations (unless you know exactly what you're doing), since this may leave the workspace in an inconsistent state.
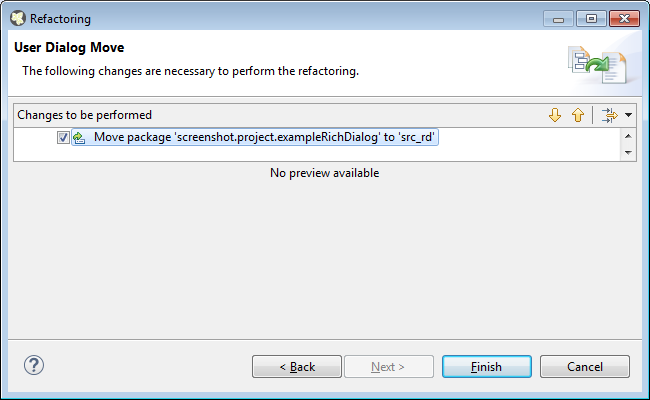
You can get from one page to another by pressing the Next and Back buttons, however there is no requirement to have a look at all three pages. As soon as the Finish button is enabled (this may not be the case, if some required input is missing on the first page), you may press it and execute the operation immediately.
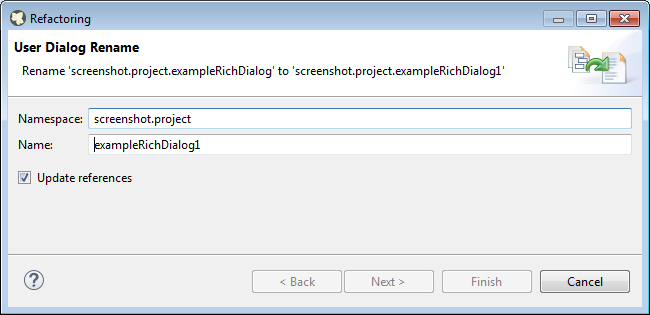
Change the name and/or namespace. If you enter invalid values then an error will be displayed.
If you leave the Update references box checked, then all existing references to the renamed artifact (within the current workspace) will be updated automatically. Otherwise, no callers or references will be updated, which will possibly result in broken references.
Note
Please note, that the namespace for processes is written with forward slashes '/' as separators (e.g. 'MyProcesses/Customer/Invoice') while the namespace for Data Classes and User Dialogs is written with a dot '.' as separator (e.g. 'customerportal.users.Employee').
Click on Finish to actually rename the selected resource(s) or on Cancel to abort the operation.
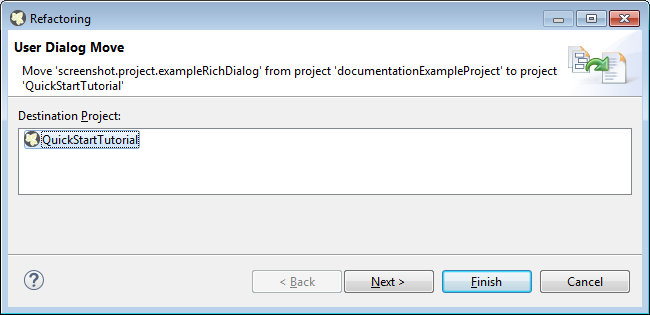
Select the destination project for the move operation from the proposed list.
The moved artifact will keep it's original name and namespace.
Click on Finish to actually move the selected resource(s) to the selected project or on Cancel to abort the operation.
If the selected resources are not Axon.ivy artifacts, then you will be presented with a confirmation dialog for the delete operation.
If you select an Axon.ivy artifact (Axon.ivy projects, User Dialog, Process, Data Class) for deletion, then you might be presented with a list of references that will break, if the operation is executed.
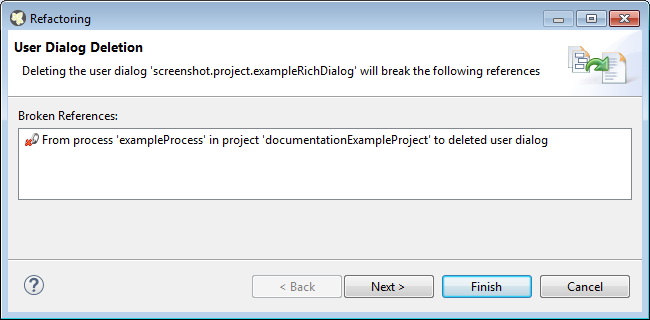
Click on Finish to actually delete the selected resource(s) or on Cancel to abort the operation.
The copy wizard appears when you execute the Paste operation (either through the menu action Paste or with Ctrl-V) after having copied something to the clipboard (e.g. through the menu action Copy or with Ctrl-C).
The copy wizard lets you change the project, name and namespace of the copy that will be created. All of the parameters are already filled in, the system tries to make educated guesses, if the selected target location is not valid or does not supply sufficient information (e.g. if a resource with the same name already exists at the paste location, then the name of the copy will be automatically have a "CopyOf" prefix).
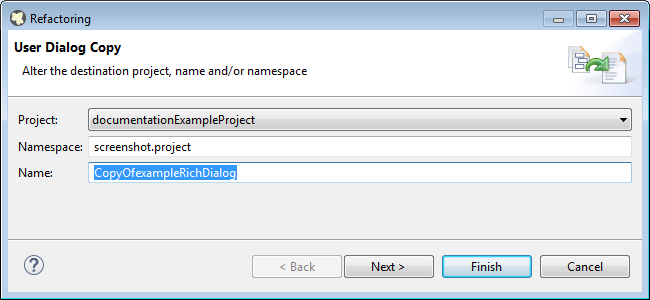
Click on Finish to actually paste the copied resource(s) to the defined location or on Cancel to abort the operation.