Getting Started
This chapter helps you getting started with the Axon.ivy Engine. You will learn how to install and configure the Engine and finally, how to deploy your Axon.ivy projects. If you are a Windows user and used to install and configure software using the UI then the first section Windows is a good starting point for you. If you are an experienced Linux user and you are used to install and configure software using the console then the second section Linux is the right starting point for you. Note, that on both systems, Windows and Linux, Axon.ivy Engine can be installed and configured using the UI or the console.
Open a web browser and navigate to http://developer.axonivy.com. Press on the Download button to navigate to the download page. Press the Download Axon.ivy Engine button:
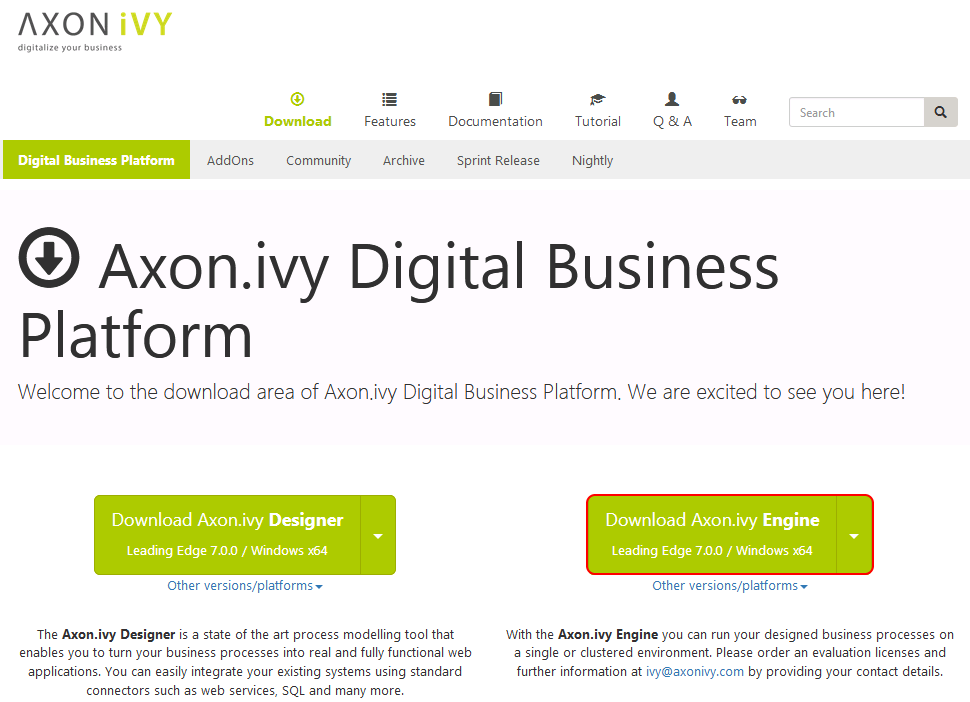
Save the AxonIvyEngine*.zip file to your temporary download folder.
We suggest that you install Axon.ivy Engine into a new folder called ivy\engine on one of your drives (e.g. c:\ivy\engine). To do so open a Windows Explorer and navigate to C:\ and create those new folders. Then, navigate to your temporary download folder and copy the file AxonIvyEngine*.zip to the newly created folder.
Right click the AxonIvyEngine*.zip file and press Extract All ... from the context menu.

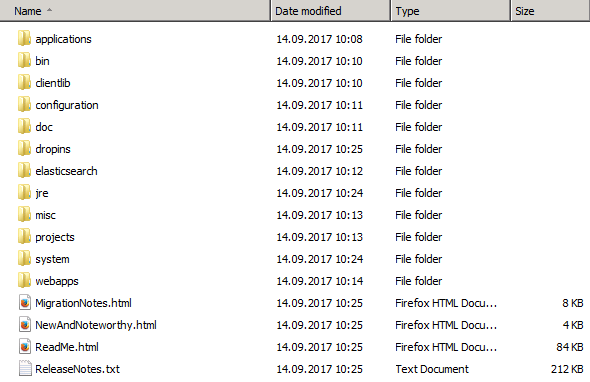
On the appearing dialog press the Extract button. After the AxonIvyEngine*.zip is extracted navigate into the new AxonIvyEngine* folder. The content of the installation folder looks like this:
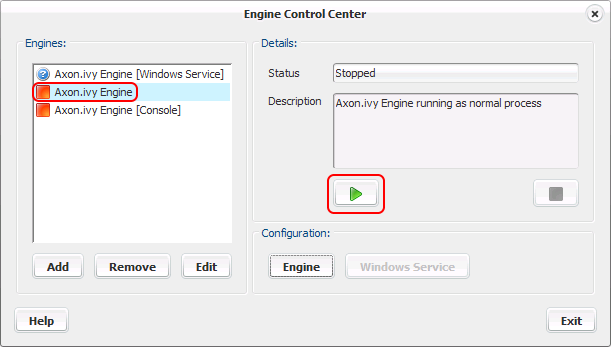
Navigate to the bin folder and double click on the ControlCenter.exe file to start the Control Center. You can use this tool to start and stop the Axon.ivy Engine in different ways (as Windows Service, as normal user process, with a console window). Select the Axon.ivy Engine and press the green play button to start the Axon.ivy Engine as a normal user process:
After the Axon.ivy Engine has started a web browser is opened and the main page of the Axon.ivy Engine is displayed.
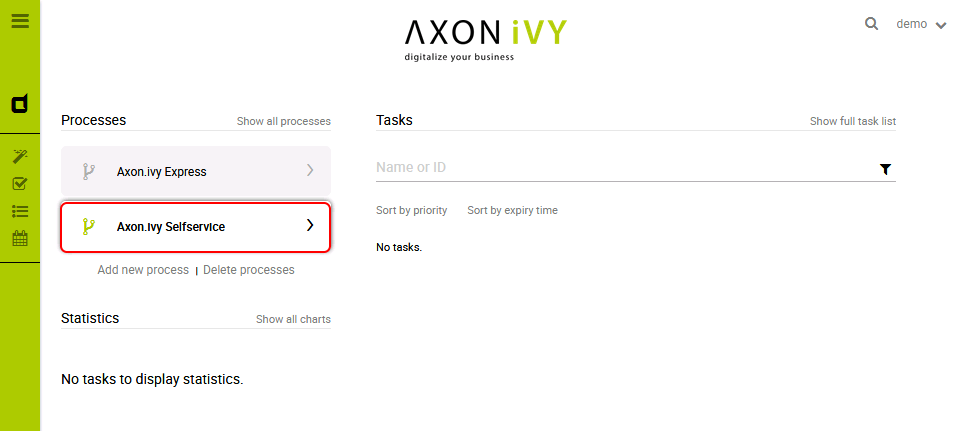
The main page of the Axon.ivy Engine looks like this:
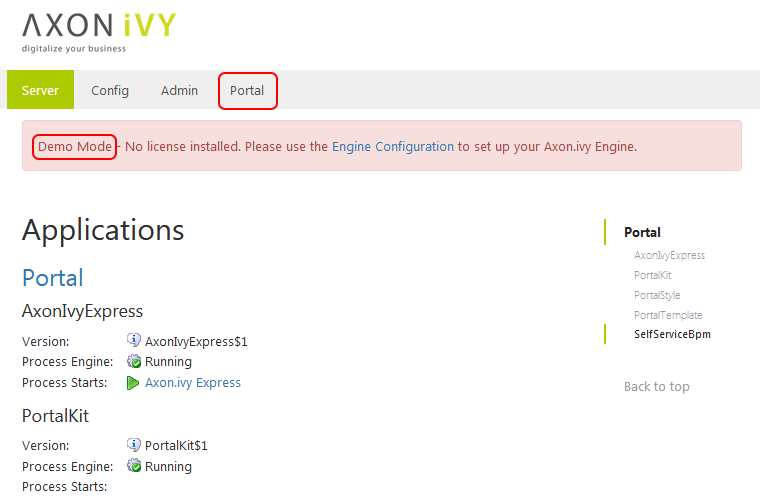
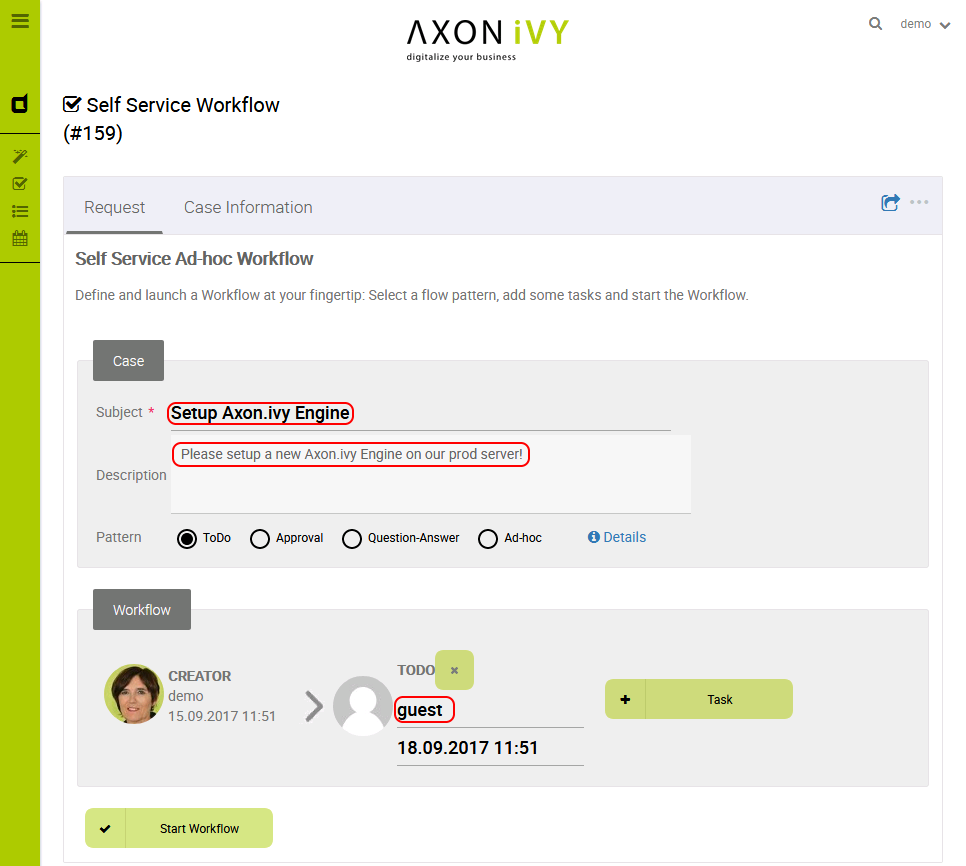
The Axon.ivy Engine is running in Demo Mode. This is because you did not install a valid license yet nor did you configure a system database. Note, that everything that you do with the Axon.ivy Engine running in Demo Mode is lost when you shut down the engine. However, you can use the engine also in Demo Mode and tryout the pre-installed Portal application by clicking on the Portal Home link. To login use one of the predefined demo users: demo, guest or admin. The passwords of the demo users are equal to the user names (E.g. demo for the demo user). Login as demo user and try to create a TODO task for the guest user using the Axon.ivy Selfservice process:
Configure the TODO task as follows:
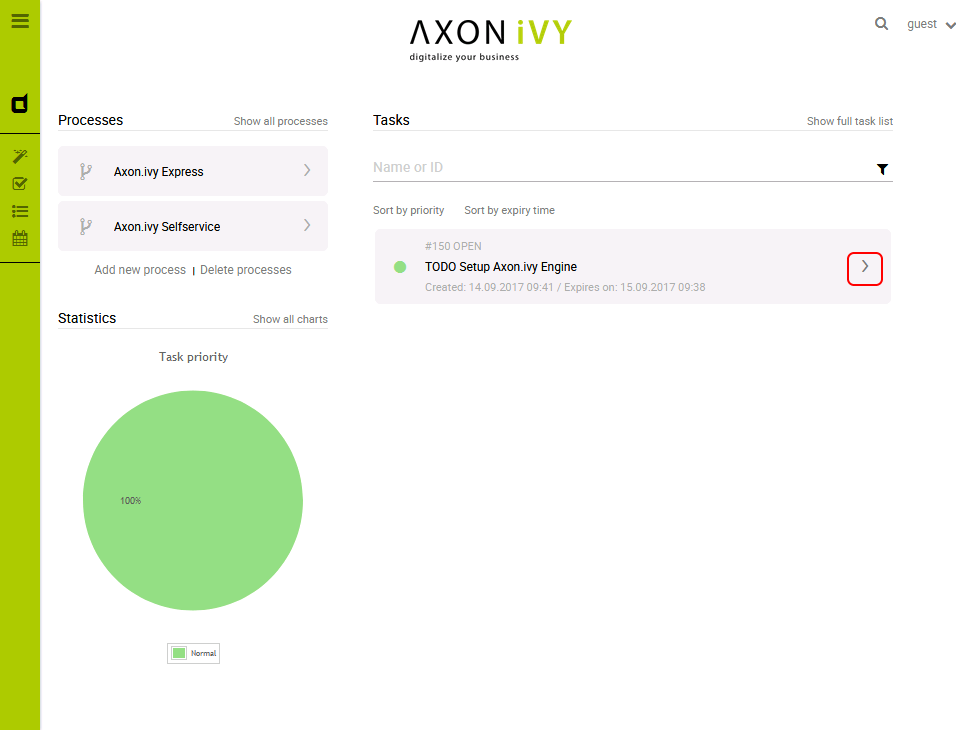
Start the workflow by pressing the Start Workflow button. After that, logout, then login again as guest user. On the task list, you now see the new TODO task that you created before. Try to work on the task by clicking on the arrow located on the right side of the task:
Go ahead and play around with the Selfservice process. Try out different types of tasks.
Now, let's configure the Axon.ivy Engine with a license and system database.
To start with that you must first request a valid Axon.ivy Engine license. Either you get a license for your productive system through one of our sales personal or contact our support for time limited tryout licenses. If you do not have a license you can skip this section and continue with the next section.
Moreover, you need to have a supported database server up and running with a database user that has the rights to create new databases. The configuration and creation of the system database differs a little bit depending on the database system you use. We will use a PostgreSQL database server.
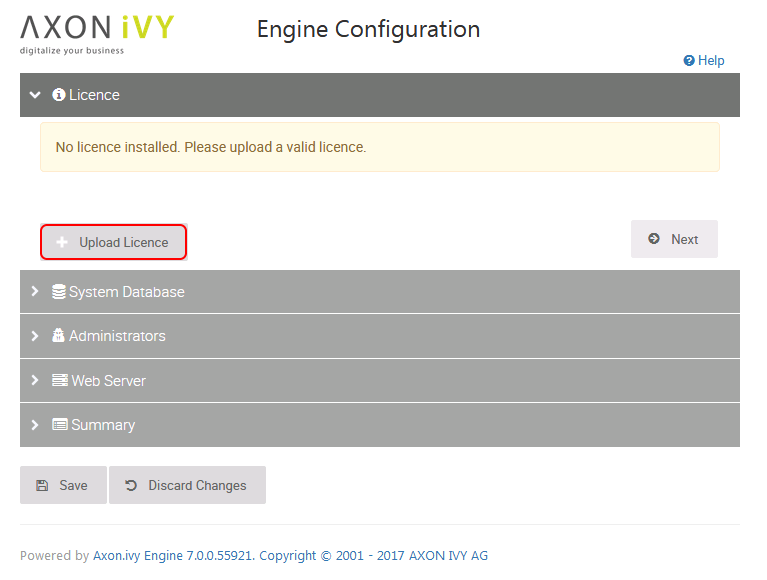
You can start the configuration on the main page of the Axon.ivy Engine (e.g. http://localhost:8081/ivy) by clicking on the Config menu.
On the first page use the Upload Licence button to install your license file.
Some information of your license will be displayed on the page as soon as you have installed it. Press the Next button to continue.
On the next screen choose the correct Database and Driver (in our case PostgreSQL). Configure the Host and Port where your database server is running and listening. Configure the Username and Password of a database user that has the right to create a new database on the database server.
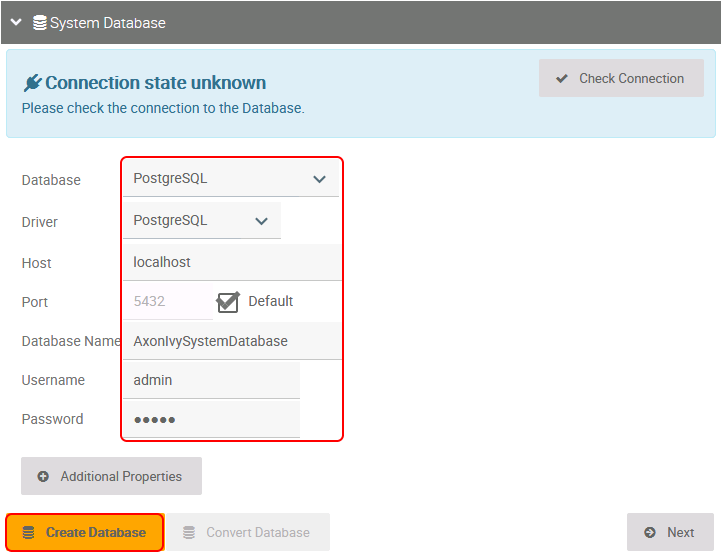
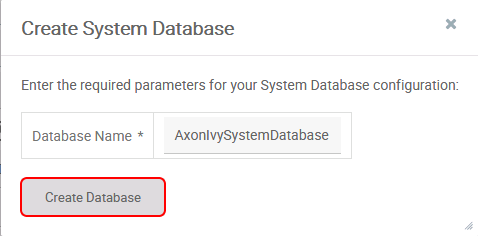
Press the Create Database button. On the appearing dialog configure the name of the Axon.ivy system database. Press the Create Database button to create the system database.
As soon as the database creation is finished the following dialog appears:

Press the Save and connect button to save the configuration and connect to the newly created system database.
Press the Next button.
On the next page, you can configure system administrators.
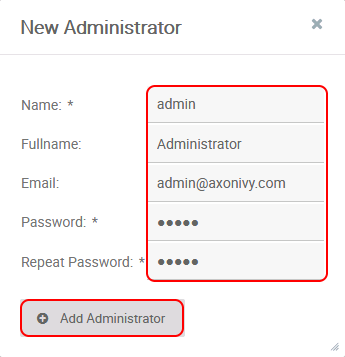
Fill in the form and press the Add Administrator button.
Press the Next button.
On the next page configure which protocol connectors and ports the Axon.ivy Engine internal web server should provide. You do not need the AJP protocol. So let's disable it.
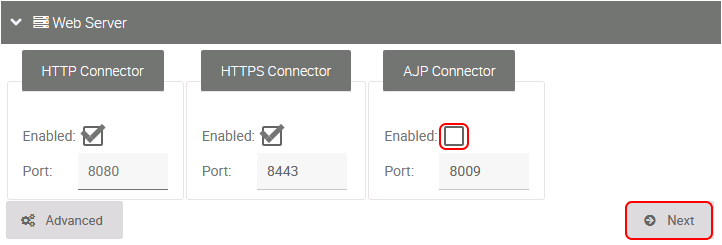
Press the NEXT button.
On the next page, the configuration is summarized.

Press the Save button to save the configuration. Switch back to the Control Center and restart the Axon.ivy Engine by stopping and starting it again.
Note, that the HTTP port of the Axon.ivy Engine may have changed. If you did not change the HTTP settings it is now 8080 and no longer 8081! So open again a web browser and navigate to http://localhost:8080/ivy. Have you seen that the header with the demo mode message is gone? You now have a production ready Axon.ivy Engine.
Let's deploy an Axon.ivy project to the Axon.ivy Engine. To do so install an Axon.ivy Designer first so that you have demo projects available that you can deploy. Simple download it from our download page and extract the AxonIvyDesigner*.zip file to the folder c:\ivy\designer.
Now start the Admin UI tool by clicking on the Admin menu on the Axon.ivy Engine main page. This will start Java Web Start. A dialog may appear asking if you want to run and trust the Axon.ivy Rich Internet Application . Press the Run button to proceed. After a few seconds, the Axon.ivy Engine Admin UI appears.
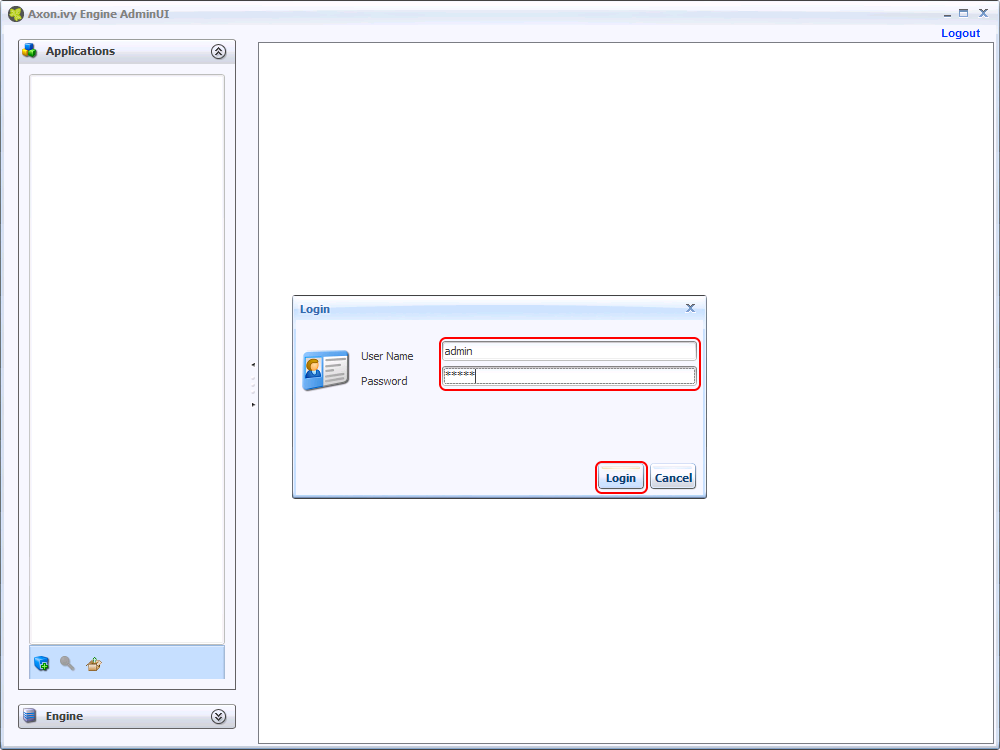
Use the credentials of the administrator that you have added in the configuration section to login. If you are still running in demo mode you can use AxonIvy/AxonIvy as credentials.
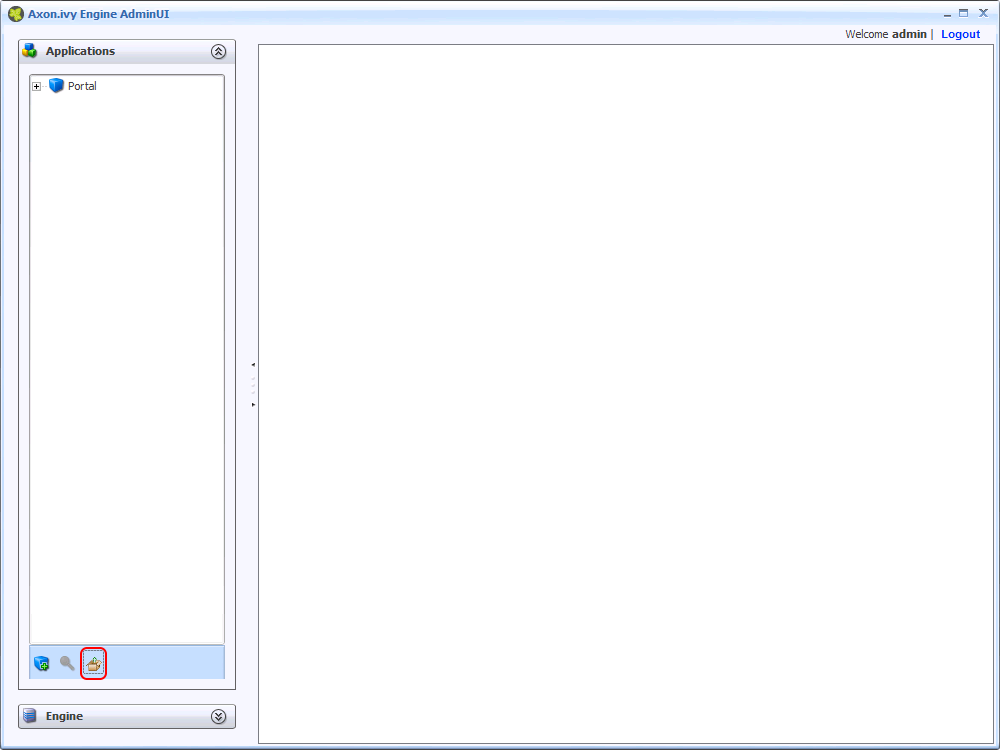
Then, press the Deployment Wizard button on the toolbar of the Applications section on the left side.
On the deployment wizard press the Browse button.
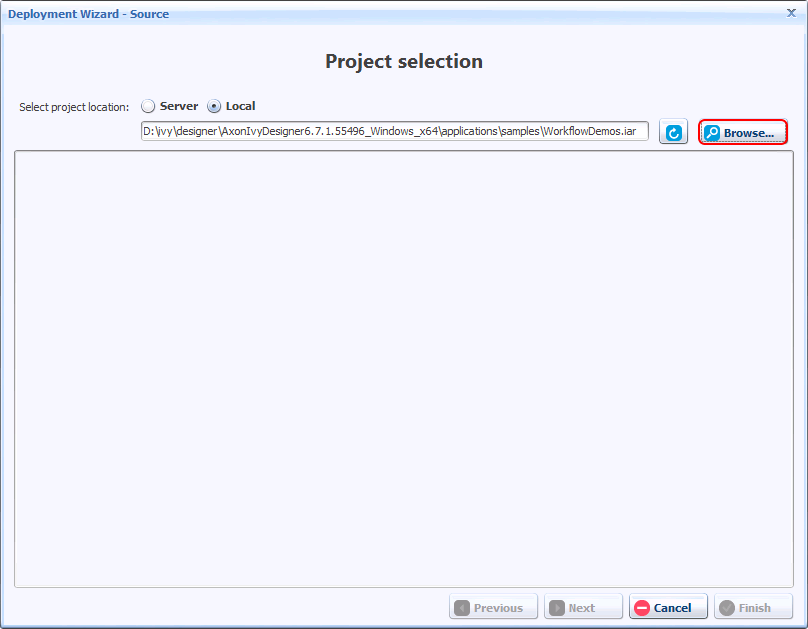
Choose the file WorkflowDemos.iar in the applications/demos folder of the Axon.ivy Designer installation folder and press the Open button.
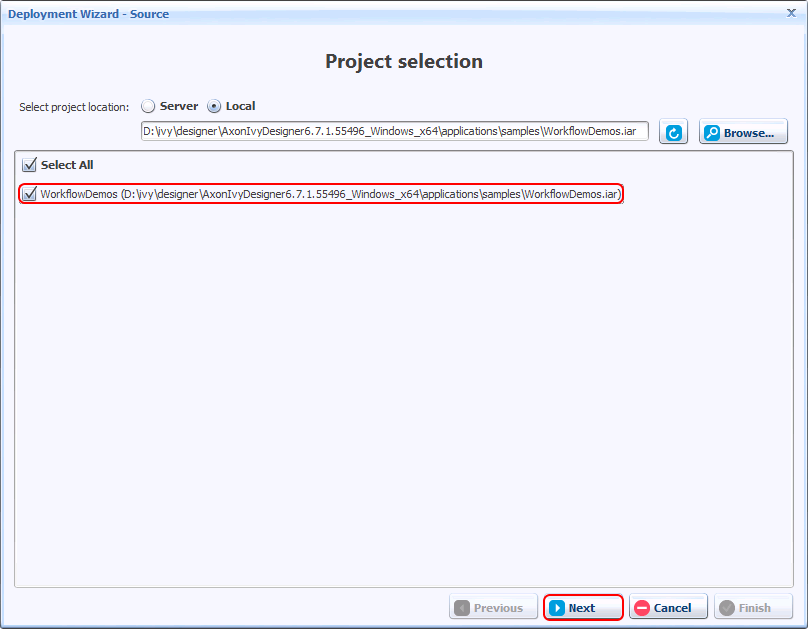
Select the WorkflowDemos project and press the Next button.
On the next page select the target application Portal.
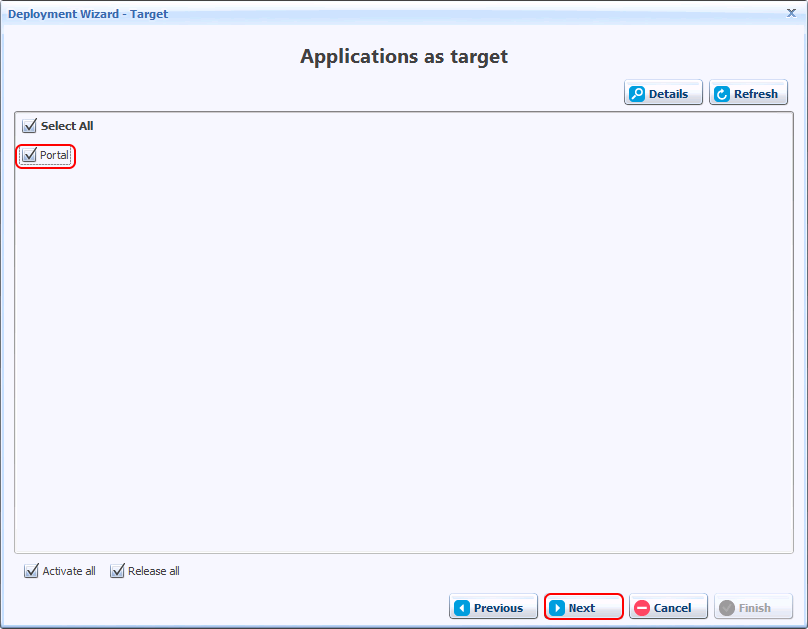
Press the Next button.
On the next two pages press also the Next button and on the final page press the Deploy button. The project WorkflowDemos is now deployed to the application Portal. Press the button Finish to close the deployment wizard after the deployment has finished. The WorkflowDemos is now visible in the Applications tree on the left side of the Admin UI.
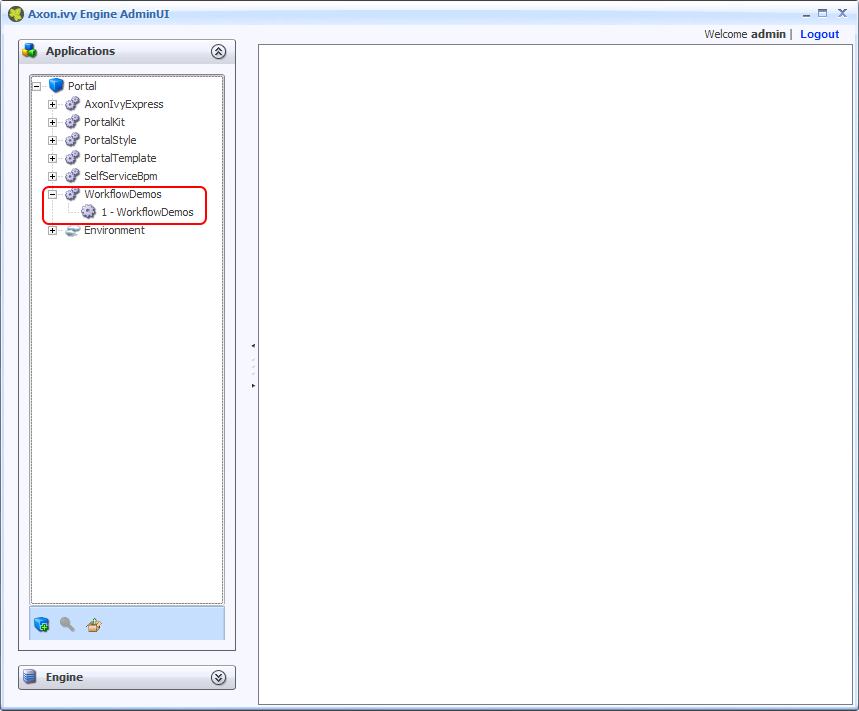
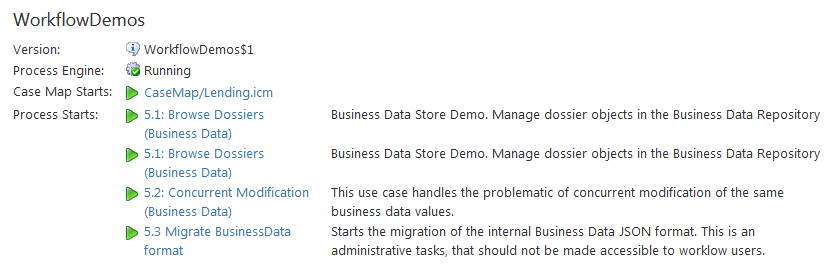
Close the Admin UI and go back to the web browser. Refresh the main page of the Axon.ivy Engine. There is now a new section called WorkflowDemos available with new links to start processes.
Congratulations you have installed and configured your first Axon.ivy Engine and deployed your first Axon.ivy project. If you are interested in how to do the same but only with a console then read the next section. In the next chapter, you will learn the main concept of the Axon.ivy Engine and the details of how to configure, administrate and monitor it.
In this section, you will learn how to install and configure an Axon.ivy Engine on a Linux server only using the console. On the Linux machine no windowing system has to be installed. However, to test your configuration a client machine with a web browser is needed.
Before starting with the installation of Axon.ivy Engine prepare your Linux machine with the necessary tools and software needed for the installation (wget, unzip, Java 8 runtime). Most distribution may have pre-installed these tools but especially certain Docker images may have not. On Debian (e.g. Ubuntu, etc.) based system use:
apt update
apt install sudo wget unzip openjdk-8-jre-headless
We suggest that you install the Axon.ivy Engine into a new folder called /opt/ivy/engine. Create the directory and change the owner to your current user:
cd /opt
sudo mkdir ivy
sudo chown myuser:myuser ivy
Replace myuser with the name of your current user.
Download the latest engine:
cd ivy
mkdir engine
cd engine
wget https://developer.axonivy.com/download/stable/Engine-All-x64.zip -O engine.zip
To install Axon.ivy Engine simply unzip the downloaded file AxonIvyEngine*.zip into a new AxonIvyEngine* folder:
unzip engine.zip -d latest
rm engine.zip
cd latest
Start the Axon.ivy Engine by navigation to the bin folder and executing the AxonIvyEngine binary:
cd bin
./AxonIvyEngine
This will start the Axon.ivy Engine as a user process. On the last lines of the output a URL is displayed:
[100%] Service ProcessModelVersion Portal/AxonIvyExpress$1 started [0ms]
Go to http://yourservername:8081/ivy to see the info page of Axon.ivy Engine.
Axon.ivy Engine is running and ready to serve. [9375ms]
Type 'shutdown' and confirm with ENTER to stop the running engine instance
Copy this URL. On your client machine open a web browser and navigate to that URL. This will display the Axon.ivy Engine main page.
The main page of the Axon.ivy Engine looks like this:
The Axon.ivy Engine is running in Demo Mode. This is because you did not install a valid license yet nor did you configure a system database. Note, that everything that you do with the Axon.ivy Engine running in Demo Mode is lost when you shut down the engine. However, you can use the engine also in Demo Mode and tryout the pre-installed Portal application by clicking on the Portal Home link. To login use one of the predefined demo users: demo, guest or admin. The passwords of the demo users are equal to the user names (E.g. demo for the demo user). Login as demo user and try to create a TODO task for the guest user using the Axon.ivy Selfservice process:
Configure the TODO task as follows:
Start the workflow by pressing the Start Workflow button. After that, logout, then login again as guest user. On the task list, you now see the new TODO task that you created before. Try to work on the task by clicking on the arrow located on the right side of the task:
Go ahead and play around with the Selfservice process. Try out different types of tasks.
Now, let's configure the Axon.ivy Engine with a license and system database.
To start with that you must first request a valid Axon.ivy Engine license. Either you get a license for your productive system through one of our sales personal or contact our support for time limited tryout licenses. If you do not have a license you can skip this section and continue with the next section.
Moreover, you need to have a supported database server up and running with a database user that has the rights to create new databases. The configuration and creation of the system database differs a little bit depending on the database system you use. We will use a PostgreSQL database server.
Shutdown the Axon.ivy Engine first by typing shutdown and Y:
...
Go to http://ivy1:8081/ivy to see the info page of Axon.ivy Engine.
Axon.ivy Engine is running and ready to serve. [11596ms]
Type 'shutdown' and confirm with ENTER to stop the running engine instance
shutdown
Should 'Axon.ivy Engine' be stopped? ([Y]es / [N]o): Y
Stopping Axon.ivy Engine ...
[  0%] Stopping Server
...
Let's install the license. You can do this by simple copy the license *.lic file into the configuration folder:
cp ~/license.lic /opt/ivy/engine/latest/configuration
To configure the system database, use the config-db command of the EngineConfigCli tool. Replace yourdatabasserver with the name of the host where your PostgreSQL server is running. Replace dbuser and password with the credentials of a database user that has the rights to create a new database on the database server.
./EngineConfigCli config-db org.postgresql.Driver \
jdbc:postgresql://yourdatabaseserver:5432/AxonIvySystemDatabase \
dbuser password
Now, let's create the system database with the create-db command:
./EngineConfigCli create-db
Next, create an administrator using the create-admin command:
./EngineConfigCli create-admin admin nimda Administrator admin@axonivy.com
The first parameter admin is the name of the administrator. The second parameter nimda is the password.
Lastly, disable the AJP protocol connector of the Axon.ivy Engine internal web server by using the set-property command.
./EngineConfigCli set-property WebServer.AJP.Enabled=false
Now, start the Axon.ivy Engine again as background process.
nohup ./AxonIvyEngine &
Note, that the HTTP port of the Axon.ivy Engine may have changed. If you did not change the http settings it is now 8080 and no longer 8081! So open again a web browser and navigate to http://yourservername:8080/ivy. Note, that the header with the demo mode message is gone. You now have a production ready Axon.ivy Engine.
Let's deploy an Axon.ivy project to the Axon.ivy Engine. We use demos that are shipped with the Axon.ivy Designer.
cd /opt/ivy/engine/deploy/Portal
wget https://developer.axonivy.com/download/stable/Designer-Linux-x64.zip -O designer.zip
unzip -j designer.zip applications/samples/WorkflowDemos.iar applications/samples/ConnectivityDemos.iar applications/samples/HtmlDialogDemos.iar
rm designer.zip
Start the deployment now by creating a file called WorkflowDemos.iar.doDeploy:
touch WorkflowDemos.iar.doDeploy
You can monitor the deployment with:
tail -f WorkflowDemos.iar.deploymentLog
As soon as the deployment is finished the file WorkflowDemos.iar.doDeploy disappears.
Refresh the main page of the Axon.ivy Engine. There is now a new section called WorkflowDemos available with new links available to start processes.
Congratulations you have installed and configured your first Axon.ivy Engine and also deployed your first Axon.ivy project. If you are interested in how to do the same but with UI tools read the previous section. In the next chapter, you will learn the main concept of the Axon.ivy Engine and the details of how to configure, administrate and monitor it.