Integration
We recommend to run Axon.ivy Engine behind a web front-end server (Apache httpd, Microsoft IIS, Reverse Proxy, Web Application Firewall, etc.).
In those cases the web front-end server receives all requests from the clients and forwards them to the Axon.ivy Engine which handles them. This allows to integrate the processes and applications that you are running on an Axon.ivy Engine into a company or web portal. Some web front-end server provide Single Sign On (SSO) functionality. The front-end server then is responsible to identify the user (either automatically or by login). After that the user is able to operate on all web sites that are integrated into the web front-end server.
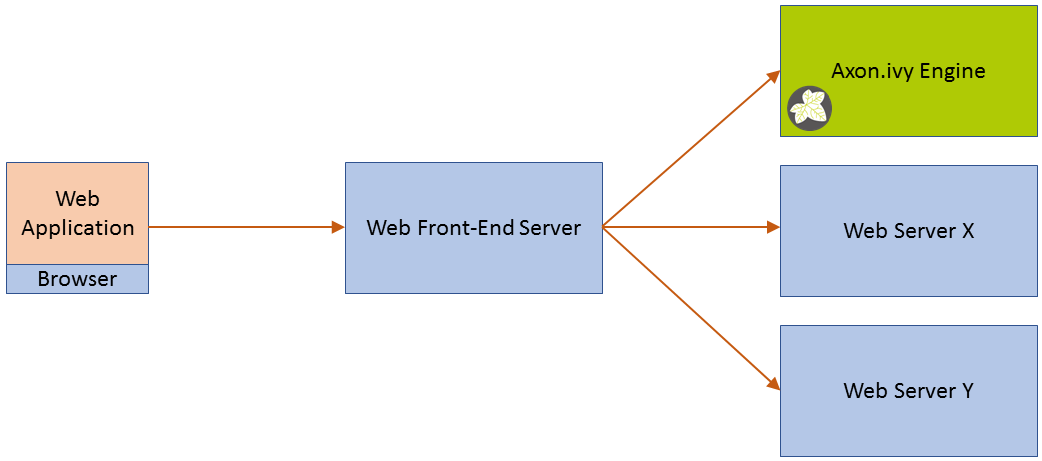
The integration for Apache httpd and Microsoft IIS is technically solved by using Tomcat Connectors. More technical details about those connectors can be found on the Apache Tomcat web site.
It is very important that the communication between the front-end server and the Axon.ivy Engine is exclusive. This means no one else should be able to communicate directly with the Axon.ivy Engine.
If front-end server and Axon.ivy Engine runs on the same host, this is secure by default and no more security considerations must be done.
If front-end server and Axon.ivy Engine runs on two different hosts, you need to ensure exclusive access to the Axon.ivy Engine. You can do this with one of the following approaches:
-
Configure your network so that only the front-end server can communicate with the Axon.ivy Engine.
-
Setup a firewall rule on the Axon.ivy Engine host, which blocks all requests from another IP address other than the front-end server.
Furthermore you need to bind AJP to the public network address of the Axon.ivy Engine, because AJP is bound by default to localhost. You need to set the system property "WebServer.AJP.Address" to "YOUR_AXON_IVY_ENGINE_IP_ADDRESS".
All necessary files that you need to integrate an Axon.ivy Engine into a Web Server can be found in the following directories inside the Axon.ivy Engine installation directory:
-
Apache HTTP Server for Windows (x64): misc/apache/
-
Apache HTTP Server for Linux (x64): misc/apache/
-
IIS for Windows (x64): misc/iis/
The directory that matches the platform and webserver where you plan to integrate the Axon.ivy Engine will be called integration directory in this chapter.
The integration binaries for Linux are not delivered with the Axon.ivy Engine as it is best practice to use the Tomcat Connector binaries that are provided by the Linux distribution. See “Linux example configuration”
Update the System properties with your external base URL after the web server integration. Those properties are required for creating external links (e.g. links in task mails):
-
WebServer.ExternalProtocol(e.g. https) -
WebServer.ExternalHostName(The external host name) -
WebServer.ExternalPort(e.g. 443 for https)
An Apache HTTP Server 2.x can be configured as web frontend of an Axon.ivy Engine. The communication between the Apache HTTP Server and the Tomcat from Axon.ivy is possible by using the Apache Tomcat Connector.
-
If your Apache HTTP Server is not running on the same host as the Axon.ivy Engine then the integration directory content must be copied to the host where your Apache HTTP Server is running.
-
Copy the mod_jk binaries and the sample configuration files from the directory that matches your OS in [[Axon.ivy Engine install dir]]/misc/apache to the Apache Host under C:\Program Files\ivy
All next steps have to be done on the host where the Apache HTTP Server is running on.
-
-
Include the copied jk_module configuration in the [[Apache Install Dir]]/conf/httpd.conf. Add the following lines to do so:
# Axon.ivy Engine Integration
Include C:/Program Files/ivy/mod_jk.conf
-
Replace all <path> strings in the file C:\Program Files\ivy\mod_jk.conf so that the file reflects your local paths:
# Load mod_jk module
LoadModule    jk_module  c:/program files/ivy/mod_jk-1.2.42-httpd-2.4.so
# Where to find workers.properties
JkWorkersFile c:/program files/ivy/workers.properties
# Where to put jk shared memory
JkShmFile     c:/program files/ivy/mod_jk.shm
# Where to put jk logs
JkLogFile     c:/program files/ivy/mod_jk.log
# Set the jk log level [debug/error/info]
JkLogLevel    info
# Select the timestamp log format
JkLogStampFormat "[%a %b %d %H:%M:%S %Y] "

# Mount the uri "/ivy/*" to the worker AxonIvyEngine.
JkMount  /ivy/* AxonIvyEngine
-
If you have configured virtual hosts in your apache configuration you have to map the URI
/ivy/*in all virtual host you want to integrate Axon.ivy Engine into. This can be done by copying the following line from the mod_jk.conf file to the appropriate virtual host definitions:JkMount /ivy/* AxonIvyEngine
Copy this to the appropriate virtual host definitions, e.g.:
<VirtualHost *:80> ServerAdmin webmaster@ivy.soreco.wan DocumentRoot "C:/Program Files (x86)/Apache Software Foundation/Apache2.2/docs/ivy.soreco.wan" ServerName ivy.soreco.wan ServerAlias www.ivy.soreco.wan ErrorLog "logs/ivy.soreco.wan-error.log" CustomLog "logs/ivy.soreco.wan-access.log" common JkMount /ivy/* AxonIvyEngine </VirtualHost> -
Define the hostname and port, where the Axon.ivy Engine is running. Adjust the content of the file C:\Program Files\ivy\worker.properties to do so.
worker.list=AxonIvyEngine
worker.AxonIvyEngine.type=ajp13
worker.AxonIvyEngine.port=8009
worker.AxonIvyEngine.host=ivyserver
-
Update the external base URL in the Admin UI
-
Restart the Apache HTTP Server and the Axon.ivy overview page should be accessible under http://apacheHostName/ivy
Within this example an Apache HTTP Server is configured so that it can connect to the Tomcat of an Axon.ivy Engine. The configuration step descriptions are generic and can be used under any Linux distribution. But the concrete examples assume that an Ubuntu distribution is installed as Operating System.
-
Install the latest Tomcat Connector (mod_JK) by console.
sudo apt-get install libapache2-mod-jk
-
Enable the new module
sudo a2enmod jk
-
Update the worker.properties file according to the examples in the [[Axon.ivy Engine install path]]/misc/apache/. The following example content would connect to an Axon.ivy Engine on the host "ivyserver" under the default AJP port 8009.
/etc/libapache2-mod-jk/worker.properties:
worker.list=AxonIvyEngine
worker.AxonIvyEngine.type=ajp13
worker.AxonIvyEngine.port=8009
worker.AxonIvyEngine.host=ivyserver
-
Mount the Axon.ivy Engine in the virtual host definition of the Apache HTTP Server. The context URI must match the context of the Axon.ivy Engine.
/etc/apache2/sites-available/default:
<VirtualHost *:80>
    ...
    #Mounts the URI /ivy/* to the worker AxonIvyEngine
    JkMount /ivy/* AxonIvyEngine
</VirtualHost>
Tip
If the Apache HTTP Server is used as Load Balancer for a clustered Axon.ivy Engine installation, the JK Status Manager can be used to display debugging informations. The Manager is accessible when it is mounted in the virtual host definition configuration.
<VirtualHost *:80> ... #Mounts the URI /jkmanager/* to the JK Status Manager interface. JkMount /jkmanager/* jkstatus </VirtualHost> -
Update the external base URL in the Admin UI
-
Restart the Apache HTTP Server and the Axon.ivy overview page should be accessible under http://apacheHostName/ivy
The context URI /ivy/ can be changed inside the Axon.ivy Engine by
changing the system property WebServer.IvyContextName (See chapter
System
Properties to learn about how to change a system property). However, if
you change the context URI on the Axon.ivy Engine you also have to change the
context URI in the Apache HTTP Server integration. This can be done by changing the
last line of the mod_jk.conf configuration
file:
JkMount /ivy/* AxonIvyEngine
If you want to have /xpertline/ as the context URI change this line
to the following:
JkMount /xpertline/* AxonIvyEngine
If you have a virtual host configuration, the JkMount command with the new context URI must also be applied to the virtual host definition:
<VirtualHost *:80>
    ...
    JkMount /xpertline/* AxonIvyEngine
</VirtualHost>
Important
To successfully integrate Axon.ivy Engine into Microsoft Internet Information Server (IIS) it is important that you exactly execute all the integration steps described below. If the integration does not work verify each integration step again.
Note
There is a batch script autoconfig.bat in the folder misc\iis of your engine installation, which installs and configures the IIS automatically on a Windows 2008 Server.
If you are setting up a new IIS Server you can use this script instead of following the instructions below.
-
If your Microsoft Internet Information Server is not running on the same host as the Axon.ivy Engine then copy the integration directory to the host where your IIS is running. All next steps have to be done on the host the IIS is running on.
-
Allow the user groups
Authenticated UsersandIUSRto haveFull controlpermission on the integration directory.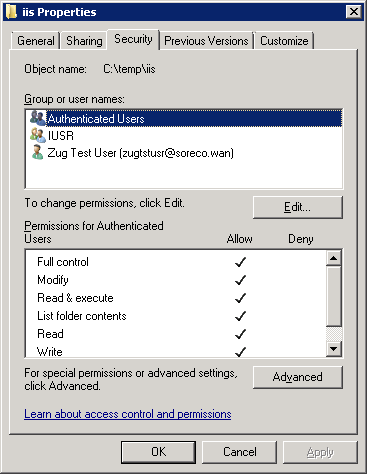
-
Install Features
Note
Instead of installing the features manually you can run the following command which ensures that all necessary IIS Features are installed:
PKGMGR.EXE /iu:IIS-WebServerRole;IIS-WebServer;IIS-CommonHttpFeatures;IIS-StaticContent;IIS-DefaultDocument;IIS-DirectoryBrowsing;IIS-HttpErrors;IIS-ApplicationDevelopment;IIS-CGI;IIS-ISAPIExtensions;IIS-ISAPIFilter;IIS-HealthAndDiagnostics;IIS-HttpLogging;IIS-RequestMonitor;IIS-Security;IIS-WindowsAuthentication;IIS-RequestFiltering;IIS-Performance;IIS-HttpCompressionStatic;IIS-WebServerManagementTools;IIS-ManagementScriptingTools;IIS-ManagementService Open the Server Manager (Start > Control Panel > Administrative Tools > Server Manager). Navigate to the node Server Manager > Roles > Web Server (IIS) and select it. Validate that under the
Role
                            Services
the servicesCGI,ISAPI ExtensionsandISAPI Filtersare installed. If this is not the case select the menuAdd Role Servicesto install the missing services.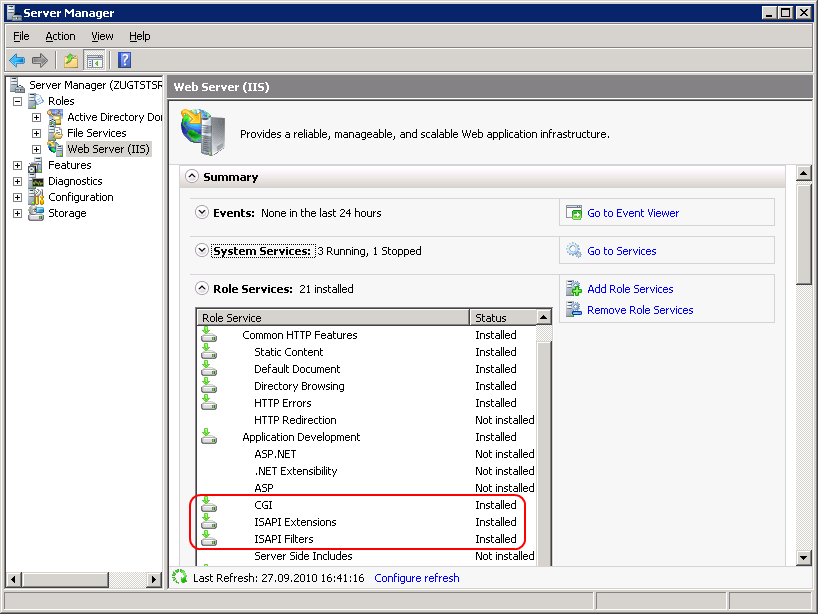
-
Feature delegation
Note
The following command automatically sets the feature delegation:
powershell -ExecutionPolicy unrestricted -ImportSystemModules Set-WebConfiguration //System.webServer/handlers -metadata overrideMode -value Allow -PSPath IIS:/ Open the Internet Information Services (IIS) Manager (Start > Control Panel > Administrative Tools > Internet Information Services (IIS) Manager). In the
Connectionspane select the node that represent your machine. In theFeature Viewopen theFeature Delegationentry.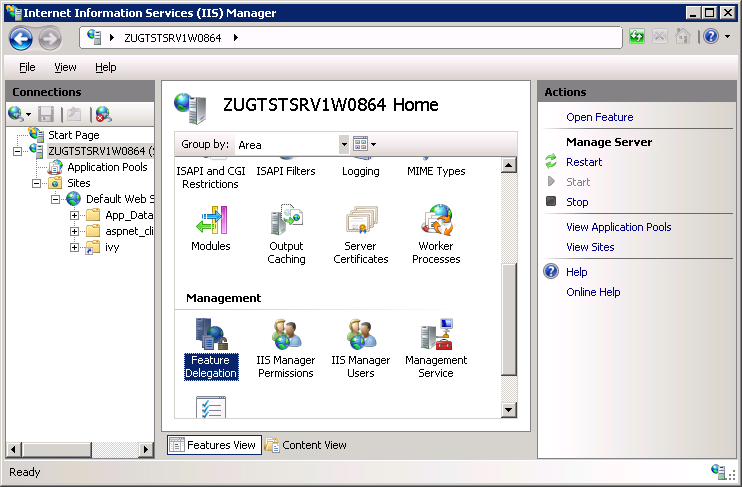
Ensure that the
Delegationof theHandler Mappingsare set toRead/Write. Use the menuRead/Writeon theActionspane to change theDelegationto Read/Write.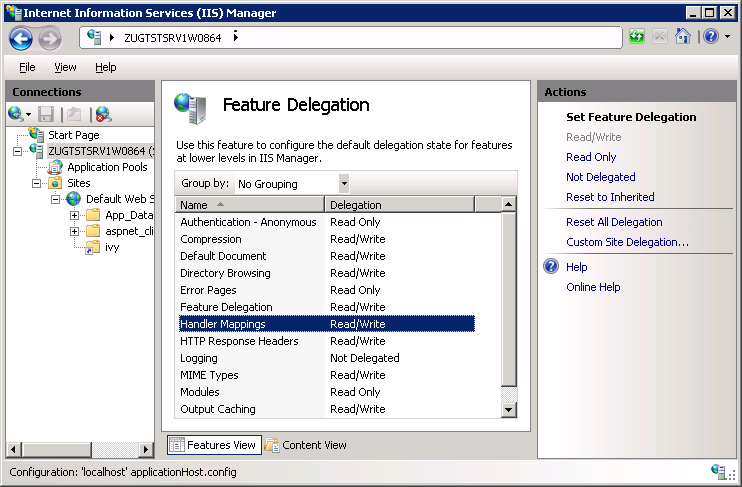
-
Virtual ivy directory
Note
The following commands automatically creates the virtual directory ivy:
set path=%path%;%windir%\system32\inetsrv appcmd.exe add vdir /app.name:"Default Web Site/" /path:/ivy /physicalPath:<replace this with the path to the integration directory> In the
Connectionspane navigate to the Web Site you want integrate the Axon.ivy Engine into. Use the context menuAdd Virtual Directory ...of the Web Site to add a new Virtual Directory. A dialog opens. Configure theAliasof the Virtual Directory withivyand thePhysical pathof the Virtual Directory with the path of the integration directory. ClickOKto close the dialog and create the Virtual Directory: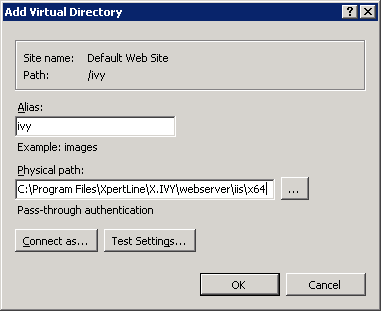
-
Handler Mapping Permissions
Note
The following command automatically sets the feature permission for the ivy virtual directory:
appcmd.exe set config "Default Web Site/ivy" /section:system.webServer/handlers /accessPolicy:Read,Write,Execute Select the new created Virtual Directory
ivyin theConnectionspane and open theHandler Mappingsentry in theFeature View: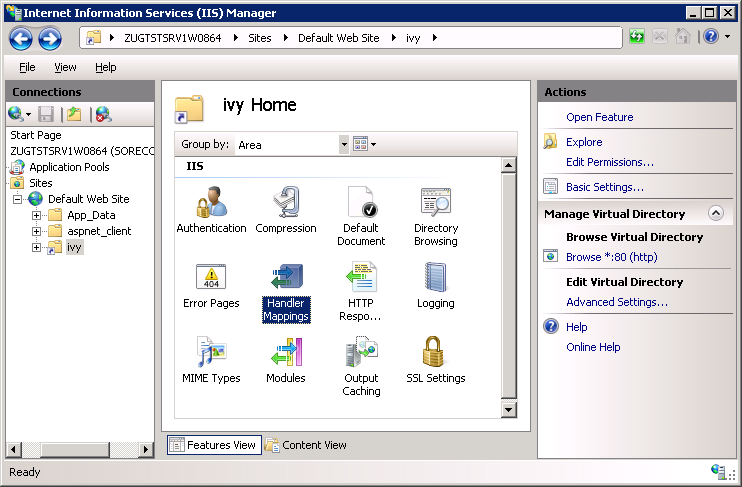
In the
Actionspane select theEdit Feature Permissions ...menu: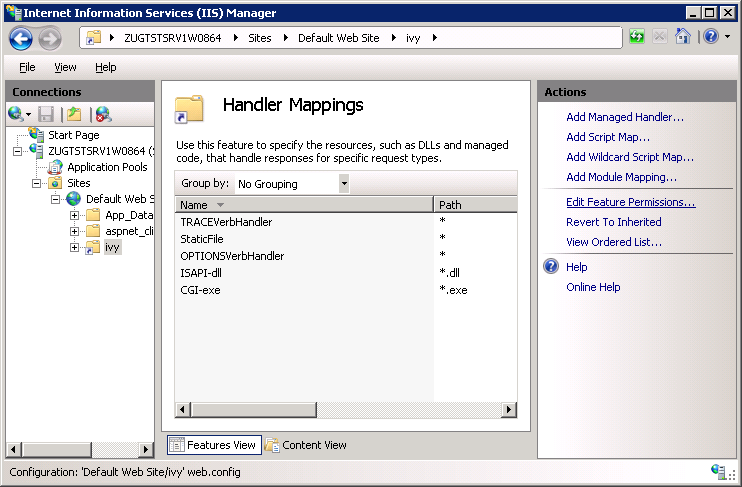
On the
Edit Feature Permissiondialog select all three permission and clickOK: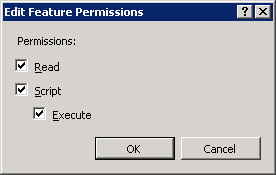
-
Configure Error Page
Note
The following command automatically configures that the detailed error page of the Engine is shown:
appcmd.exe set config "Default Web Site/ivy" /section:system.webServer/httpErrors /errorMode:Detailed Tip
See chapter Error Handling for more information about this configuration.
Select the new created Virtual Directory
ivyin theConnectionspane and open theError Pagesentry in theFeature View: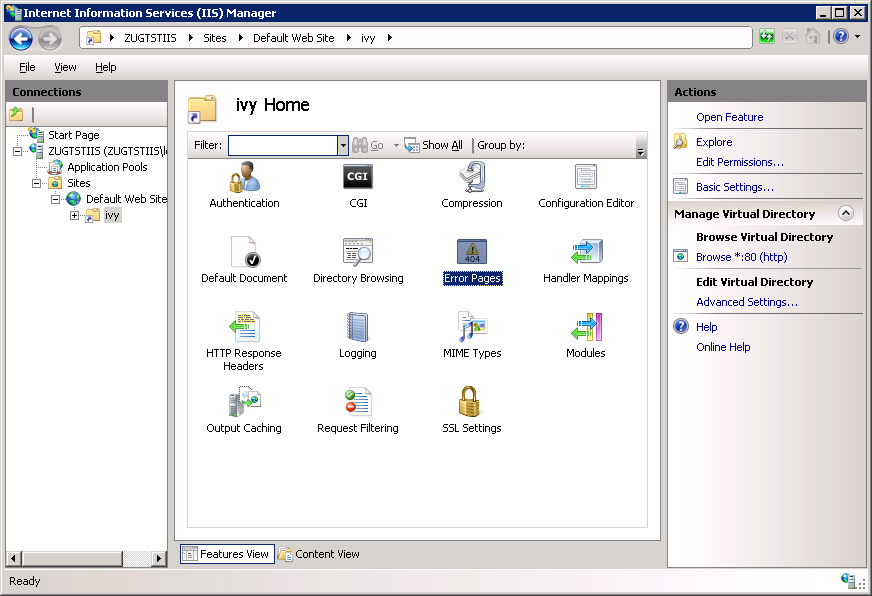
Right click and select the
Edit Feature Settings...or select the same from theActionspane (in the right hand side)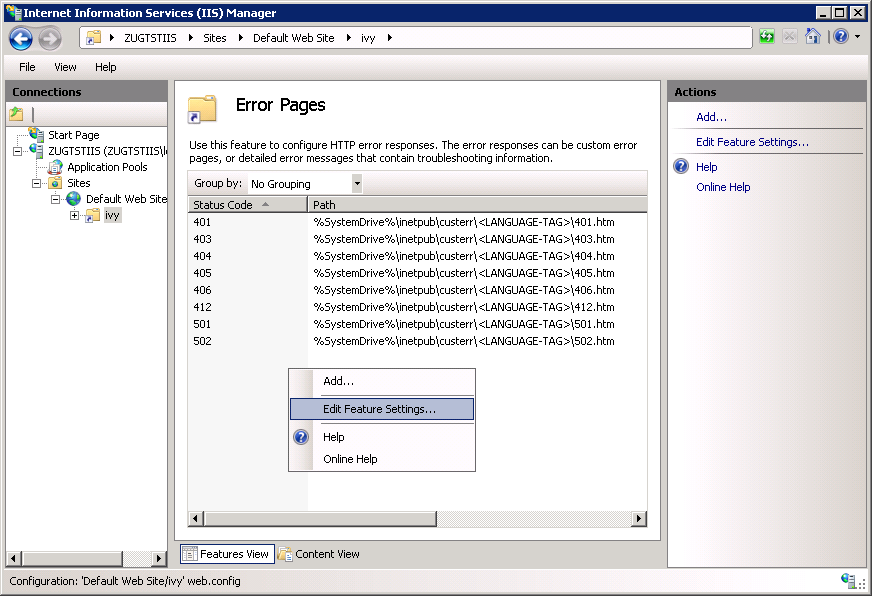
Select the
Detailed errorsradio button and click onOK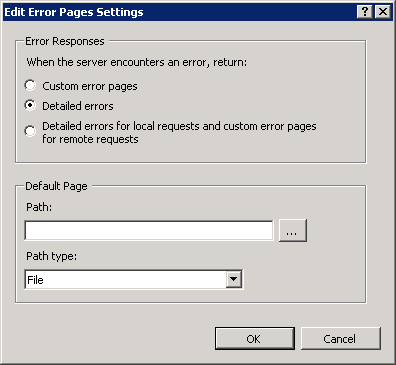
-
Install ISAPI filter
Note
The following command automatically adds the ISAPI Filter:
appcmd.exe set config /section:isapiFilters /+[@start,name='Tomcat',path='<replace this with the path to the integration directory>\isapi_redirect-1.2.42.dll'] Select the Web Site in the
Connectionspane and open theISAPI Filtersentry in theFeature View: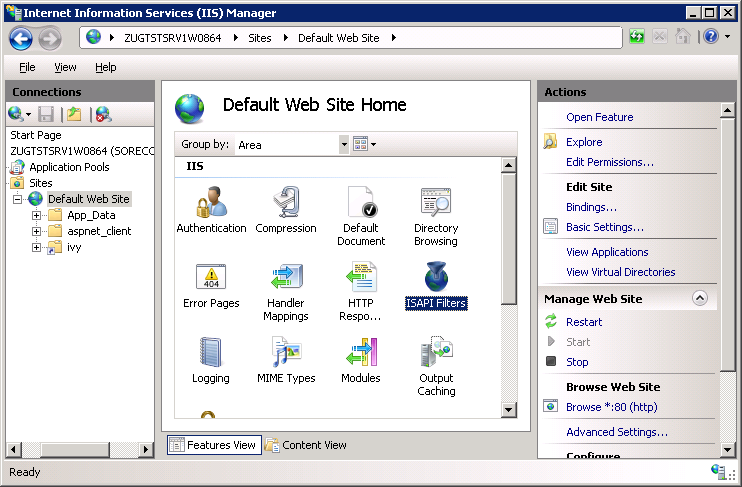
In the
Actionspane select theAdd ...menu: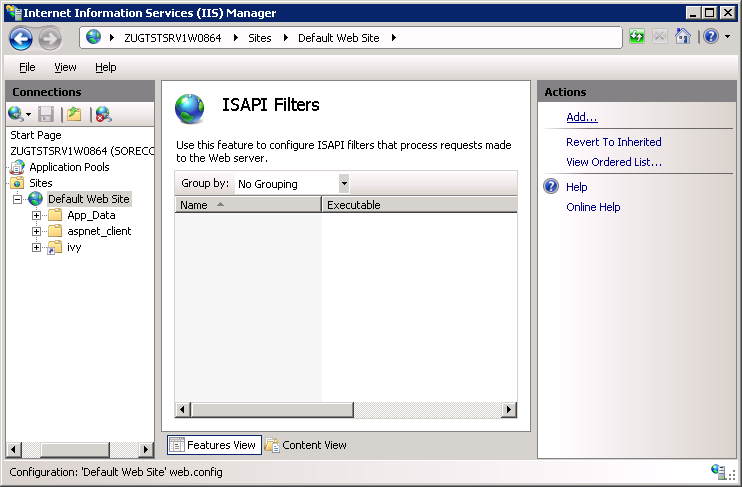
On the
Add ISAPI Filterdialog configure theFilter namewithAxon.ivy Engineand theExecutablewith the path of the isapi_redirect-1.2.42.dll located in the integration directory. ClickOKto add the ISAPI Filter: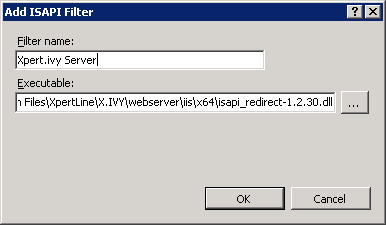
-
Change ISAPI filter restriction
Note
The following command automatically adds the ISAPI Restriction:
appcmd.exe set config /section:isapiCgiRestriction /+[@start,description='Tomcat',path='<replace this with the path to the integration directory>\isapi_redirect-1.2.42.dll',allowed='true'] In the
Connectionspane select the node that represent your machine and open theISAPI and CGI Restrictionsentry in theFeatures View: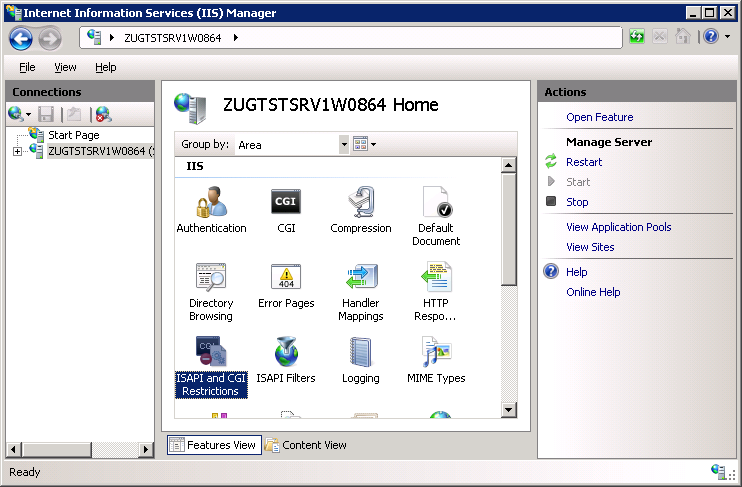
In the
Actionspane select theAdd ...menu:
On the
Add ISAPI or CGI Restrictiondialog configure theISAPI or CGI pathwith the path of the isapi_redirect-1.2.42.dll located in the integration directory. AsDescriptionuseAxon.ivy Engine. Select theAllow extension path to executecheck box. ClickOKto add the ISAPI or CGI Restriction: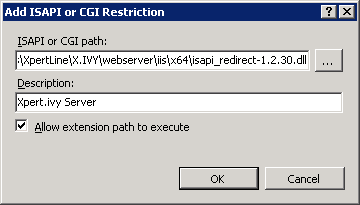
-
If your Microsoft Internet Information Server is not running on the same host as the Axon.ivy Engine or if you have changed the AJP port of the Axon.ivy Engine then open the file worker.properties inside the integration directory in a text editor. Change the following line if you have changed the AJP port to another value than
8009:worker.AxonIvyEngine.port=8009
Change the value
localhostin the following line to the host where your Axon.ivy Engine is running if your Microsoft Internet Information Server is not running on the same host as the Axon.ivy Engine:worker.AxonIvyEngine.host=localhost
-
Update the external base URL in the Admin UI
-
Check if the integration is working by opening a web browser on the address
http://<your host>/ivy/
Note
There is a batch script autoconfig.bat in the folder misc\iis of your engine installation, which installs and configures the IIS automatically on a Windows 2012 Server.
If you are setting up a new IIS Server you can use this script instead of following the instructions below.
-
If your Microsoft Internet Information Server is not running on the same host as the Axon.ivy Engine then copy the integration directory to the host where your IIS is running. All next steps have to be done on the host the IIS is running on.
-
Allow the user groups
Authenticated UsersandIUSRto haveFull controlpermission on the integration directory. -
Install Features
Note
Instead of installing the features manually you can run the following command which ensures that all necessary IIS Features are installed:
PKGMGR.EXE /iu:IIS-WebServerRole;IIS-WebServer;IIS-CommonHttpFeatures;IIS-StaticContent;IIS-DefaultDocument;IIS-DirectoryBrowsing;IIS-HttpErrors;IIS-ApplicationDevelopment;IIS-CGI;IIS-ISAPIExtensions;IIS-ISAPIFilter;IIS-HealthAndDiagnostics;IIS-HttpLogging;IIS-RequestMonitor;IIS-Security;IIS-WindowsAuthentication;IIS-RequestFiltering;IIS-Performance;IIS-HttpCompressionStatic;IIS-WebServerManagementTools;IIS-ManagementScriptingTools;IIS-ManagementService Open the Server Manager (Start > Server Manager). Select the Web Server (IIS). Validate that under the
Role
                            Services
the servicesCGI,ISAPI ExtensionsandISAPI Filtersare installed. If this is not the case select the menuAdd Role Servicesto install the missing services. -
Feature delegation
Note
The following command automatically sets the feature delegation:
powershell -ExecutionPolicy unrestricted -ImportSystemModules Set-WebConfiguration //System.webServer/handlers -metadata overrideMode -value Allow -PSPath IIS:/ Open the Internet Information Services (IIS) Manager (Start > Internet Information Services (IIS) Manager). In the
Connectionspane select the node that represent your machine. In theFeature Viewopen theFeature Delegationentry.Ensure that the
Delegationof theHandler Mappingsare set toRead/Write. Use the menuRead/Writeon theActionspane to change theDelegationto Read/Write. -
Virtual ivy directory
Note
The following commands automatically creates the virtual directory ivy:
set path=%path%;%windir%\system32\inetsrv appcmd.exe add vdir /app.name:"Default Web Site/" /path:/ivy /physicalPath:<replace this with the path to the integration directory> In the
Connectionspane navigate to the Web Site you want integrate the Axon.ivy Engine into. Use the context menuAdd Virtual Directory ...of the Web Site to add a new Virtual Directory. A dialog opens. Configure theAliasof the Virtual Directory withivyand thePhysical pathof the Virtual Directory with the path of the integration directory. ClickOKto close the dialog and create the Virtual Directory: -
Handler Mapping Permissions
Note
The following command automatically sets the feature permission for the ivy virtual directory:
appcmd.exe set config "Default Web Site/ivy" /section:system.webServer/handlers /accessPolicy:Read,Write,Execute Select the new created Virtual Directory
ivyin theConnectionspane and open theHandler Mappingsentry in theFeature View:In the
Actionspane select theEdit Feature Permissions ...menu:On the
Edit Feature Permissiondialog select all three permission and clickOK: -
Configure Error Page
Note
The following command automatically configures that the detailed error page of the Engine is shown:
appcmd.exe set config "Default Web Site/ivy" /section:system.webServer/httpErrors /errorMode:Detailed Tip
See chapter Error Handling for more information about this configuration.
Select the new created Virtual Directory
ivyin theConnectionspane and open theError Pagesentry in theFeature View:Right click and select
Edit Feature Settings...or select the same from theActionspane (in the right hand side)Select the
Detailed errorsradio button and click onOK -
Install ISAPI filter
Note
The following command automatically adds the ISAPI Filter:
appcmd.exe set config /section:isapiFilters /+[@start,name='Tomcat',path='<replace this with the path to the integration directory>\isapi_redirect-1.2.42.dll'] Select the Web Site in the
Connectionspane and open theISAPI Filtersentry in theFeature View:In the
Actionspane select theAdd ...menu:On the
Add ISAPI Filterdialog configure theFilter namewithAxon.ivy Engineand theExecutablewith the path of the isapi_redirect-1.2.42.dll located in the integration directory. ClickOKto add the ISAPI Filter: -
Change ISAPI filter restriction
Note
The following command automatically adds the ISAPI Restriction:
appcmd.exe set config /section:isapiCgiRestriction /+[@start,description='Tomcat',path='<replace this with the path to the integration directory>\isapi_redirect-1.2.42.dll',allowed='true'] In the
Connectionspane select the node that represent your machine and open theISAPI and CGI Restrictionsentry in theFeatures View:In the
Actionspane select theAdd ...menu:On the
Add ISAPI or CGI Restrictiondialog configure theISAPI or CGI pathwith the path of the isapi_redirect-1.2.42.dll located in the integration directory. AsDescriptionuseAxon.ivy Engine. Select theAllow extension path to executecheck box. ClickOKto add the ISAPI or CGI Restriction: -
If your Microsoft Internet Information Server is not running on the same host as the Axon.ivy Engine or if you have changed the AJP port of the Axon.ivy Engine then open the file worker.properties inside the integration directory in a text editor. Change the following line if you have changed the AJP port to another value than
8009:worker.AxonIvyEngine.port=8009
Change the value
localhostin the following line to the host where your Axon.ivy Engine is running if your Microsoft Internet Information Server is not running on the same host as the Axon.ivy Engine:worker.AxonIvyEngine.host=localhost
-
Update the external base URL in the Admin UI
-
Check if the integration is working by opening a web browser on the address
http://<your host>/ivy/
The context URI /ivy/ can be changed inside the Axon.ivy Engine by
changing the system property WebServer.IvyContextName (See chapter System Properties to
learn about how to change a system property). However, if you change the context URI on
the Axon.ivy Engine you also have to change the context URI in the Microsoft IIS
integration. This can be done by changing the last line of the
uriworkermap.properties configuration
file:
/ivy/*=AxonIvyEngine
If you want to have /xpertline/ as the context URI change this line to
the following:
/xpertline/*=AxonIvyEngine
Multiple Axon.ivy Engine instances can be accessed through a single IIS server. This is especially useful if multiple Axon.ivy versions must be accessible during a migration phase. The following explanation shows a solution for the scenario, where a legacy Xpert.ivy 3.9 Server and an Axon.ivy 5.x Engine must be accessible through a single IIS host.
-
Make the newer Axon.ivy Engine accessible through the IIS as if only one engine would be behind the IIS. For detailed instructions follow “Microsoft IIS Integration”.
In our scenario the integration directory from the Axon.ivy 5.x Engine was used to make the engine instance accessible under
http://localhost/ivy. -
The contexts of the Axon.ivy Engines must be unique. By default the context is set to
/ivy/. If different versions of ivy engines are accessed from the same IIS host, it's useful to change the contexts so that it matches the ivy version. For detailed explanation see “Change context URI /ivy/”In our scenario the context URI of the Axon.ivy 5.x Engine was changed to
/ivy5/and the Xpert.ivy 3.9 Server kept his default context/ivy/. -
All Axon.ivy Engines, which are accessed from the same IIS, must listen on a different port for AJP communication. Therefore the AJP port must be changed. For detailed explanation see “Web Server Ports”.
In our scenario the AJP port of the Axon.ivy 5.x Engine was changed to 8010 and the Xpert.ivy 3.9 Server kept his default AJP port 8009.
-
The Axon.ivy Engines must be declared in the worker.properties file of the integration directory. It's important that each worker has a unique name and that they are listed in the
worker.listproperty.In our scenario the worker.properties looks as follows:
worker.XpertIvyServer3x.type=ajp13
worker.XpertIvyServer3x.port=8009
worker.XpertIvyServer3x.host=ivyhostname39

worker.AxonIvyEngine5x.type=ajp13
worker.AxonIvyEngine5x.port=8010
worker.AxonIvyEngine5x.host=ivyhostname50

worker.list=XpertIvyServer3x,AxonIvyEngine5x
-
The contexts of the Axon.ivy Engines must be registered in the uriworkermap.properties file of the integration directory.
In our scenario we make Axon.ivy 5.x available under
http://localhost/ivy5/and Xpert.ivy 3.9 underhttp://localhost/ivy. So the uriworkermap.properties file looks as follows:/ivy/*=XpertIvyServer3x /ivy5/*=AxonIvyEngine5x
Axon.ivy Engine supports single sign on in Windows environments. The following preconditions must be fulfilled for single sign on:
-
The application on the Axon.ivy Engine must use Active Directory Security System
-
The Axon.ivy Engine must be integrated into a Microsoft Internet Information Server (IIS)
To activate the single sign on open the Internet Information Services (IIS)
Manager (Start > Control Panel > Administrative Tools >
Internet Information Services (IIS) Manager). On the left pane
select the context menu Properties on the ivy Virtual
Directory node. A dialog appears. On the tab Directory Security
click on the Edit ... button in section Authentication and
access control. A new dialog appears.
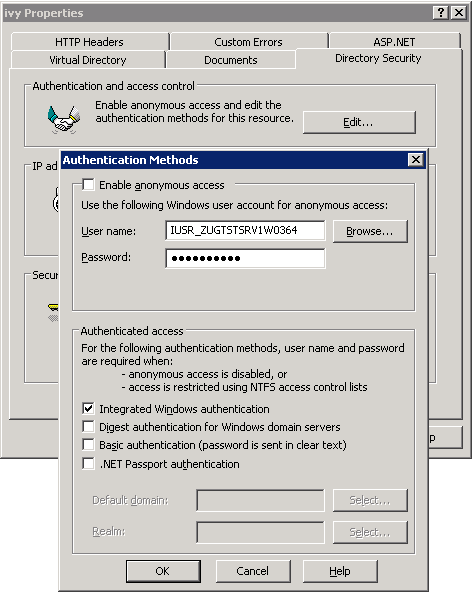
Select the check box Integrated Windows authentication. Make sure
that all other authentication modes such as Enable anonymous access
or Digest authentication for Windows domain servers are disabled,
otherwise IIS will use those authentication modes and Single Sign On will not
work.
Click OK again to close the Properties
dialog.
To use only NTLM as security provider for the whole IIS, change into the InetPub\Adminscripts\ directory and execute following command:
Cscript adsutil.vbs set w3svc/NTAuthenticationProviders "NTLM"
Note
There is a batch script autoconfigSSO.bat in the folder misc\iis of your engine installation. This script automatically sets up SSO on a Windows 2008 Server.
If you are setting up a new IIS Server you can use this script instead of following the instructions below.
-
Install Windows Authentication
Note
The following command automatically installs the Windows Authentication:
PKGMGR.EXE /iu:IIS-WindowsAuthentication Open the Server Manager (Start > Control Panel > Administrative Tools > Server Manager). Navigate to the node Server Manager > Roles > Web Server (IIS) and select it. Validate that under the
Role Servicesthe serviceWindow Authenticationis installed. If this is not the case select the menuAdd Role Servicesto install the missing service.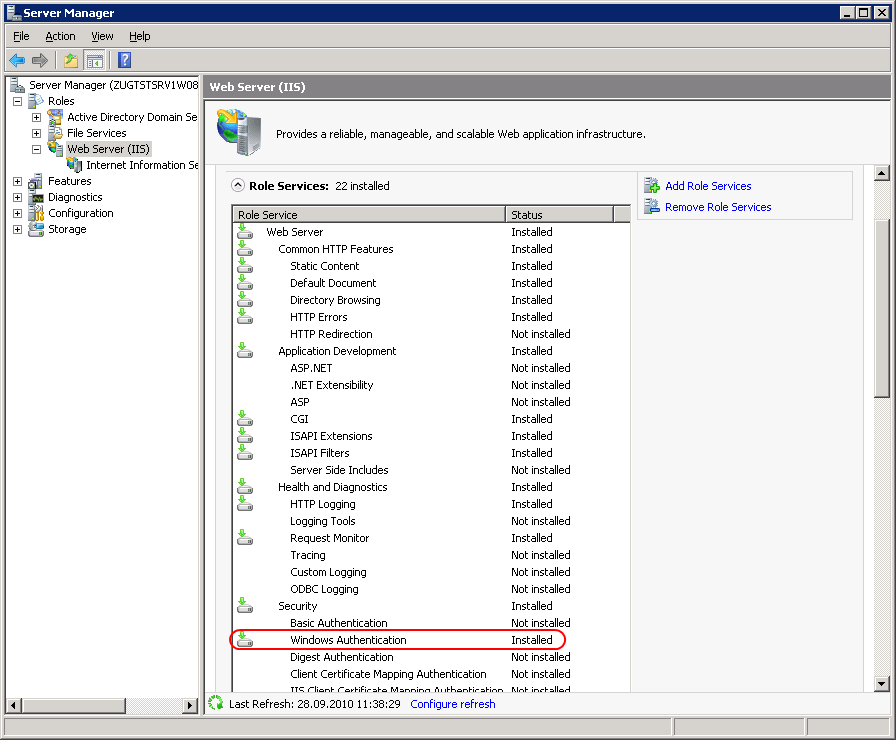
-
Deactivate Anonymous Authentication
Note
The following command automatically deactivates the Anonymous Authentication:
set path=%path%;%windir%\system32\inetsrv appcmd.exe set config "Default Web Site/ivy" -section:system.webServer/security/authentication/anonymousAuthentication /enabled:"False" /commit:apphost Open the Internet Information Services (IIS) Manager (Start > Control Panel > Administrative Tools > Internet Information Services (IIS) Manager). In the
Connectionspane select theivyVirtual Directory node. In theFeature Viewopen theAuthenticationentry. Select theWindows Authenticationand use the menuEnablein theActionspane to enable Windows Authentication.Make sure that all other authentication modes such as
Anonymous AuthenticationorDigest Authenticationare disabled, otherwise IIS will use those authentication modes and Single Sign On will not work.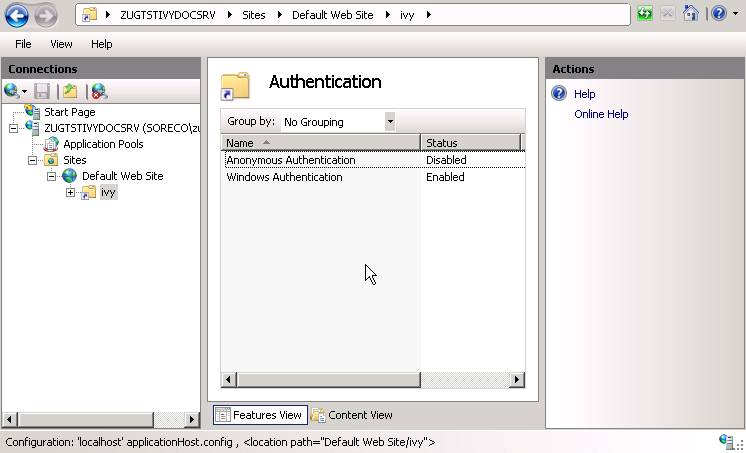
-
Activate Windows Authentication
Note
The following command automatically activates the Windows Authentication:
appcmd.exe set config "Default Web Site/ivy" -section:system.webServer/security/authentication/windowsAuthentication /enabled:"True" /-"providers.[value='Negotiate']" /commit:apphost Remove all providers expect
NTLMfrom Windows Authentication, otherwise Single Sign On may not work with the RIA clients.IIS 7.5 (Windows Server 2008 R2)
Select the
Windows
                            Authentication
and use the menuProviders ...in theActionspane to configure the enabled providers. Remove all providers expectNTLMfrom this list.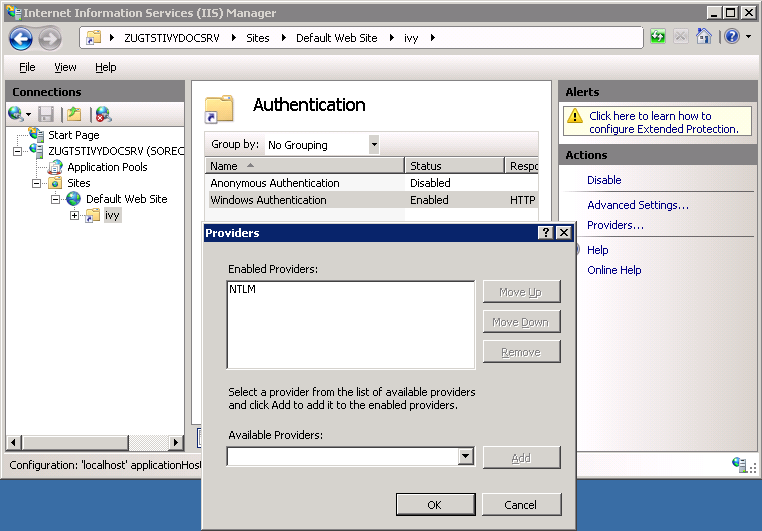
Note
There is a batch script autoconfigSSO.bat in the folder misc\iis of your engine installation. This script automatically sets up SSO on a Windows 2012 Server.
If you are setting up a new IIS Server you can use this script instead of following the instructions below.
-
Install Windows Authentication
Note
The following command automatically installs the Windows Authentication:
PKGMGR.EXE /iu:IIS-WindowsAuthentication Open the Server Manager (Start > Server Manager). Select the Web Server (IIS). Validate that under the
Role Servicesthe serviceWindow Authenticationis installed. If this is not the case select the menuAdd Role Servicesto install the missing service. -
Deactivate Anonymous Authentication
Note
The following command automatically deactivates the Anonymous Authentication:
set path=%path%;%windir%\system32\inetsrv appcmd.exe set config "Default Web Site/ivy" -section:system.webServer/security/authentication/anonymousAuthentication /enabled:"False" /commit:apphost Open the Internet Information Services (IIS) Manager (Start > Internet Information Services (IIS) Manager). In the
Connectionspane select theivyVirtual Directory node. In theFeature Viewopen theAuthenticationentry. Select theWindows Authenticationand use the menuEnablein theActionspane to enable Windows Authentication.Make sure that all other authentication modes such as
Anonymous AuthenticationorDigest Authenticationare disabled, otherwise IIS will use those authentication modes and Single Sign On will not work. -
Activate Windows Authentication
Note
The following command automatically activates the Windows Authentication:
appcmd.exe set config "Default Web Site/ivy" -section:system.webServer/security/authentication/windowsAuthentication /enabled:"True" /-"providers.[value='Negotiate']" /commit:apphost Remove all providers expect
NTLMfrom Windows Authentication, otherwise Single Sign On may not work with the RIA clients.
In the following situations Basic Authentication is required:
-
to use the Axon.ivy Mobile App
-
to provide REST services which require authentication
Note
There is a batch script autoconfigBasicAuth.bat in the folder misc\iis of your engine installation. This script automatically sets up Basic Authentication on a Windows 2012 Server.
If you are setting up a new IIS Server you can use this script instead of following the instructions below.
-
Install Basic Authentication
Note
The following command automatically installs Basic Authentication:
PKGMGR.EXE /iu:IIS-BasicAuthentication Open the Server Manager (Start > Server Manager). Select the Web Server (IIS). Validate that under the
Role Servicesthe serviceBasic Authenticationis installed. If this is not the case select the menuAdd Role Servicesto install the missing service.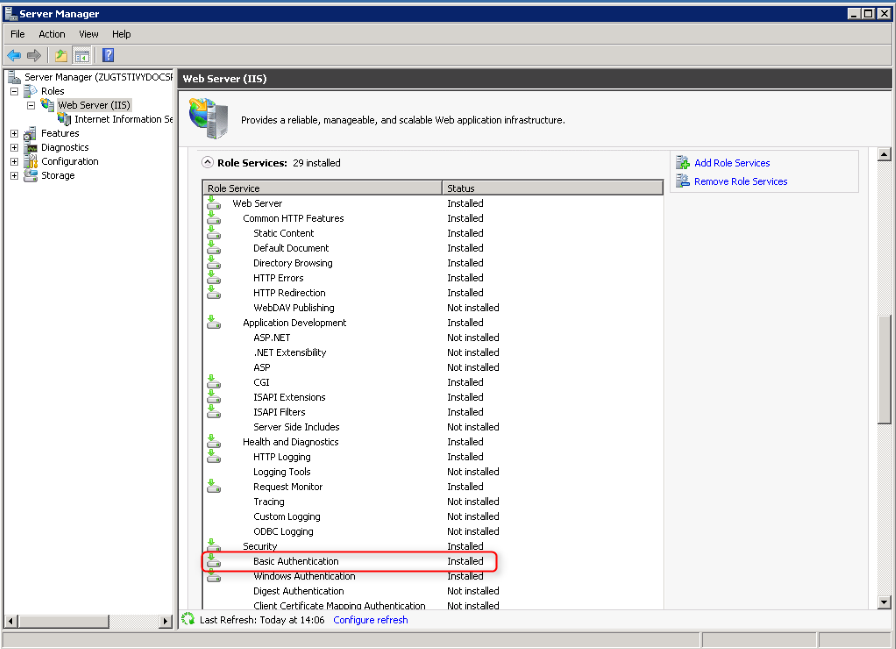
-
Activate Basic Authentication
Note
The following command automatically activates the Basic Authentication:
set path=%path%;%windir%\system32\inetsrv appcmd.exe set config "Default Web Site/ivy" -section:system.webServer/security/authentication/basicAuthentication /enabled:true /commit:apphost Open the Internet Information Services (IIS) Manager (Start > Internet Information Services (IIS) Manager). In the
Connectionspane select theivyVirtual Directory node. In theFeature Viewopen theAuthenticationentry. Select theBasic Authenticationand use the menuEnablein theActionspane to enable Basic Authentication.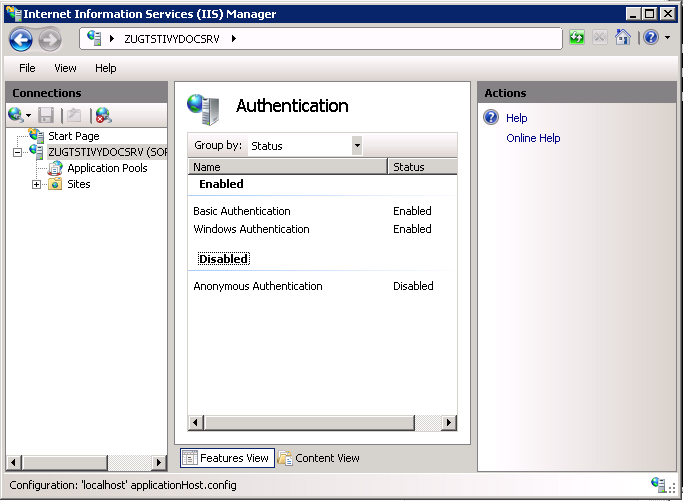
Axon.ivy Engine Enterprise Edition (Cluster) works with sticky sessions. This means that the load balancer must forward all requests from a session to the same cluster node. Of course if a cluster node is no longer available then the request can be sent to another cluster node. Note, that this will cause that the user gets a new session and he loses his current work.
The Tomcat connector can be configured to act as a load balancer for multiple Axon.ivy
Engine Enterprise Edition nodes. The load balancer and the cluster nodes can be
configured in the workers.properties file that is located in the
integration directory. An
example load balancer configuration can be found in the file
cluster_loadbancer_workers.properties. In this file one worker
is configured called AxonIvyEngine that is a load balance worker (type=lb).
The property balance_workers of the AxonIvyEngine worker defines the
workers between which the load balance worker will balance the load. Here one worker per
each Axon.ivy Engine Node should be configured. In the example file three workers are
configured AxonIvyEngineNode1, AxonIvyEngineNode2 and
AxonIvyEngineNode3.
The node workers are similar to a normal standalone worker. You can use the attributes
hostname and port as explained above. Additionally they
have two extra attributes called lbfactor and route. With the
lbfactor attribute you can influence how the load balancer distributes
the load to the workers. The higher the lbfactor of a worker relative to
the other workers is the more load the worker gets.
The route attribute is necessary for realizing sticky sessions. An
Axon.ivy Engine Enterprise Edition will only work correctly, if the load balancer sends all
request of the same http session to the same node (sticky sessions). To support this
requirement, each Axon.ivy Engine Enterprise Edition node will add a special identifier
called jvm route to the http session identifier.
The jvm route identifier is calculated from the host
name and the Local Cluster Node
Identifier. The route attribute configured on a node worker must
be equal with the jvm route of the node:
worker.AxonIvyEngineNode1.route=<JVM route identifier of Node
            1>
worker.AxonIvyEngineNode2.route=<JVM route identifier of Node
            2>
The JVM route identifier of a cluster node can be found on the cluster node detail page for an Axon.ivy Cluster Node. This information can be retrieved as follows:
-
Using a web browser, navigate to the main page (
http://<host>:<port>/ivy) of an Axon.ivy Engine installation. -
Select the Cluster link in the page header.
-
In the appearing list of cluster nodes press the name of a cluster node to see it's details.

More technical details about load balancing and sticky sessions can be found on the Apache Tomcat web site.
Let's assume that we have an Axon.ivy Engine Enterprise Edition with two Cluster
Nodes. Node 1 is installed on host ivynode1 and the AJP port is
configured to 8009. Node 2 is installed on host ivynode2 and the AJP
port is configured to 8010. ivynode1 is a new machine with a lot of
power. ivynode2 is an old machine and we want that
ivynode1 is working twice as hard as ivynode2. The jvm
route of the nodes are ivynode1.soreco.ch and
ivynode2.soreco.ch.
The workers.properties file must then look like this:
worker.list=XIvy

# Load Balanced Cluster Worker
worker.AxonIvyEngine.type=lb
worker.AxonIvyEngine.balance_workers=AxonIvyEngineNode1,AxonIvyEngineNode2

# 1st Axon.ivy Engine Cluster Node
worker.AxonIvyEngineNode1.type=ajp13
worker.AxonIvyEngineNode1.port=8009
worker.AxonIvyEngineNode1.host=ivynode1
worker.AxonIvyEngineNode1.route=ivynode1.soreco.ch
worker.AxonIvyEngineNode1.lbfactor=2

# 2nd Axon.ivy Engine Cluster Node
worker.AxonIvyEngineNode2.type=ajp13
worker.AxonIvyEngineNode2.port=8010
worker.AxonIvyEngineNode2.host=ivynode2
worker.AxonIvyEngineNode2.route=ivynode2.soreco.ch
worker.AxonIvyEngineNode2.lbfactor=1
As described above the load balancer must ensure that all requests from the same
user session is forwarded to the same cluster node. This can be done by configuring
the load balancer so that all requests sent by one client IP address is always
forwarded to the same cluster node (IP based stickiness). Another possible
configuration is to use the Axon.ivy Session Id to provide session stickiness. The
session id is provided by Axon.ivy Engine Enterprise Edition with two different methods.
Either as HTTP session cookie with the name JSESSIONID or at the end of request URLs
as ;jsessionid= parameter. The load balancer must be able to read the
session id with both methods otherwise RIA clients will not work correctly.
Warning
Some load balancer provide session stickiness using their own HTTP session cookie. If you use this method then RIA clients will fail to start.
A web application firewall (WAF) or web shield is a firewall which protects web applications against attacks over the HTTP protocol. Combined with an Identity and Access Management (IAM) System it also protects against unauthorized access and supports single sign on (SSO).
Most WAF or IAM systems allow to configure a way how the user name of the identified user is transmitted to the web applications. With Axon.ivy Engine a typical system landscape will look like this:
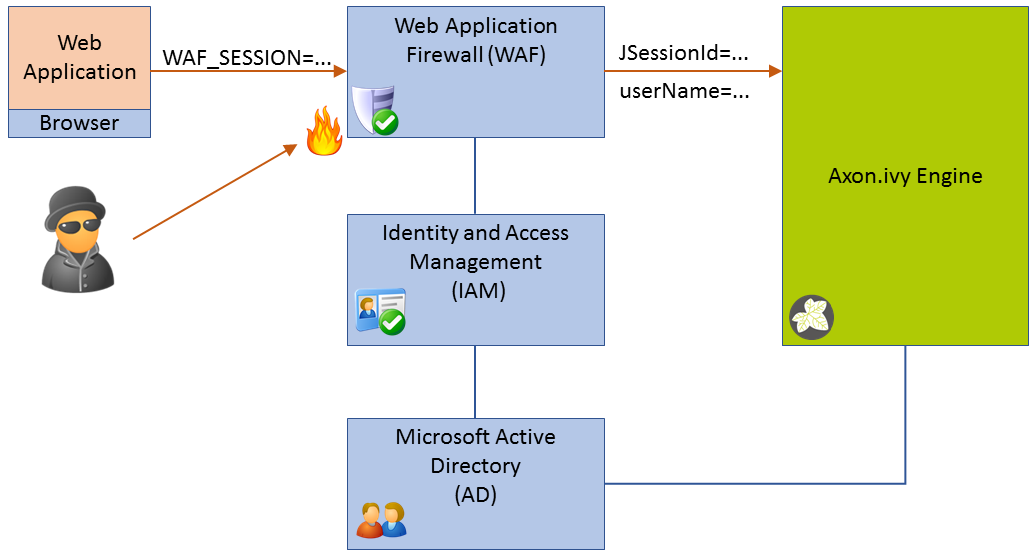
Figure 5.3. Single Sign On Infrastructure using a Web Application Firewall, Identity and Access Management and Active Directory
The only available access point must be the WAF. Any traffic has to be routed
over it. The WAF tries to protect the web application behind it (e.g. Axon.ivy Engine)
from attacks. The WAF uses the IAM to identify users and to protect certain resources
from unauthorized access. The IAM itself may use a directory server like Microsoft
Active Directory to know users. The WAF can be configured to provide the name of the
identified user either as HTTP header or HTTP cookie to the web application (Axon.ivy
Engine).
On the other side Axon.ivy Engine provides a Valve that reads the user name from a HTTP header. If Axon.ivy Engine knows the user it automatically authenticates the user to the current Axon.ivy Engine session. This works best if Axon.ivy Engine also uses a directory server like Microsoft Active Directory to synchronize users. The Valve that reads the user name from a HTTP header is disabled by default. To enable it, open the file webapps/ivy/META-INF/context.xml from the Axon.ivy Engine installation directory and uncomment the following line:
<Valve className="ch.ivyteam.ivy.webserver.security.SingleSignOnValve" userNameHeader="user"/>
The attribute userNameHeader can be used to configure the HTTP header
that should be read.
Warning
If you activate this Valve you must ensure that the Axon.ivy Engine cannot be accessed directly. All traffic must be routed over the WAF. Otherwise, an attacker could simple send a valid user name as header in a HTTP request and immediately has access bypassing the authentication!
Instead of sending the plain user name in a HTTP header there are multiple other ways and technologies (SAML token, Kerberos, etc.) how the WAF can transmit the current user identity to the web applications. You can support this cases by registering your own Valve in the context.xml file. Your value reads the current user identity from the request and puts a user principal object with the user name to it. Axon.ivy Engine will check if a user principal is set on a request and automatically searches the user and authenticates it. The code of your valve can look like this:
  @Override
  public void invoke(Request request, Response response) throws IOException, ServletException
  {
    String userName = getUserNameFromRequest(request);
    if (StringUtils.isBlank(userName))
    {
      getNext().invoke(request, response);
      return;
    }
    Principal userPrincipal = createUserPrincipalWith(userName);
    request.setUserPrincipal(userPrincipal);
    getNext().invoke(request, response);
  }
The method getUserNameFromRequest depends on the technology the WAF sends the user identity.