Configuration
This chapter explains the configuration concept of Axon.ivy and describes the configuration editor and the various configuration types.
Axon.ivy allows for individual configuration of many of it's features, specifically for the following:
- Environments
-
Define environments for your project
- Global Variables
-
Define global variables for your project and assign environment values for global variables.
- Widget Styles
-
Define logical GUI styles for all available Rich Dialog widgets and containers.
- Output Format
-
Define output formats for various data types.
- Input Validation
-
Define validation policies for user input.
The specifics of the above described configuration types are explained in more detail in a separate section.
A configuration is always associated with a type (the type of object that it configures) and with an unique name. When applying a configuration to an object, only the name of the configuration must be given, because the type is defined by the object being configured.
By consistently defining and using the logically named configurations instead of setting properties individually on each configurable object you can later easily change or redefine the looks and behavior of the application in a single place.
All configurations can be created, edited and deleted using the Configuration Editor.
Tip
In Axon.ivy, each project has it's own configuration database.
Lookup of any configurations is performed by an (type, configuration name) request. If the look-up of such a configuration fails for the current project then the configuration databases of the required projects are searched with the same query recursively. With this mechanism, configurations can effectively be shared among projects.
Since the current project is always asked first for a specific configuration, you can easily overwrite configurations that come from a required project, simply by re-defining them locally (on the same type with the same name).
Warning
When creating a new project with the New Project Wizard you will be asked if default configuration content should be created for the new project. You should always disable this option if you're creating a project that will be dependent on other projects. If you don't disable it then all of the default configurations that are defined in the base project will be redefined automatically in the new project (and thereby shadow the inherited configurations), which may lead to unexpected behavior of the application.
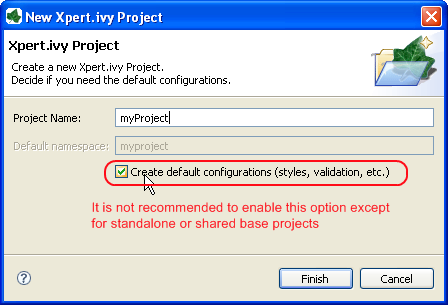
If you unintentionally forgot to disable the option in the wizard you can still manually delete all configurations that have been created in the content database using the Configuration Editor at a later point of time.
The configuration editor is used to add/edit/delete configurations in the hierarchically organized configuration database of a project.
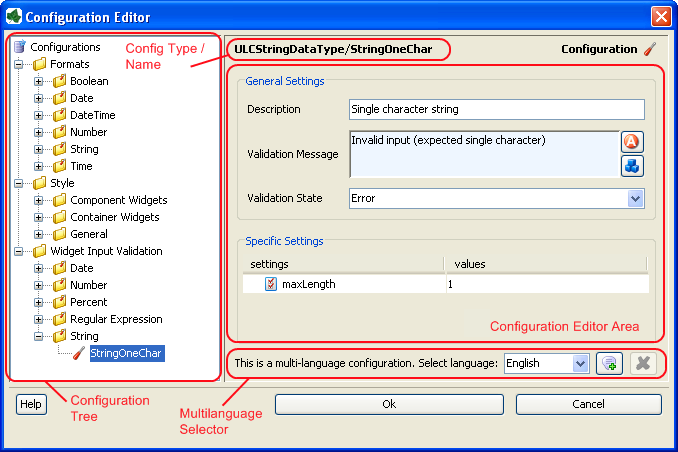
The configuration editor consists of different parts that are described separately below:
-
Configuration Tree
-
Configuration Editor Area (with header showing Type/Name of currently selected configuration)
-
Multi-Language Selector (not for all configuration types) This part is only visible if you have enabled the multi-language feature in the Axon.ivy preferences. Axon.ivy preferences > Configuration > Show Multi language Configurations
Generally, configurations are selected from the tree on the left hand side of the editor and edited in the details area on the right hand side. Modification of the configuration tree is performed with various actions that are available from the tree's context menu.

The configuration tree shows the currently defined configurations inside a
hierarchically organized tree. Configurations ( ) are associated with a configuration class or
configuration type (
) are associated with a configuration class or
configuration type ( ) which in turn are logically grouped in a hierarchical folder
structure (
) which in turn are logically grouped in a hierarchical folder
structure ( ).
).
Only configuration nodes can be edited in the tree, the structure of the configuration database (i.e. the folders and types) is given by the system and cannot be changed.
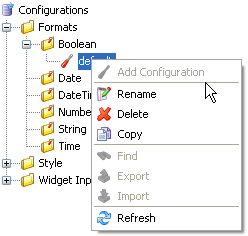
The following operations are available from the context menu of the various configuration tree nodes:
 Add configuration
-
Adds a new configuration below the selected configuration class node.
 Rename
-
Renames the currently selected configuration.
Warning
Renaming of a configuration does not update the objects that currently use the configuration with the old name. I.e. objects or scripts that used the old configuration name may not produce the expected outcome anymore, because the specified configuration does no longer exist. Typically this leads to the fallback of using the default configuration of the respective configuration class.
 Delete
-
Deletes the currently selected configuration node.
Warning
Deleting configurations may lead to the same effects as renaming them. See warning above for a description of the possible consequences.
 Copy
Copy-
Copies the selected configuration into a new configuration with a name prompted from the user.
Note
Please note that you don't have to paste the new configuration, it will be pasted automatically next to the selected source configuration, because a configuration is always associated with exactly one configuration class. It is not possible to copy a configuration of type A to a type B.
 Refresh
-
Refreshes the configurations below the selected node.
The editor area shows a different editor depending on the configuration type (also called configuration class) of the currently selected configuration. The individual editors are described in the configuration types section.
The title bar of the editor area shows the type (i.e. the configuration class) and the name of the currently selected configuration as <ConfigClassName>/<ConfigurationName>.
Enable the multi selection configuration by setting the flag in the Axon.ivy preferences.

Some configurations can be defined in multiple languages because they contain language specific settings. The validation configurations may have to validate input differently if it is entered in another language.
Tip
Use CMS references for the error message property in order to support multiple languages.
The language selector is shown only for configurations that support multiple language values per configuration. Use it to select the language of the configuration that you want to edit.
Features:
 Add new language value
-
Adds a value in a new language to the currently selected configuration. The contents of the last shown value are copied as initial content to the new configuration value.
 Delete language value
-
Clicking on this button removes the currently shown value from the set of values for this configuration. Only works if more than one language value are defined.
Renderer Configurations are used for specific Content Object when they are rendered, the result then is displayed on the client browser.
The Smart Table Configuration editor is part of the Configuration Management. See Configuration Editor for more information. A Smart Table Configuration can be added by using the add configuration function. The name is used in the Smart Table Content Object Editor for choosing a specific Configuration.
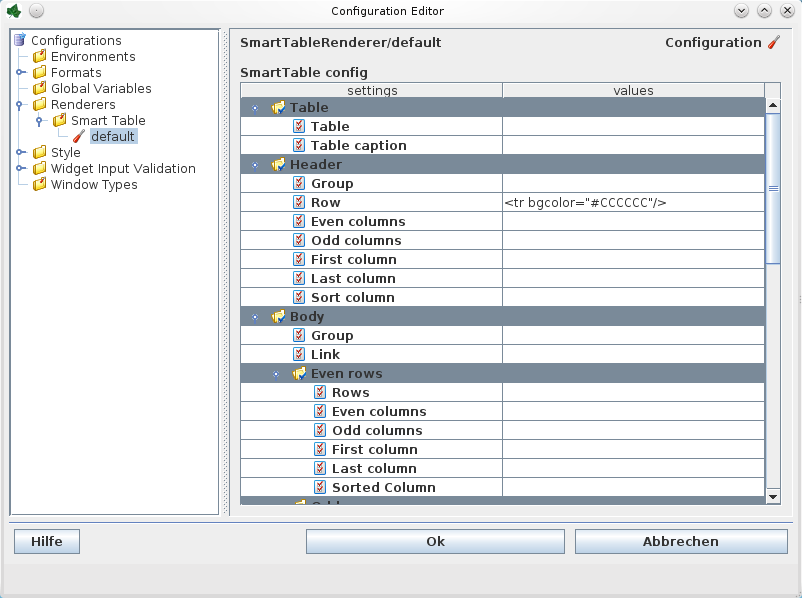
- Table Settings
-
The HTML attributes settings for the table and the caption HTML elements.
- Header Settings
-
The HTML attributes settings for the table header group (thead element), the header row (tr element) and the header cells (th elements).
- Body Settings
-
The HTML attributes settings for the table header group (thead element), the header row (tr element) and the header cells (th elements).
- Footer Settings
-
The HTML attributes settings for the table body group (tbody element), the body rows (tr elements) and the body cells (td elements). Here it is possible to define different configuration for the rows and cells depending if they are displayed on an even or odd row position. The cells can also be different if they are in a even or odd column, in the first or last column or if they are in the column which is actually sorted. The first and last column settings does override the even or odd columns settings and the sorted column setting does override all other settings.
- Sort Settings
-
Enter the text which is displayed in the header if a column is sortable. Then Ascending and Descending values are shown. When a column actually is sorted then the Sorted ascending or Sorted descending values are shown.
- Page Selector Settings
-
Enter the format of the page selector, where it is shown (default: bottom) and the values displayed for the first, previous, next and last page to show. For the format there are the following possibilities:
Symbol Description {|<} Link to jump to the first page is shown with the value configured with the setting "First page". {<} Link to jump to the previous page is shown with the value configured with the setting "Previous page". {123} Links to jump to every page is shown with the page number. {>} Link to jump to the next page is shown with the value configured with the setting "Next page". {>|} Link to jump to the last page is shown with the value configured with the setting "Last page". {n} The number of the actual page is displayed. {m} The number of the total amount of pages is displayed. {x} The number of the first showed row is displayed. {y} The number of the last showed row is displayed. {z} The number of the total rows in the table source is displayed. Table 8.1. Format Symbols
The configuration database of a project contains configurations for various configurable targets (e.g. widgets, date or time values, input text fields, etc).
The user can define configurations for the following three aspects of an application: formats, styles and validation. Each of those aspects encompasses a number of configurable types (e.g. date or time or number) for each of which an arbitrary number of named configurations can be defined, which can then be referred from different locations in the configuration.
This section briefly discusses the different configuration types and explains the usage of their respective configuration editors.
Format configurations define how values of a specific type will be rendered when output to the user. Formats can be defined for all the base types of IvyScript, i.e. Boolean, Date, DateTime, Time, Number, and String. All non-null values of those types may be output as formatted strings by calling the format("<format name>") within any script.
Examples:
panel.label.text = in.selectedDate.format("long");
out.invoice.customerNumber = wsData.customer.format("customer_id");
The format configuration editor allows to specify various ways of formatting for the different IvyScript base type values. The formatting options (described below) vary from type to type; not all options are available on all types.
Tip
Format configurations are always language dependent. Just watch the Preview editor area after each selection or option that you enable for an understanding what the effects are for each language.
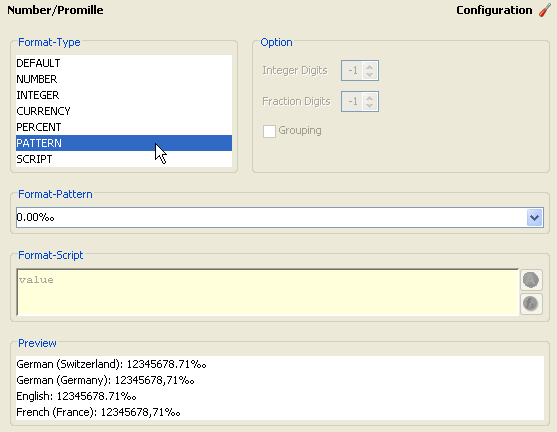
- Format Type
-
Select a predefined kind of formatting. The selected format kind may be further specified in the editor areas Option, Format Pattern and Format Script (depending on which kind that was selected).
- Option
-
This editor area is only available for some of the Number format kinds. The number of digits for the integer and/or fraction part may be selected (-1 stands for as many as needed). If you select grouping then a group character will be inserted to group the integer digits of the formatted number.
- Format Pattern
-
This group is only available if you have selected the PATTERN format from the Format Type list.
If Pattern is selected as format then this combo box allows for a selection from a number of predefined patterns. Use Script if you'd like to specify an own pattern format.
- Format Script
-
This group is only available if you have selected the SCRIPT format from the Format Type list.
Specify your own format with a script. The value variable will contain the value to be formatted. If you want to specify different patterns for different languages you should use the language selector to create multiple configurations for various languages.
- Preview
-
Shows an instant preview of the configured formatting applied to a default value.
Style configurations define the appearance of widgets when rendered as part of an user interface. Styles can be defined for each widget and container type separately, e.g. for Label, TextField or BorderLayoutPane. You can also specify general Styles that can be used for all container and widget types.
The Look up for the right settings to apply to a specific widget takes place in a provided order. The first match wins. Each of the following six pints will be evaluated respective to the project dependency:
-
Local Style set via the Widget Configuration.
-
Widget style (e.g. for a
RLabel) set by a reference in the Widget Configuration. -
The style with the same reference as for point (2) of the
RWidgettype. -
Default style of the specific widget (e.g.
RLabel). -
Default style of the
RWidgettype. -
Styles set in the Properties view or in the Java source code.
Note
The dependent projects are browsed by a breadth first algorithm.
The style configuration editor allows to specify style properties for each widget or container type. Not all widget types have the same properties that may be specified.
Note
The layout style properties are layout dependent. They may not have an effect, if the widget is added to a different layout than the property is intended for (mostly GridBagLayout). For example, the property weightX will not have any effect if the widget is added to a BorderLayoutPane.
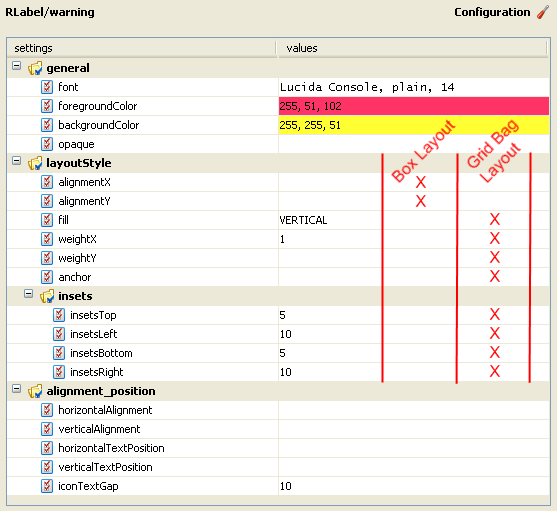
- General
-
Define general properties such as the font, the foreground color and the background color. Setting of the background color may not have an effect, if the widget or container do not have opaque to true (this is look-and-feel dependent).
Warning
The Look&Feel may override your settings. Specially the Background is usually overridden by the Look&Feel.
- Layout Style
-
Settings to be used when the configured component type is placed within a specific layout.
- Insets
-
Insets (i.e. inner padding) that should be applied to the component. Padding will be applied within the specified size (i.e. the actual size of a component is given by it's specified size minus the inset values).
- Margin
-
Margin (i.e. outer padding) that should be applied to the component. The specified margin will effectively be added to the specified size of a component.
- Alignment Position
-
Arrangement definition for components that have a text label and an optional icon.
- Size
-
Define the maximum, minimum and preferred size of a component. The specified values will be taken into account by the layout manager of the container where the component is added.
Validation configurations can be specified for the following types of input data:
Date, DateTime, Time,
Number, Percent and Regular
Expression. The validation type Regular
Expression(formal String) can be used
to validate any kind of data. The result of a validation is always either
true (valid) or false (invalid).
Each validation configuration contains of a set of general settings and a set of specific settings that are dependent on the selected type of validation.
The validation configuration editor allows you to specify various kinds of input validation that can be applied to user text input.
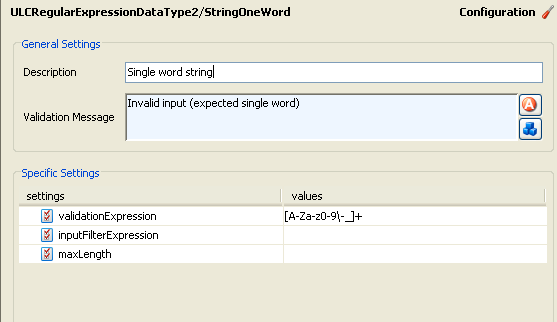
- Description
-
A short verbose description of the validation. This text will be shown in the widget configuration to help selecting the correct validation.
- Validation Message
-
Enter the message that will be displayed to the user on a tool tip, if the entered input is not valid. Use CMS (Content Management System) references here, in order to support multi language messages.
Specific setting vary between the different validation types The list below describes all available settings.
| Format | Defines the format on how the value will be presented to the user on the UI. Select a format out of your format configurations. |
Table 8.2. Date Validation Type
| Format | Defines the format on how the value will be presented to the user on the UI. Select a format out of your format configurations. |
Table 8.3. DateTime Validation Type
| Format | Defines the format on how the value will be presented to the user on the UI. Select a format out of your format configurations. |
Table 8.4. Time Validation Type
| Format | Defines the format on how the value will be presented to the user on the UI. Select a format out of your format configurations. |
| Max | Maximally permitted number value. |
| Min | Minimally required number value. |
Table 8.5. Number Validation Type
| Format | Defines the format on how the value will be presented to the user on the UI. Select a format out of your format configurations. |
Table 8.6. Percent Validation Type
| Validation Expression | A regular expression that the entered input must match. This expression is not evaluated until the field loses focus. |
| Input Filter Expression | A regular expression that the input must conform to in order to be set on the widget. Default value is '.*' |
| Max Length | Maximum length of the input text. |
Table 8.7. Regular Expression (String) Validation Type
The validation framework enables a Rich Dialog developer to implement the needs for GUI widgets that give feedback to the user about its entries in the GUI widgets. E.g. it draws a red background into a RTextField if the entered value does not conform to a date if a date is expected.
- Background Coloring
-
The background of the supported widgets can be colored do to its validation or mandatory state.
- Tool tip
-
The tool tip of the supported widgets is decorated do to its validation and mandatory state.
- Server Side Validation
-
Its possible to set a error on a supported widget from the server side.
- Supplied Widgets
-
The framework supplies two widgets that are not on the palette:
RErrorHeaderandRErrorView.
| Widget | Mandatory State | Validation Types |
|---|---|---|
| RTextField | yes | all |
| RComboBox | yes | no |
| RTextArea | yes | no |
| RLookupTextField | yes | no |
| RButtonGroup | yes | no |
| RCheckBox | yes | no |
| all RContainers | inherited | inherited |
Table 8.8. Supported Widgets of the Validation Framework
| Widget | Description |
|---|---|
| RErrorHeader |
A Important properties: |
| RErrorView | A widget that shows the errors of the observed container in a list. The list will be updated on each client-server round trip. |
Table 8.9. Supplied Widgets by Validation Framework (not on the palette)
- General framework configurations
-
Edit the file %AXON_IVY_INSTALL%/configuration/validationconfig.any in order to configure the framework for your needs. The configuration file lets you configure the following properties:
- mandatory-error-message
-
The message that will be displayed on the tool tip to the user if the mandatory field has no user changes.
- mandatory-background-color
-
Color of the background if the field has no user changes.
- error-background-color
-
Color of the background if the field has erroneous user changes.
- background-feedback
-
Set this flag to true if the background feedback should be enabled.
- show-highlight-color-when-disabled
-
Set this flag to true if the background feedback should be enabled even if the widget is disabled.
Tip
The configuration file validationconfig.any changes the validation behaviour for the whole designer/engine not only for selected project(s). This setting will not be uploaded automatically but has to be set up manually on the Engine just like on the Designer.
The API of the Validation Framework is very slim. It consist mainly of a
IValidator object per supported widget. To
access this IValidator object you can call the method
ivy.rd.getValidator(widget). Some widgets offer special properties to
get validated values (e.g. valueAsNumber on RTextField if validated for
number). In case the entered value is not accepted by the actual validation, then a so
called INVALID value of the specific IvyScript type is returned by the
widget (e.g. Date.INVALID from RDatePicker's valueAsDate
property).
All RContainers implements the IEnabler interface, that enables those
widgets to act as enabler for other widgets (E.g. a submit button).
The IValidator object returns IvyErrorObjects if you ask for
pending errors on a IValidator.
| IValidator |
|---|
|
hasErrors() getErrors() : List<IvyErrorObject> getError() : IvyErrorObject showErrorMessage(String errorMessage, Serializable illegalValue) addPropertyChangeListener(PropertyChangeListener listener) removePropertyChangeListener(PropertyChangeListener listener) |
Table 8.10. ch.ivyteam.ivy.richdialog.server.validation.IValidator
| IValidator |
|---|
|
getMessage() : String getParameter() : Object[] getError() : IvyErrorObject getIllegalValue() : Object |
Table 8.11. ch.ivyteam.ivy.richdialog.shared.IvyErrorObject
Tip
Server side validation cannot be used alone, it must be combined with a client side validation!
This section briefly discusses the usage of environments in your projects .Developers should have the possibility to configure multiple environments (pointing to an infrastructure) and decide at deployment, runtime and/or design time which environment should be used for the application. Here are some examples where environments can be used
-
Companies provide different environments for their software products, like Development, Test and Productive. Each environment has its own infrastructure including databases, web services and other connections used by the project.
-
Multi Client Capability. When the user logged into the system he can choose the client (German: Mandant) (e.g. Company 1, Company 2, etc.) and works with the data of the selected company. In the background the right databases connections, web services and other services for the selected environment will be used.
Actual projects use the CMS functionality to manage global Constants and set these constants every time on the engine when a new version of the project will be deployed. Another solution for this problem is the usage of property files which will be loaded by the application. If you use environments, the user only change the environment and all configuration settings of the environment will be used (e.g. database, web service, etc.) once. The system switch the settings in the background.
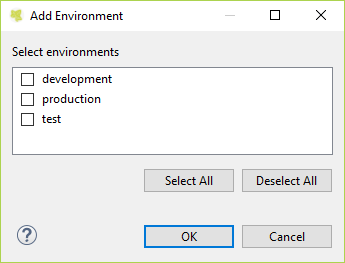
The environment editor is part of the Configuration Management. The basic handling of the configuration editor will be described here. By using the add configuration function a new environment will be added. The name of the environment is the name of the configuration.
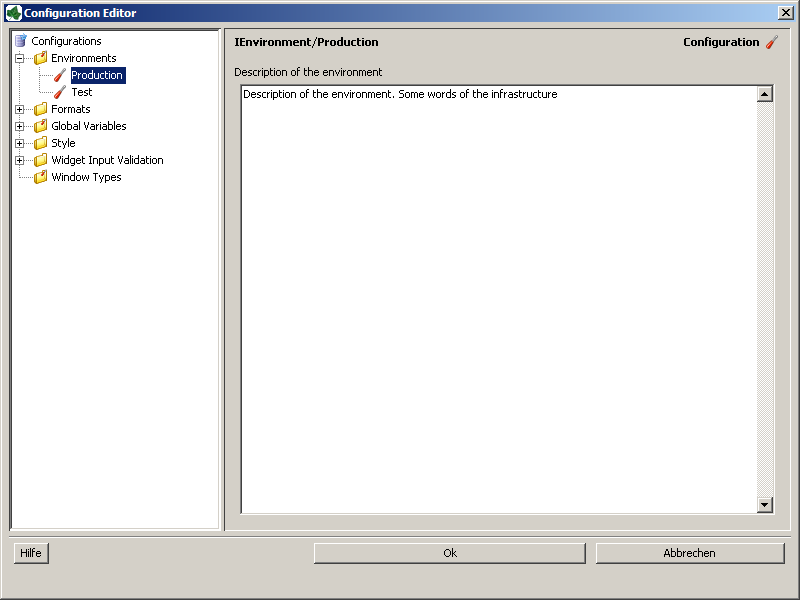
Description of the environment
Provide a description of the environment. The description can also be used to describe some server IPs, specifics of the infrastructure and other interesting stuff.
Note
Remove Environments If environment configurations are removed all environment values for global variables, databases and web services will also be removed. If you environments removed from projects included in the Library the values will also be removed in your project.
Warning
Rename Environments If environment configurations are renamed all configurations for global variables, databases and web services will NOT be replaced by the new name. This will be supported in a future version.
After the environment is created you can now assign environment values for different project objects. The environment settings for the project objects are done in their associated editors. Environment setting can be done for:
- Global Variables
-
Assign environment values to global variables
- Databases
-
Add environment connection properties to databases
- Web Services
-
Add environment connection properties to web services
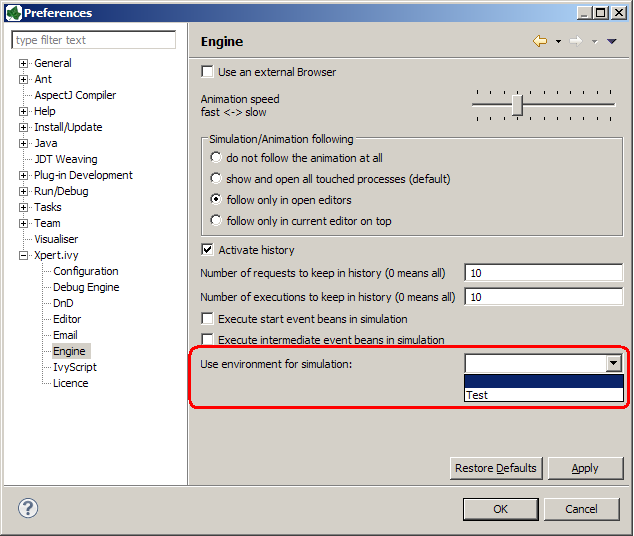
It is possible to change the environment for the Simulation by setting the Environment in the Preferences.
It is possible to change the environment at runtime on Case, Session and Application Level. This is an essential feature in order to fulfill the requirements of an multi-client capability application.
| Scope | How to set in IvyScript |
|---|---|
| Case Scope |
ivy.case.setActiveEnvironment(String name)
|
| Session Scope |
ivy.session.setActiveEnvironment(String name)
|
| Application Scope |
ivy.wf.getApplication().setActiveEnvironment(String name)
|
Note
The setActiveEnvironment(String name) methods throw a runtime exception if no
environment with the given name exist.
Important
How does the system check which environment is active?
The environment determination is a follows:
-
Environment that is set on the current case.
-
Environment that is set on the current session.
-
Environment that is set on the current application.
-
Default environment
Global Variables acts as global constants which can be used in your application. Global Variables are simple Key/Value pairs which can be specified by the developer. Some examples for global variables are:
-
Company data (name, address, contacts)
-
Simple Rule Values (e.g. credit account)
-
Path values for saving files
-
Path values for 3rd party systems and some other variables
The global variable editor is part of the Configuration Management. See Configuration Editor for more information. A global variable can be added by using the add configuration function. The name of the global variable is the name of the configuration.
Default value
Provide a default value of the global variable. This can be a Number or a String. This value will be used if you access the global variable in the application.
Description
Provide a description of the global variable.
Environment settings
In this section the default value of the global variable can be overridden/new assigned for the specific Environment.
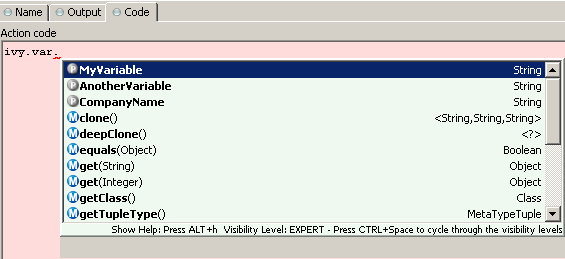
In order the access the Global Variables in your code a new environment variable var was introduced in IvyScript which provides a comfortable access to your defined variables. This approach has the advantage that, if global variables are removed developers will immediately informed in which process element the variable was used.
This chapter deals with the database configuration. To use databases in your business or User Dialog processes you need to define some database configurations first. After you have configured the databases (data sources) you can use them in your process steps. The process steps references only the database configuration ids. So you can use different database configuration settings on your productive server.
The Axon.ivy database configuration editor lets you configure the databases you use in your project and the extending projects.
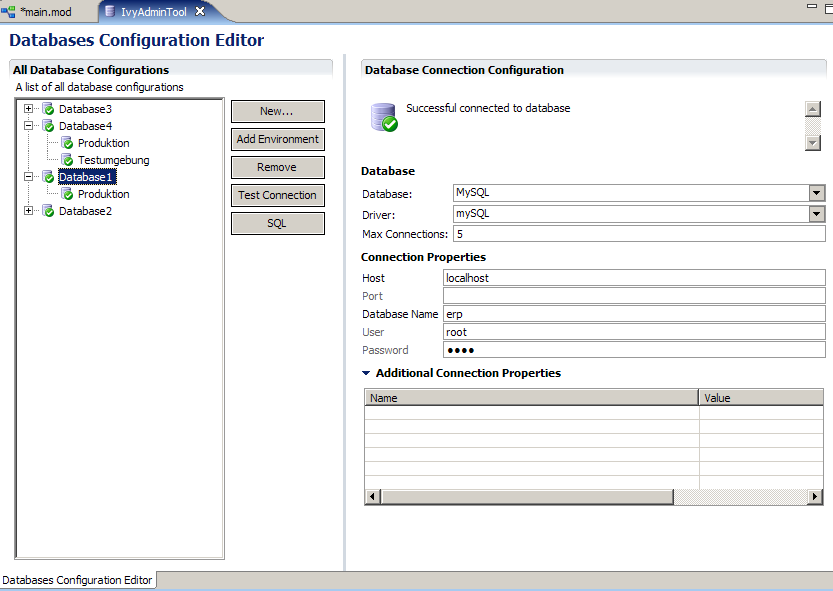
- New
-
Add a new database configuration
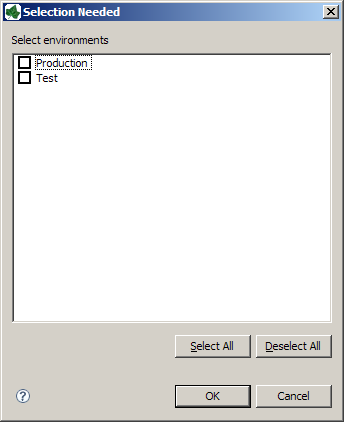
- Add environment
-
Add an environment configuration for the selected database. Select one or more environments for the environment list. For new environment configurations the standard configuration is taken. Please note, existing environment configurations will be overridden, if you add an environment twice.
- Remove
-
Remove the selected database configuration
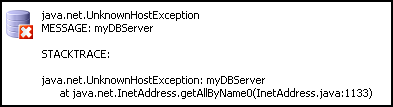
- Test Connection
-
Test database connection. A dialog shows the result status if the database can be connected or not. In the case of a failure the reason will be displayed
- SQL
-
Opens a SQL editor in order to set up SQL Statements. The SQL Editor displays the result in a result table
In the configuration editor you can define different Environments. The environments can be added to existing database configurations. For example it is possible to define a Database for your development, test and production environment. Depending on the Active Environment the associated environment configuration will used. If no environment configuration for a database is available, the default configuration will be used.
If a new database configuration is added to the container, the system automatically adds empty environment database configurations for each environment found in the project.
Note
The root database acts as the default configuration and must always be set
Tip
You don't must define environment configurations for every database. If the database configuration is the same for all environments, only the default configuration is necessary.
- All Database Configurations
-
A list of all database configurations defined in this project. A red or green icon indicates the result of the automatically executed connection test.
- Database Connection Configuration
-
Shows the state of the automatically executed connection test.
- Database
-
Select the type and driver of the database you use. Some often used and tested drivers are shipped with the Designer. Additional drivers can be added by copying its JDBC driver Jar into the jre/lib/ext folder of your Axon.ivy installation.
The field
max. connectionslets you specify the number of concurrent connections to your database. - Connection Properties
-
Specify the properties for the connection to your database.
- Additional Connection Properties
-
If your database needs more information you can use this section to define the additional properties.
The REST Clients configuration contains the definition of all REST services, which can be consumed from a BPM process.
A REST Client can be referenced by its name or by its universal unique identifier (uuid). The uuid is generated when a new REST Client is created and will never change. The name of a REST Client is given when a new REST Client is created. It can be changed later. By referencing a REST Client by its uuid ensures that renaming of the REST Client will not break the reference.
Further information about how to use the REST Clients can be found in the chapter “Call a remote REST Service”.
Like other configurations a REST Client can be configured differently per environment.
The REST Client Editor allows to configure REST Client default and environments configurations.
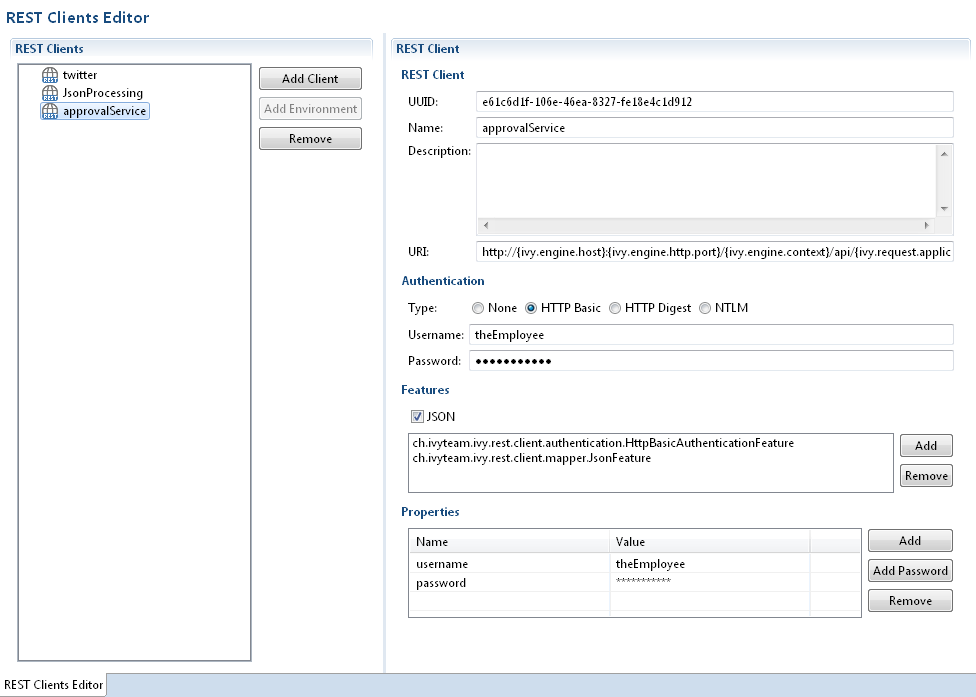
Shows the REST Clients and its environment configurations.
- Add Client
-
Adds a new REST Client.
- Add Environment
-
Adds a new environment configuration for the selected REST Client.
- Remove
-
Removes the selected environment or REST Client configuration.
Shows the currently selected REST Client or environment configuration.
- UUID
-
Universal unique identifier of the REST Client. The REST Client can be referenced by this uuid. Cannot be modified.
- Name
-
The name of the REST Client. The REST Client can be referenced by this name. Can be modified. Note that references using the name will break if you change it.
- Description
-
Description of the REST Client.
- Uri
-
The base URI under which the remote service publishes its resources (e.g. https://api.twitter.com/1.1).
The URI can contain template placeholders which are resolved later by the client user (e.g. https://api.twitter.com/{version}).
ivy.rest.client("twitter").resolveTemplate("version", "1.1").get()Tip
To consume a REST service running in the same Axon.ivy Engine / Application as the client a set of Axon.ivy placeholders can be used. These placeholders are automatically resolved: {ivy.engine.host}, {ivy.engine.http.port}, {ivy.engine.context}, {ivy.request.application}.
E.g.
http://{ivy.engine.host}:}{ivy.engine.http.port}/{ivy.engine.context}/api/{ivy.request.application}/my/service
- HTTP Basic
-
Adds support for HTTP Basic authentication.
- HTTP Digest
-
Adds support for HTTP Digest authentication.
- NTLM
-
Adds support for NTLM authentication. Optionally, the
NTLM.domainand theNTLM.workstationcan be configured in the properties section. - Username
-
The name of the user used to authenticate the client.
- Password
-
The password of the user used to authenticate the client.
- JSON
-
Adds a feature so that responses in JSON are mapped to Java Objects and Java Objects in requests are mapped to JSON.
- Features List
-
Shows the configured "features" classes. The classes configured here are registered in the WebTarget using the method
register(Class). The classes needs to implement a JAX-RS contract interface and must have a default constructor. - Add
-
Adds a new feature class.
- Remove
-
Removes the selected feature.
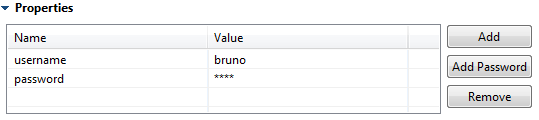
- Properties Table
-
Properties can customize the settings of the REST Client or one of its features.
Client properties
Well known properties of the client are documented here: org.glassfish.jersey.client.ClientProperties.
In order to configure SSL client authentication for a REST Client call, you need to specify the property SSL.keyAlias. The value of this alias needs to correspond with a key alias available in the client keystore configured under SSL Client Settings.
The JSON feature knows many properties that customize the serialization from JSON to Java objects and vice versa.
It is for instance possible to read a very complex JSON object with many fields back to a Java object that contains only a subset of these fields. To allow this incomplete but efficient mapping the property
Deserialization.FAIL_ON_UNKNOWN_PROPERTIESmust be set tofalse.Consult the Jackson documentation for a list of all configurable items:
-
Jackson Deserialization features can be set using
Deserialization.as prefix. E.g.Deserialization.FAIL_ON_UNKNOWN_PROPERTIES -
Jackson Serialization features can be set using
Serialization.as prefix. E.g.Serialization.WRITE_ENUMS_USING_INDEX
-
- Add
-
Adds a new property.
- Add Password
-
Adds a new password property. The value of a password property is not visible in the table and is stored encrypted in the configuration file.
- Remove
-
Removes the selected property.
This chapter describes how web service configurations are organized.
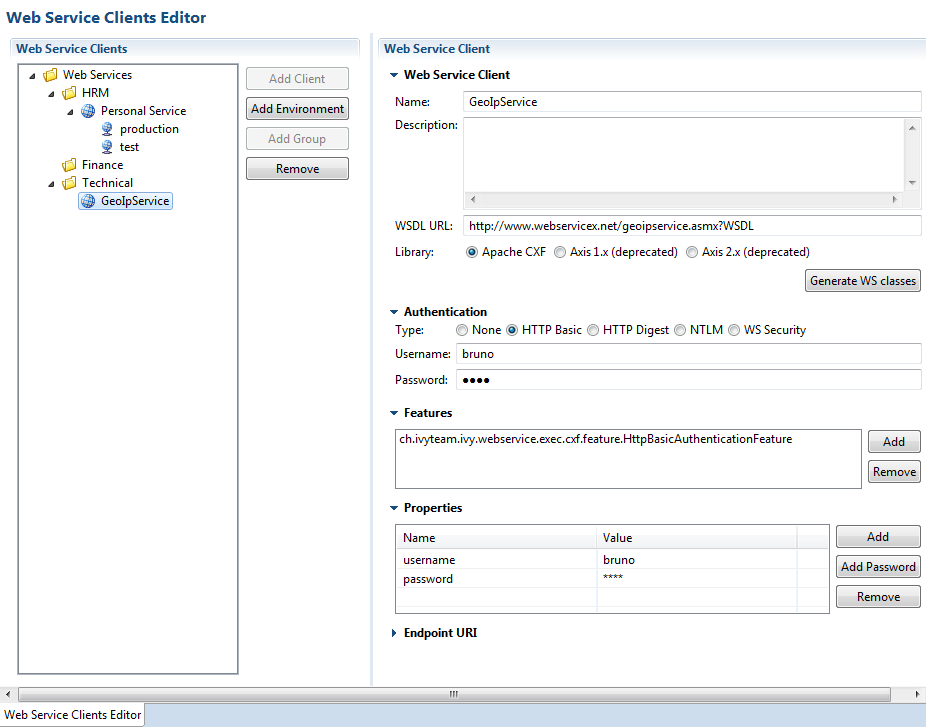
Web service configurations are displayed in a tree hierarchy. The tree editor helps to add and delete existing tree elements (web service groups, web service configurations and web service environment configurations).
In the editor the groups are symbolized with a folder icon. The web service configuration elements are symbolized with a globe icon. On the right side there are buttons offer following functions:
- Add Client
-
Adds a new web service client configuration.
- Add Environment
-
Adds an environment configuration to the selected web service configuration. Select one or more environments from the environment list.
- Add Group
-
Adds a new web service group. These can be used to structuring your services tree.
- Remove
-
Remove the current selection.
Warning
Entries you want to erase might still be in use. Check all dependencies before removing elements from the tree.
Details of currently selected web service configuration node are displayed on the right hand side. In this editor details of an tree element (web service group, web service configuration or web service environment configuration) can be changed.
The following attributes are available in the Web Service Section:
- Name
-
The name attribute specifies the displayed name of a web service configuration. The name is not used as identifier, so it can be changed at any time.
- Description
-
Description of the web service. This field is for documentation purposes only.
- WSDL URL
-
Service details and classes will be generated using the WSDL specified here. Please use protocol prefix like:
http://myserver.ch/hello.wsdl
file://c:\temp\myWis.wsdl
- Library
-
The library that is used to generate the web service client classes. Unless you have some special reasons to use the older Axis framework, please select Apache CXF. Note that you have to regenerate the web service client classes if you change this setting.
- Generate WS classes
-
After specifying the mandatory fields WSDL URL and Library you can click the Generate WS classes button to read the WSDL and generate client side classes. The generated files will be compiled and packaged into a jar file. The generated jar file will be located in the lib_ws/client folder of ivy project and automatically added to the project libraries.
Note
When you change the WSDL URL, the WSDL itself or the Library setting you always have to re-generate the service classes.

Configures the authentication that is sent to the remote web service.
The following attributes are available in the Authentication section:
- Type
-
The authentication type to be used. The available authentication types depends on the selected library.
- Username
-
Name of the user used to authenticate the client. Will be stored as a property.
- Password
-
Password of the user used to authenticate the client. Will be stored as a property.
Tip
Authentication properties like (username and
password) can be overridden in the “Web Service Call Activity” that performs the
call to the remote service. On these activities authentication
properties can contain scripted/dynamic values.

Features add optional functionality to a web service client call execution.
- Add
-
Adds a new feature class to the list. All specified feature classes must implement the JAX-WS standard class javax.xml.ws.WebServiceFeature or
ch.ivyteam.ivy.webservice.exec.feature.WebServiceClientFeature. - Remove
-
Removes the selected feature class from the list.
Properties configure the web service client and its features. Some well known properties are documented here: javax.xml.ws.BindingProvider
- Add
-
Adds a new property.
- Add Password
-
Adds a new password property. The value of a password property is not visible in the table and is stored encrypted in the configuration file.
- Remove
-
Removes the selected property.
Tip
In order to configure SSL client authentication for a Web Service, you need to specify the property SSL.keyAlias. The value of this alias needs to correspond with a key alias available in the client keystore configured under SSL Client Settings.
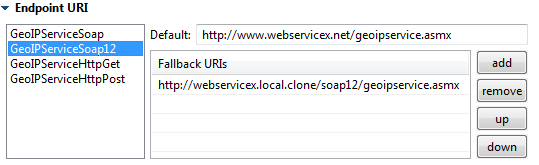
The following attributes are available in the Ports section:
- Ports
-
The list of ports is available after web service client classes generation. (see: Generate WS classes). The content of this list originates from the specified WSDL and is filled with information from the client framework.
- Default URI
-
The URI where the current web service is located. The initial URI is derived from the WSDL. But one can override this setting if the address has changed. It can also be overridden per environment. For instance to route calls during development to test instance of the service.
- Fallback URIs
-
An optional list of URIs. They are used as fallback URI if any error happens during the web service request. The default endpoint will be called first, then the fallback URI in the appearing order. Servers on the list are queried one by one until a successful web service access can be made. You find error messages in the runtime log when endpoint invocations fail. If a service invocation is successful then the process continues as normal.
This list is optional. If this list is empty and no default URI is specified then an exception is raised during the call and the process continues with error handling.
In the configuration editor you can define different Environments. Special setups can be defined this way for different environments web services are running in, e.g. production, test or development environments. This is the place where traditionally alternative authentication methods and endpoint URIs are configured for other execution environments.
Environments can be added to existing web service configurations. Depending on the active environment the associated environment configuration will used. The default configuration will be used if no or no matching environment configuration is specified for the web service.
Note
The web service configuration acts as the default configuration and must be set
Tip
You don't need to define environment configurations for every web service. If the web service configuration is the same for all environments, only a default configuration is necessary.
Role is a widely used term in the computer industry and means a group of users of a certain system which share a common property. This enables an administrator to define configurations for this groups (roles) of users at once instead of defining it for each and every user individually. Axon.ivy incorporates a sophisticated role and user model to support:
-
Authentication - Who may login into Axon.ivy
-
Authorization - Control who is allowed to do what
-
Task assignment - Decide who has to perform a task in a workflow
-
User dependent UI elements - Configure who can see and operate on UI elements
In the following two sections you will learn how to create, edit and remove roles and users and how to link users with roles and vice versa.
The hierarchy of the roles is built upon the principle of specialization. Each child
role specialises its parent role(s) meaning that a role Team
A always implicitly contains its parent roles. The role
Everybody is the root for all roles, all roles specialize this
role. For example in the figure below, a member user of role Team A
also has the roles Development and Everybody.
A Member Role can be added as a child of an existing Role and links to another existing Role. While resolving the role tree, to collect the specializations of each role, the Member Role is handled like a normal child Role. Basically this simplifies the configuration and administration of roles.
Tip
The concept with Member Roles allows to create a sub-tree of roles with 'company roles' and a sub-tree of roles with 'permission roles'. The sub-tree of 'company roles' represents typically the structure of the company. The sub-tree of 'permission roles' represents the use or execution permission of a specific part or feature of an application. With a Member Role it is possible to assign a permission to a 'company role' by linking the 'company role' as a member role of a specific 'permission role'.
The following configuration illustration that users of group First Level and Team B have the permission for Process N and users of both support groups and of the Support Group itself has the permission for Process M.
+ Everybody
  + Support Group
    + First Level
    + Second Level
  + Development
    + Team A
    + Team B

  + Application Permissions
    + Process M
      - First Level (Member Role linked to role 'First Level')
      - Team B (Member Role)
    + Process N
      - Support Group (Member Role linked to role 'Support Group')
The role editor allows to create a new role and to edit and/or to remove existing roles and to structure them into a hierarchy. It can be started by double clicking on the Roles node in the Axon.ivy Projects view.
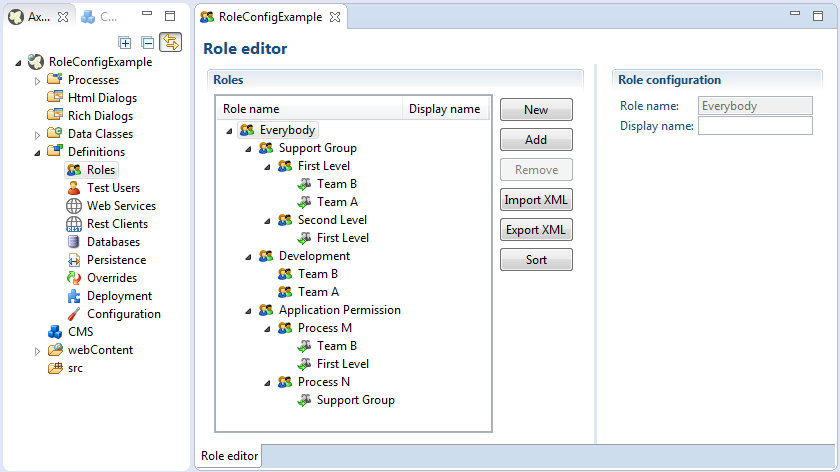
The left side of the Role editor consists of a tree showing all the roles in a
hierarchy order. A click on one of the roles will show the properties for the selected
role on the right side of the editor. The role hierarchy can be manipulated by dragging
a role and dropping it at the new place in the hierarchy.
New
A new role is created as a child of the selected role.
Add
A role is added as a linked member role to the selected role.
Remove
The selected role and all its children roles are removed. The user is obliged to confirm the removal. Note that the role Everybody may not be deleted.
Import XML
A .roleconfig file from another project can be imported for convenience reasons.
Export XML
All roles are exported in a XML file with the extension .roleconfig to easily re-use the role hierarchy.
Sort
The selected roles are sorted alphabetically, if desired this is performed recursively on the children.
Warning
Roles created in the designer are uploaded to the Axon.ivy Engine not until the deployment of the project. They are merged with all other roles in the same application context. Consider that the deployment will fail if the same role exist in more than one project in different role hierarchies.
Process designers can create, edit and remove test users in the user editor. Users need a password in order to authenticate themselves and they need to be assigned to at least on role. The editor can be started by double clicking on the Test Users node in the Axon.ivy Projects view.
Note
Test users are only used in the process simulation within the Axon.ivy Designer and they are not uploaded to the engine at the deployment. Users for deployed processes on the Axon.ivy Engine need to be created and configured on the engine.
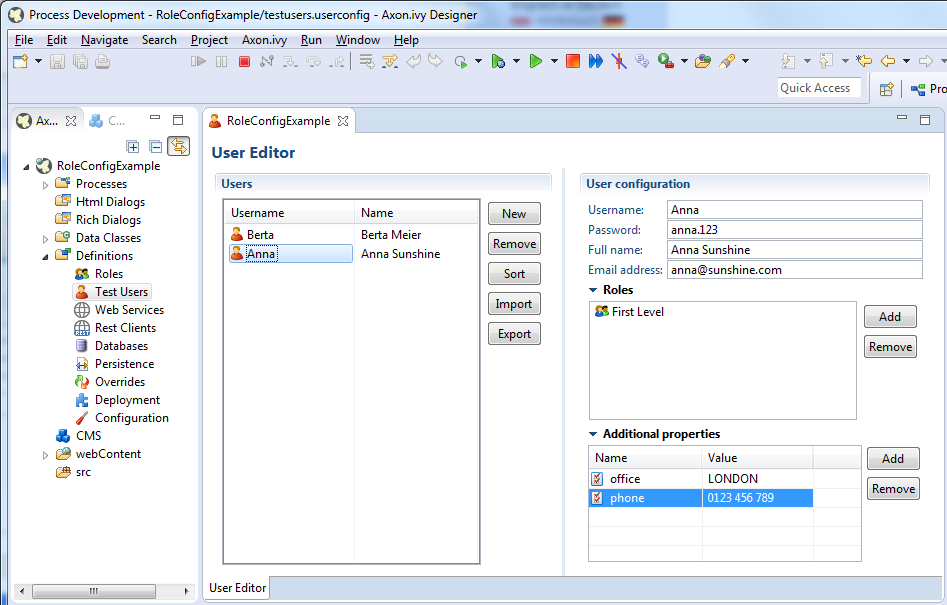
The left side of the editor you see all users with their user names (i.e. login
name) and their full names. On the right side the specific properties for the selected
user on the left side is displayed. A user can be assigned to several roles and he is
implicitly assigned to the parent roles of the roles, he explicitly is assigned to (see
Role Editor for more precise details).
Additional properties can be added to each user in terms of string key-value pairs and
be reused within process steps in IvyScript.
New
Creates a new user with the specified name.
Remove
Removes a user from the list. The process designer is obliged to confirm the removal
Sort
Sorts the user list in alphabetical order
Import
A .userconfig file from another project can be imported for convenience reasons
Export XML
All users and their corresponding properties are exported in a XML file with the extension .userconfig to easily re-use the users in another project.
Tip
You do not see the user called Developer, because it is a built in user, that belongs to each groups, and owns all rights. The user is meant to be used for testing, so that it exists only in the Designer. The password of this user is Developer (in case you would like to log in using IvyScript)
This chapter deals with configuration files of the Axon.ivy Designer
Configuration files are located in the configuration folder under the %AXON_IVY_INSTALLATION% folder. These files you have to edit out of Axon.ivy, e.g. using a system editor. It is recommended to stop your designer before you start changing these configurations.
There are some configuration files with extension *.xml. These are normal XML files. Meanwhile the *.any files are so called any files. There are a couple of any implementations - so that there is no real standard. The intension behind this is to have an easily to understand configuration with simple structure, and practically unlimited parameter types.
Tip
It is recommended to make a backup copy before you start changing configurations.
Using this file you can change logging preferences. This files contains a Log4j configuration. Log4j is an open source framework for logging. You can change logging format, logging destination (file, console, etc.), logging level and control which packages should be logged on which level.
Tip
The official web page of Log4j is http://logging.apache.org/log4j/ Meanwhile all around the Internet you can find many articles and documentations.
Using this file you can change properties of the JNLP file that will be sent to client computers to start an Axon.ivy Rich Internet Application.
jnlpconfig.any is devided into tree sections: information, java and
application-desc
- information
-
Configure general information about the application like title or its vendor.
- java
-
Configure parameters used for the Java virtual machine on client side like memory parameters, additional jvm arguments and the download-mode of jars.
- application-desc
-
Configure technical attributes of the application like client-site logging, tooltip behavior or the rich dialog session timeout.
Tip
Have a look into the file jnlpconfig.any. The configuration options are described in detail there.
Note
By default, the lazy download of jars is set to false. This means, that all jars requred by the application are downloaded at startup. With a good internet connection, this will not be a problem. The application will start quite fast. In case the client is connected by a slow internet connection, it makes sense to enable lazy download of jars. But if lazy download is enabled, it will cause an overhead in the security certifacte validiation - each jar will be verified individually. This also takes a cerain amount of time.
Using this file you can change server side logging properties for ULC components. You can configure log level and log file. Sub-configurations can be defined per process model that receives the first request. If no log-file is defined, then System.err will be used as output of JNLP file that will be sent to client computers to start Axon.ivy application.