Projects
Axon.ivy Projects can be seen as development modules that encapsulate the processes and other artifacts that form an application. An Axon.ivy project roughly comprises of processes, User Dialogs, Data Classes, a Content Management System and various configurations. All of those aspects are explained in separate chapters of this document.
Projects can be reused, i.e. any project can depend on functionality which is implemented by another project. Projects that implement reused functionality and/or artifacts are called required projects with respect to the project that makes use of that functionality. The latter is in turn called the dependent project* with respect to its required projects.
Once you have finished your development you will usually want to install the implemented application or workflow on an Axon.ivy Engine. Projects form the single unit of deployment for this purpose, i.e. you deploy each project into a container on the engine which is called process model version. A project may be deployed in multiple versions on the engine; each process model version therefore contains a snapshot of a project at a specific point of time in development. See chapter Deployment for more information on this topic.
The data that specifies a project’s deployment information is contained in the project’s Project Deployment Descriptor. The deployment descriptor (formerly known as library) specifies all of the required projects and the specific versions in which they must be present on the engine in order for the deployed project to work. The descriptor also defines an unique deployment ID and the development version of a project (not equal to the process model version), as well as some information about the project provider and a description of the project itself.
On the engine, a project in a specific development state/version corresponds to a process model version, as explained above. On the engine, all the deployed versions of a project are children of a process model container (which corresponds to the project as an entity without a specific version). The process models themselves are part of an application (see chapter Deployment for a more thorough explanation).
In the Designer, projects may only exist in one version at a given point of time. Projects are created and organized inside an Eclipse workspace. Roughly, on the Designer, the workspace corresponds to the application on the engine. Since projects can only exist in one version on the Designer, there is no process model equivalent necessary in the Designer.
When working on a project, which depends on other projects, then the required projects need to be present as well in the Designer, which means that they must be present in the current workspace. Otherwise dependencies cannot be resolved and reused artifacts are not available, which will prevent the application from running.
Ivy Archives
There are two different types of Axon.ivy projects available. Normal
Axon.ivy projects are used to develop artifacts. Artifacts in those
projects are changed frequently. Once the artifacts of a project are
developed and stable you can export the normal Ivy project to an
Axon.ivy Archive. Archives are pre-built Ivy projects that are stored in
one single *.iar file.
Ivy Archives can be imported to a workspace like normal Ivy projects. All artifacts of an Ivy Archive can be viewed but not edited. Archives already contain all built artifacts. Therefore, they do not have to be built or validated again in the workspace. As a consequence Ivy Archives will improve your workspace build, refresh and update time.
There are multiple ways to create or import Axon.ivy Archives:
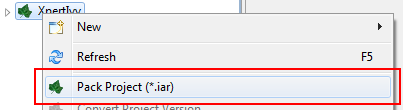
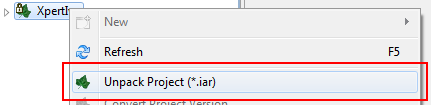
Axon.ivy Projects can be packed (archived) or unpacked (unarchived) inside the workspace.
Tip
Ivy Archives are not validated automatically. Validation can be started manually by using the context menu.
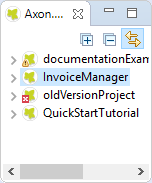
Ivy Project View
Here all the projects (including their content) in a given workspace are displayed in a tree view. This is the central component to obtain an overview of the project and to start the specific editors for all Axon.ivy entities.
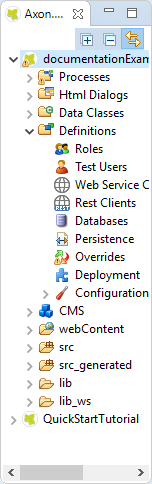
Axon.ivy Project View with some content
Some of the entries are categorized such as User Dialogs and processes, but in general double-clicking on the leafs opens the corresponding editor. Furthermore a popup menu is provided with the most important interactions:
New… - Opens a wizard for creating new Axon.ivy entities such as User Dialogs or processes.
Refresh - Use this to inform and refresh the project tree whenever the project resources have been changed externally.
Close Project - Closes open projects. Closed project are still visible in the workspace but you cannot browse their content or execute them.
Open Project - Opens closed projects.
Convert Project - Converts a project so that it has the newest format.
Export Axon.ivy Archive (.iar) - Starts the Export Wizard to export normal Axon.ivy projects to Axon.ivy Archives.
Import - Opens the Import Wizard. Very useful to import new projects from the file system or from a source repository such as Subversion or CVS
Export - Opens the Export Wizard to exchange certain artifacts with other installations.
Rename - Let you rename your resources (User Dialog, Data Class, Process, etc.) while keeping references to those artifacts intact. This menu item is only shown, if the selected resources are eligible for renaming. If renaming is possible, then the Rename Wizard will be shown, where you can enter a new namespace and/or name for the selected artifact.
Warning
Please rename your resources only in Axon.ivy and not in Java or Resource perspectives. Trying to do renaming of Axon.ivy artifacts in other perspectives may result in an unusable project.
Move - Moves the selected resources to another project. The move wizard will be shown, allowing you to select the project to which the resource(s) should be moved.
Note
If Axon.ivy artifacts (such as User Dialogs, Processes or Data Classes) are moved, then the wizard will show an overview of the references (e.g. calls to sub processes) that might be broken by the operation.
Copy - Copies the selected resource(s) to the clipboard
Paste - Pastes the content of the clipboard into the selected node.
Note
The copy operation is intelligent: it tries to guess the correct location from the contents inside the clipboard, if the selected target node is not suitable for pasting. If there is a conflict upon paste (e.g. because the result would be two resources with the same name) then the Copy Wizard is presented with a new name suggestion, where you may modify the name and/or namespace of the pasted resource(s) before the operation is executed.
Delete - Removes the selected node from the project. Multiple resources may be deleted at once.
Note
If Axon.ivy artifacts (such as Axon.ivy projects, User Dialogs, Processes or Data Classes) should be deleted, then the Delete Wizard opens and shows an overview of the references that might be broken by the operation.
Tip
Commit your project in SVN before performing any delete operations.
Open with - Lets the user choose with which editor the selected entity is opened. It is possible to view a textual representation or a possible external editor for the entity.
Team - Gives access to the Team functionality offered by CVS or SVN
Compare with - Compares the current version of the entity with an older version from the local history or (if used) from the source repository.
Replace with - Replaces the current version of the entity with an older version from the local history or (if used) from the source repository.
Properties - Useful on the project level to set the Project Preferences of the project
New Project Wizard
The New Axon.ivy Project wizard lets you create a new Axon.ivy project. The wizard consists of three pages, of which two are optional.
On the first page you must specify the settings that are required for the new project. After filling those in, you may already press finish to create the new project.
The second and third page are optional and you do not have to complete them. However, they allow you to specify information with regard to deployment that you would otherwise have to specify at a later point of time, by using the deployment descriptor editor.
Accessibility
File -> New -> Axon.ivy Project
Features
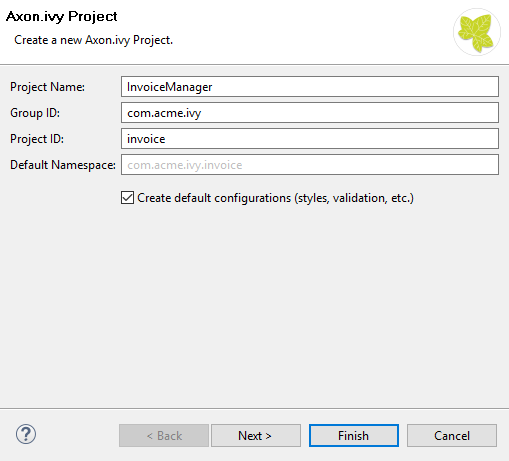
New Project Wizard: First Page
This page lets you define the minimally required settings for a new project.
- Project name
Chose a name that describes the contents or the purpose of your project. You are not allowed to use any special characters or spaces.
- Group ID
Identifies your project uniquely across all projects. It has to follow the package name rules, what means that has to be at least as a domain name you control, and you can create as many subgroups as you want. e.g.
com.acme.ria.- Project ID
You can choose whatever name you want with lowercase letters and no strange symbols, e.g.
usersoruser-manager.During deployment to the engine the concatenated Group ID + Project ID will act as unique identifier of the project, once it is deployed.
- Default namespace
Define the default namespace for your project. This namespace will be used as standard namespace for new Axon.ivy artifacts. It is also the namespace into which the project’s default data class (
Data) will be generated.- Create default configurations
If your project is a base or standalone project (e.g. if it doesn’t have any dependencies on required projects) then you should leave this box checked. As a result of this, the new project will be initialized with default configurations in its configuration database.
However, if you’re creating a project that is dependent on other projects (see wizard page 2) then you should uncheck this box, because configurations are inherited from required projects. If you leave the box checked, then the default configurations that are created for the new project may possibly shadow (i.e. override) custom configurations with the same name from any required projects that you may have.
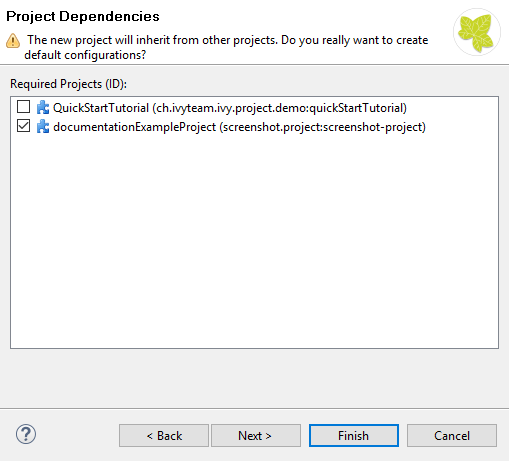
New Project Wizard: Second Page
The second page is optional. It allows you to specify any project from the workspace as a required project.
- Required Projects
Check the projects that the new project should be depend upon. The selected projects will automatically be required with the version that they currently have in the workspace. The maximum version will be left empty.
You can always reconfigure the required projects at a later point of time in the Project Deployment Descriptor.
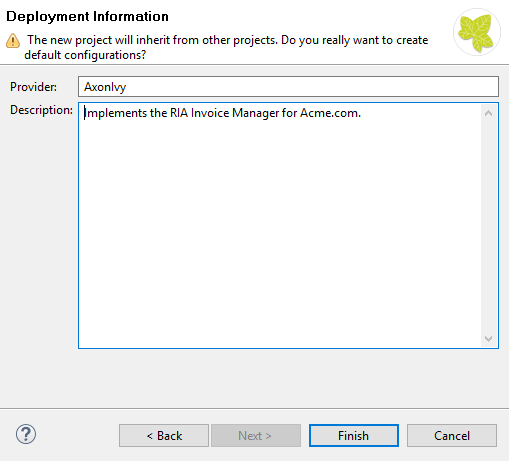
New Project Wizard: Third Page
The third page is optional. It allows you to define information about the implementor and the purpose of the new project. This information has documentation value only.
You can always specify and change this information at a later point of time in the Project Deployment Descriptor.
- Provider
Define the company or individual that develops and maintains this project.
- Description
Describe the purpose of the project’s contents or what the application is, that it implements.
Importing a Project
You can import existing Axon.ivy projects into your workspace using the Import Wizard. Projects can be exported from the workspace using the Export Wizard (See section Exporting a Project. This allows you to exchange or share your projects with other people.
Accessibility
You can access the Import Wizard over the menu:
File -> Import …
Features
For Axon.ivy users the following import sources and formats are useful:
- General > Existing Projects into Workspace
Imports a project from a project directory located somewhere in the file system into the workspace. The project directory may or may not be located in the workspace directory.

In the wizard page seen above you can select either the directory where your project(s) resides or a archive file (zip, jar, tar-gz) that contains the project(s). If Axon.ivy finds valid projects in the given directory or archive file, they can be (de-)selected for the import and you can decide whether the projects should be copied into your workspace directory or not (which has no effect if a project already is in the workspace directory). After clicking on the button Finish the import is performed and you will find the imported projects in the Ivy Project View.
- Axon.ivy > Axon.ivy Archive (*.iar)
Imports Axon.ivy Archives (*.iar) into the workspace.

In the wizard page seen above you can select the directory where your Axon.ivy Archives resides. If Axon.ivy finds valid Axon.ivy Archives in the given directory, they can be (de-)selected for the import and you can decide whether the Axon.ivy Archives should be copied into your workspace directory or not (which has no effect if an Axon.ivy Archive already is in the workspace directory). After clicking on the button Finish the import is performed and you will find the imported Axon.ivy Archives in the Ivy Project View.
Importing demo projects
The Axon.ivy Designer can import several demo projects, which are provided from our maven repository (internet connection needed). Those demo projects are in the Ivy Archive (*.iar) format and can be imported with the help of the Sample icon on the welcome page.
Following projects are available for the Designer:
Project name |
Demo content |
|---|---|
ConnectivityDemos |
Demonstrates the consuming and providing of REST Services with ivy. |
ErrorHandlingDemos |
Samples that demonstrate the Error Handling. |
HtmlDialogDemos |
Demonstrates several JSF components that can be used in Html Dialogs. |
QuickStartTutorial |
The same project that is built in the QuickStart Tutorial. |
RuleEngineDemos |
Shows how to use the Rule Engine. |
WorkflowDemos |
Demonstrates how to handle typical Workflow use cases, makes use of features like Signals and Business Data |
Exporting a Project
Axon.ivy projects can be exported from the workspace to various output formats using the Export Wizard.
Accessibility
You can access the Export Wizard over the menu:
File -> Export …
Features
For Axon.ivy users the following output formats are useful:
- General > Archive File
Exports projects to a *.zip or *.tar file.
- General > File System
Exports projects to the file system.
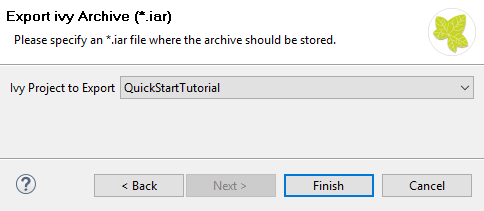
- Axon.ivy > Axon.ivy Archive (*.iar)
Exports a normal Axon.ivy project to an Axon.ivy Archive (*.iar file).
Converting Projects
If the project format version changes with a new Axon.ivy release, then old projects will show an error marker, describing them as out of date or having an invalid version. This can happen, when the technical format for Axon.ivy projects changes with a new Axon.ivy release (e.g. the way how some artifacts are stored may be changed, new artifacts may be introduced, etc.). :

Wrong project version marker
If you inspect your project’s properties, the main page will show you the actual project version and inform you whether it is up to date or not (see Project Preferences below):

Project version before conversion

Project version after conversion
Axon.ivy can convert your old projects automatically to the newest project format for you. During this process, all existing artifacts will be converted (if necessary) so as to work with the new Axon.ivy version, and any missing but required artifacts will be added.
To run the project conversion, select the project’s node in the Axon.ivy
project view and right click to bring up the context menu. Select
Convert Project to initiate the conversion. A log screen will appear
that documents the conversion process (this log is also saved in the
logs/ folder inside your project), and which will inform you about
whether the conversion was successful or not.
Invoking the project conversion
Warning
It is absolutely recommended that you create a copy of your project before invoking the conversion. Alternatively you can have your project under version control. In this case, make sure that all your projects are checked in, before you invoke the conversion, so that you can easily roll back (revert) to the old version, if conversion should fail for some reason.
Project Preferences
You can access the properties and preferences of a project either over the item Properties in the popup menu of the Ivy Project View or over the menu item Project -> Properties. Here you can redefine almost all of the global Preferences and override them with project specific values.
Additionally, the project preferences allow you to define values for some project specific properties, that do not have a global default value. Those are described in the sections below.
Axon.ivy - Project Information
The main project properties page shows information about the project.

Project Properties Axon.ivy information
- Project format version
Shows the version of the project format. If the project was created with an old version of Axon.ivy, this is indicated with an warning message. Consult the Chapter Converting Projects to learn how to convert your project to a new version of the project format.
- Number of process Elements
Shows the number of Process Elements in this project.
Content Management System Settings
The languages in the CMS and the defaults for HTML dialog pages can be set here.
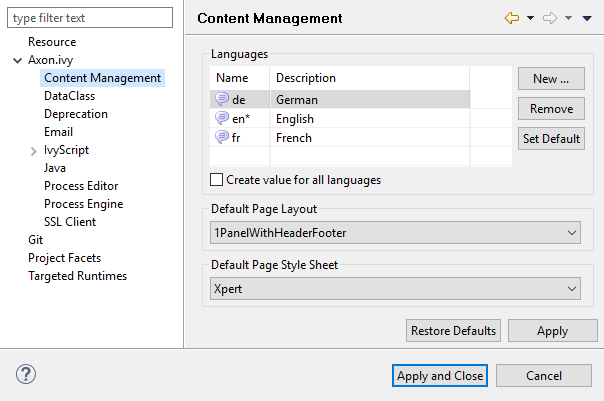
In the list at the top you can add and remove languages to/from the CMS and you can set the default language. Just below you can define whether Axon.ivy should automatically create a value for every language of the CMS if you create a new Content Object or not. Do not use this option if you do not need content in multiple languages or if you export the CMS content to translate it. Use the option if you know that you need to translate the vast majority of Content Objects within the Axon.ivy Designer
Furthermore, you have the choice between different HTML page layouts and CSS style sheets for use as default values for HTML dialog pages.
Data Class Settings
Allows you to specify the default namespace and the name of the project Data Class.
IvyScript Engine
- Automatically imported classes
Allows you to specify fully qualified class names which should be automatically available with their simple class names in every ivy script code.
Java
With these preferences you can adjust the Java settings of the project.
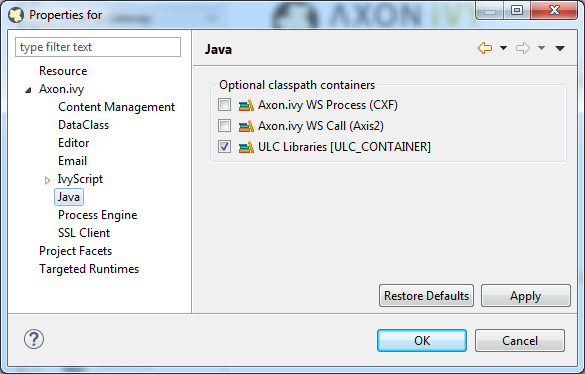
Java preferences
- Optional classpath containers
Defines optional libraries which can be accessed by Java or IvyScript code of the project.
If migrated your project from 6.0 or older you may have used CXF or AXIS2 libraries by accident in your code. With the classpath container checkboxes you can put these libraries on the classpath to avoid compilation or runtime errors.
Project Deployment Descriptor
Each Axon.ivy project has a deployment descriptor. The deployment descriptor defines various properties of a project that are important with respect to deployment on the engine. Specifically the descriptor defines:
A unique project ID (i.e. a fully qualified symbolic name) for the project, by which it can be identified and referenced. Also a current development version of the project is defined (please note that this version may, but does not necessarily have to be, identical with the project model version on the engine into which the project will eventually be deployed).
The dependencies of a project to other projects and the exact version range of those projects that must be available in order for the project to work. Once a project is referenced in this way, its artifacts may be used inside the referencing project. This applies especially to the following artifacts: User Dialogs, Data Classes, Web Service Configurations, CMS Entries, Configurations, Java classes or Java libraries (JAR files).
Information about the implementor of the project and its purpose.
The following figure illustrates the above:
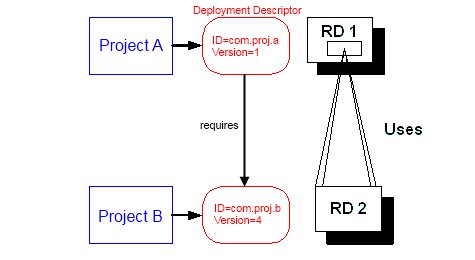
A project dependency, defined by the Project Deployment Descriptor
Since referenced projects may in turn reference other projects, a whole (acyclic) dependency graph may be constructed this way. All artifacts of projects that are reachable from some project in this way (i.e. by following the arrows) can be used.
The following figure illustrates this feature. For example, a User Dialog defined in Project D may be used in Project A. A Data Class that is defined in Project E may also be used in Project A. However, it is not possible to use a sub process defined in Project B from Project C (unless Project B is added as required project in the deployment descriptor of Project C).
The search order to look up reused artifacts is breadth first. The order in which directly referenced projects are looked up, can be defined in the Project Deployment Descriptor.
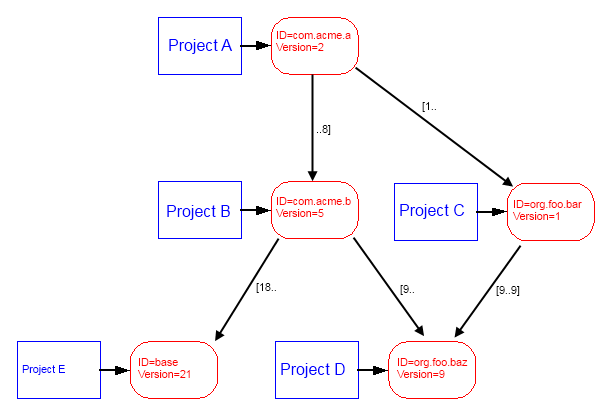
Project Dependency Graph
Projects may be required with a specific version or within a specific version range. This is also illustrated in the above figure.
When deploying projects on the engine, the availability of the required projects (and their versions) is checked. If the required project versions can not be resolved, then a project can not be deployed. Therefore projects must be deployed bottom up, i.e. one must start by deploying first the required projects that are lowest in the dependency hierarchy.
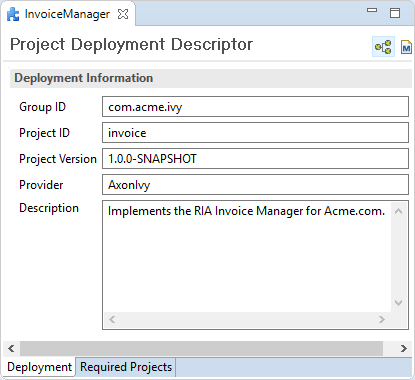
Deployment Descriptor Editor
The Deployment Descriptor editor allows to edit a project’s deployment properties as well as the required projects and their version ranges as described above. Most of those properties can already be specified in the New Project Wizard, when a project is initially created.
The deployment descriptor editor consists of two tabs:
The Deployment tab is used to configure the project’s own deployment information.
The Required Projects tab is used to define other projects (possibly in a specific version) that the project depends on.
The deployment description is stored as Maven pom.xml so that Ivy Projects can be built on a continuous integration server. See Continuous Integration.
Accessibility
Axon.ivy Project Tree -> double click on the Deployment node inside
the project tree ( )
)
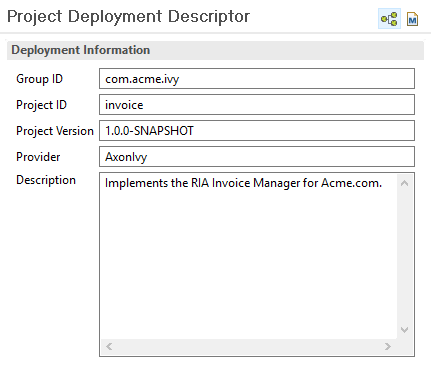
Deployment Tab
- Group ID
Identifies your project uniquely across all projects. It has to follow the package name rules, which means that it has to contain at least the domain name you control, and you can create as many subgroups as you want. e.g.
com.acme.ria. .- Project ID
You can choose whatever name you want with lowercase letters and no strange symbols, e.g.
usersoruser-manager.During deployment to the engine the concatenated Group ID + Project ID will act as unique identifier of the project, once it is deployed.
- Project Version
The current development version of the project.
- Provider
The name of the user or company that implements and maintains (i.e. provides) the project. The provider setting has not functional purpose. It is for documentation only.
- Description
A (short) description of the project’s purpose and contents. The description setting has no functional purpose. It is for documentation only.
Required Projects Tab
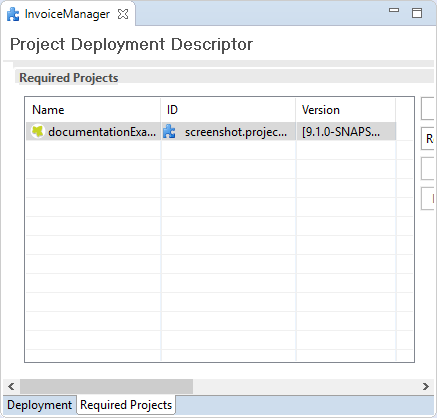
Deployment Descriptor Editor: Required Libraries Tab
- Required Projects
A table shows the list of the required projects, both with their name and their ID (as defined in the project’s deployment descriptor). The table also shows the version range in which the referenced project must be available.
- Name
The display name of the required project (how it is shown in the workspace).
- ID
The unique identifier of the required project.
- Version
The range specification of the version that the referenced project is required to have.
Note that the order in the table defines the order how referenced artifacts are searched (Use the Up Button and Down Button to change the order). The general search order in the dependency graph is breadth first, but the order that you define here is the search order that will be used at a specific node when searching the graph.
Clicking the Add button brings up a dialog with a selection box, in which any of the projects that are currently present in the workspace may be selected as required project. Closed projects or projects, that are already (directly) required, can not be selected.
Selecting an entry in the table and subsequently clicking the Remove button removes a project dependency.
- Required Project Details
Shows the details of the currently selected project.
- Group and Project ID
The identifiers of the required project (not editable).
- Maximum Version
Optionally specify the maximum version that the required project needs to have. Choose whether you want to include or exclude this maximal version by checking the Inclusive box
- Minimum Version
Optionally specify the minimum version that the required project needs to have. Choose whether you want to include or exclude this minimal version by checking the Inclusive box
Warning
Beware of cycles in the project dependencies! You should never require a project B from a project A, if B also requires A (or if B requires any project that in turn requires A, which would form a larger cycle). Error markers will be displayed when the workspace is built, and cycles are detected, because this condition can lead to endless recursion and other unpredictable behavior when looking up artifacts.
Project Graph view
The Project Graph view shows the dependency graph of all projects in the workspace.

Toolbar actions
 Refreshes the complete graph. Manually moved nodes will be
rearranged by the auto layout algorithm.
Refreshes the complete graph. Manually moved nodes will be
rearranged by the auto layout algorithm.
 Selects the zoom level of the view.
 Selects the layout algorithm that arranges the nodes and
dependency edges in the view.
Selects the layout algorithm that arranges the nodes and
dependency edges in the view.
 Automatically opens the Project Graph whenever a Library
Descriptor Editor is opened.
Automatically opens the Project Graph whenever a Library
Descriptor Editor is opened.
Graph actions
Double click on a node to open its Library Descriptor Editor
Drag a node to improve the layout
Click on a node to highlight it
Accessibility
Windows -> Show View -> Axon.ivy -> Project Graph
CTRL + 3 (Quick Access) -> Project Graph
Deployment Descriptor Editor -> Open Project Graph from header toolbar
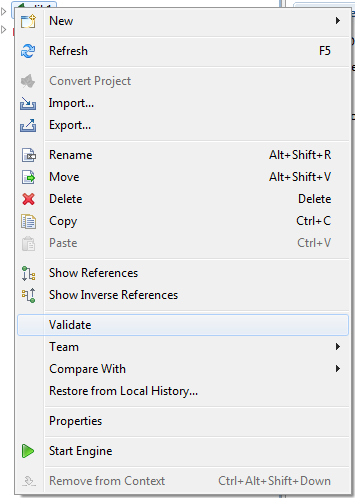
Validating Axon.ivy projects and resources
Axon.ivy comes with various validators which verify that projects and its resources do not have any errors. After a resource has changed the responsible validator will run automatically and report errors or warnings.
Validating projects and resources
To manually validate a project or a resource you can right click on it and select Validate.
After the validation the errors are shown in the Problems view.

Validation preference
Go to Window -> Preferences -> Validation to get an overview of the validations that are run.
Warning
It is recommended not to change these settings. It could lead to problems while running the projects.