Windows (with UI tools)
Download the Engine
Download the Axon.ivy Engine and save the
AxonIvyEngine*.zip file to your temporary download folder.
Install the Engine
We suggest that you install the Axon.ivy Engine into a new folder called
ivy\engine on one of your drives (e.g. c:\ivy\engine). To do
so open a Windows Explorer and navigate to C:\ and create those new
folders. Then, navigate to your temporary download folder and copy the file
AxonIvyEngine*.zip to the newly created folder.
Right click the AxonIvyEngine*.zip file and press Extract
All … from the context menu.
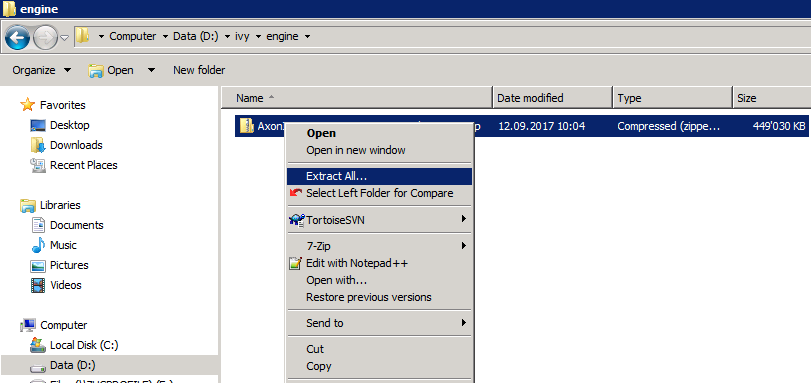
On the appearing dialog press the Extract button. After the
AxonIvyEngine*.zip is extracted navigate into the new
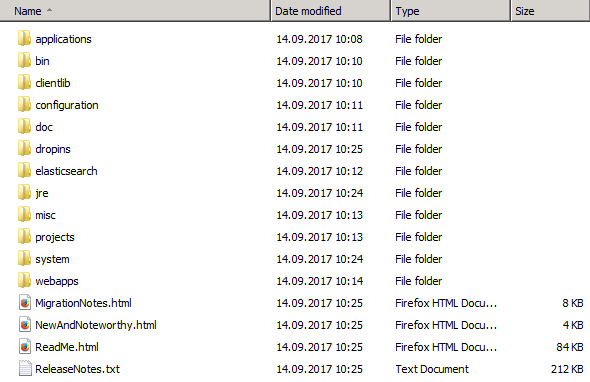
AxonIvyEngine folder. The content of the installation folder looks like
this:
Hint
The most important sub folders in the Axon.ivy Engine installation folder are:
binfolder contains all the executablesconfigurationfolder contains the configuration files.
Start the Engine
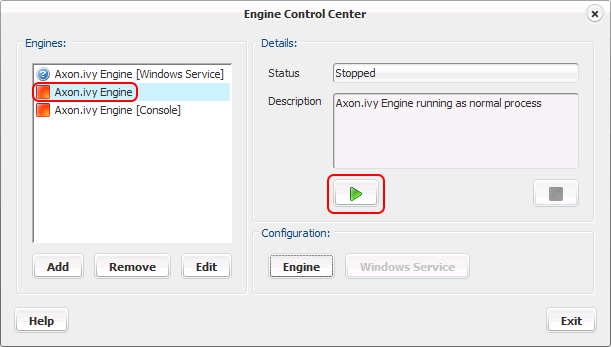
Navigate to the bin folder and double click on the
ControlCenter.exe file to start the Control Center. You can use this
tool to start and stop the Axon.ivy Engine in different ways (as Windows Service,
as normal user process, with a console window). Select the Axon.ivy Engine and
press the green play button to start the Axon.ivy Engine as a normal user process:
Hint
You can use the Control Center also to register Axon.ivy Engine as Windows Service. Moreover, you can add other existing Windows Services to the list of Engines to start and stop them with the Control Center. For example, if you have installed your database server on the same machine you can add the Windows Service of the database server.
After the Axon.ivy Engine has beend started a web browser is opened and the main page of the Axon.ivy Engine is displayed.
Use the Engine
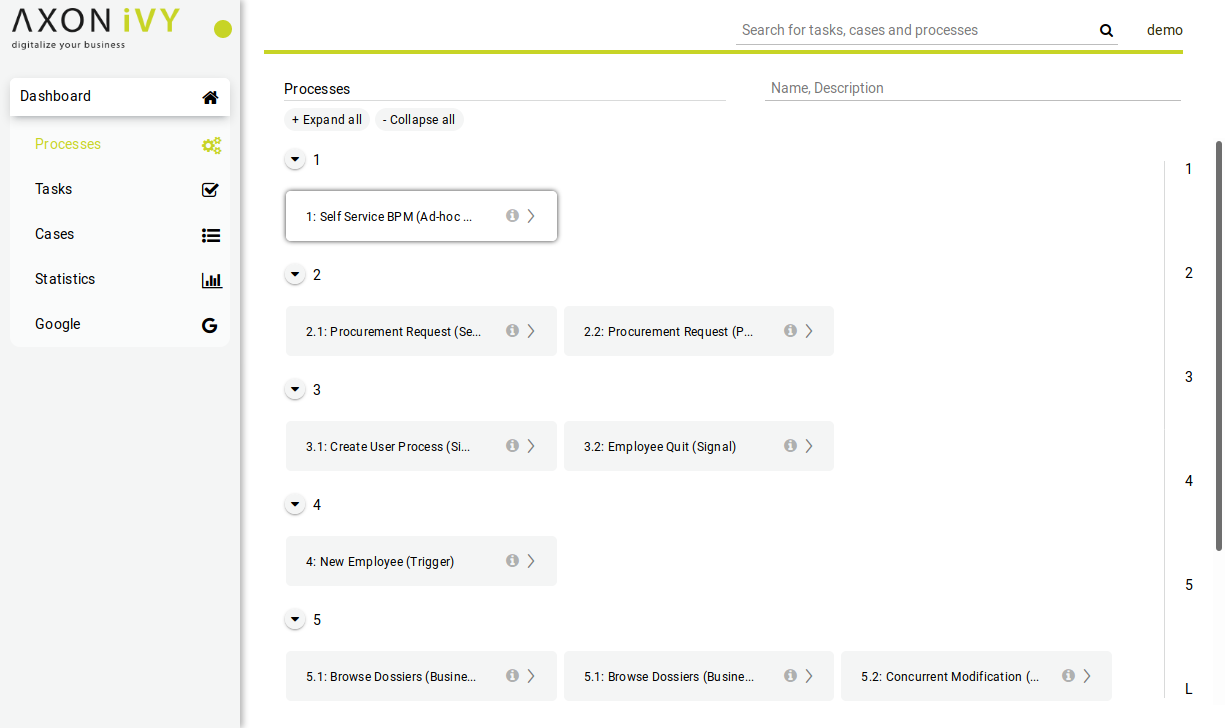
The main page of the Axon.ivy Engine looks like this

The Axon.ivy Engine is running in Demo Mode. This is because you did not install a valid license yet nor did you configure a system database. Note, that everything that you do with the Axon.ivy Engine running in Demo Mode is lost when you shut down the engine. However, you can use the engine also in Demo Mode and tryout the pre-installed Portal application by clicking on the Portal Home link. To login use one of the predefined demo users: demo, guest or admin. The passwords of the demo users are equal to the user names (E.g. demo for the demo user). Login as demo user and try to create a TODO task for the guest user using the Axon.ivy Selfservice process:
Configure the TODO task as follows:
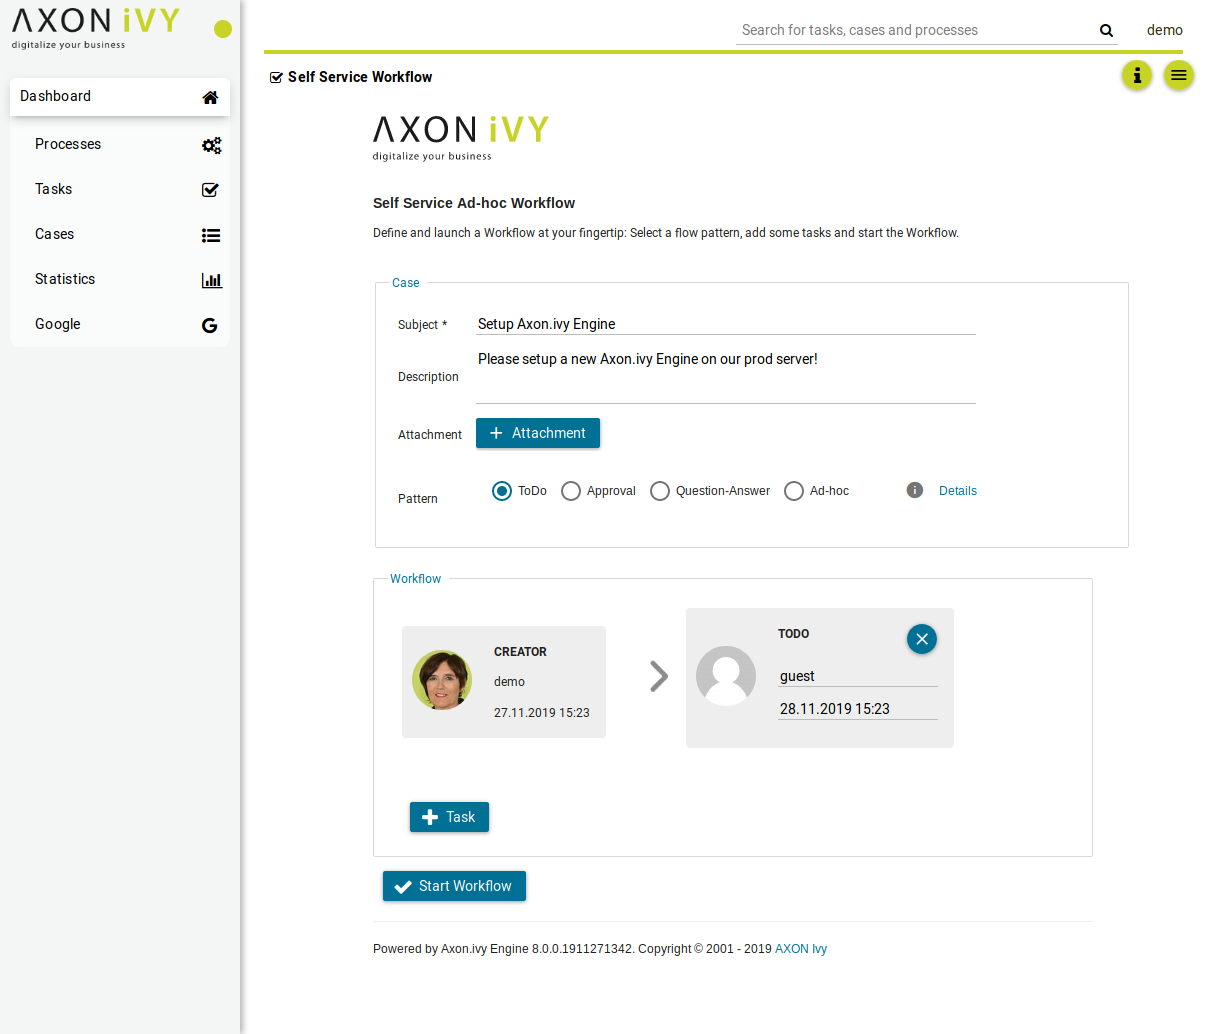
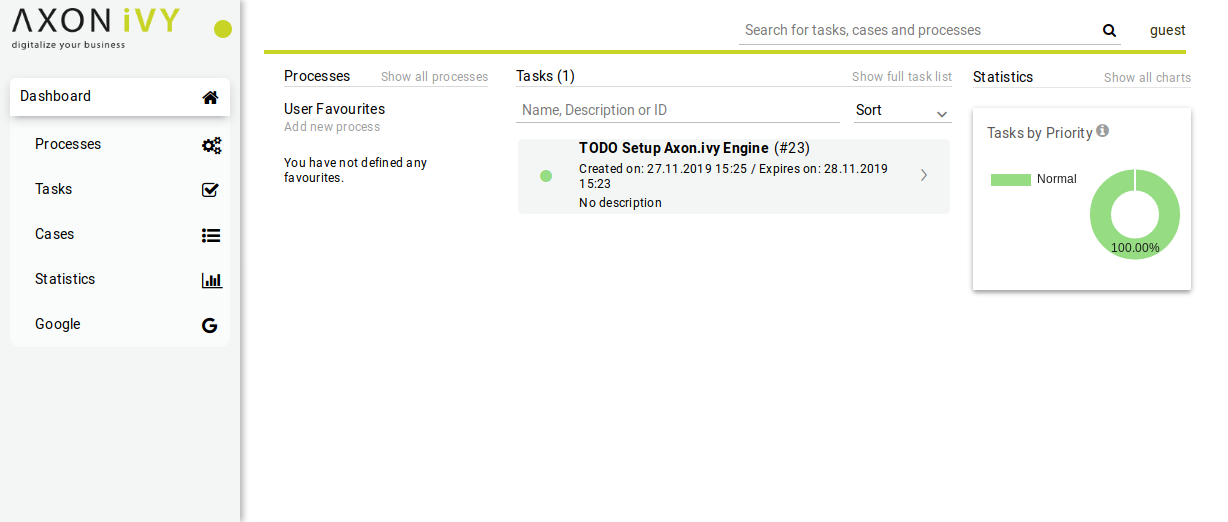
Start the workflow by pressing the Start Workflow button. After that, logout, then login again as guest user. On the task list, you now see the new TODO task that you created before. Try to work on the task by clicking on it:
Go ahead and play around with the Selfservice process. Try out different types of tasks.
Note
In Axon.ivy a task is a piece of work (a part of a process) that is assigned to a user or role. A user to whom a task is assigned or who has the role to which a task is assigned can work on the task. When a user works on a task the task disappears from the task list of other users who might also able to work on the task. This means only one user can really work on a task at the same time. In a process, it is possible to define parallel tasks. Therefore, it is possible that two or more users work parallel on different tasks of the same process instance. In Axon.ivy a process instance is called a case.
Configure the Engine
Now, let’s configure the Axon.ivy Engine with a license and system database.
To start with that you must first request a valid Axon.ivy Engine license. Either you get a license for your productive system through one of our sales personal or contact our support for time limited tryout licenses. If you do not have a license you can skip this section and continue with the next section.
Moreover, you need to have a supported database server up and running with a database user that has the rights to create new databases. The configuration and creation of the system database differs a little bit depending on the database system you use. We will use a PostgreSQL database server.
You can start the Setup Wizard on the main page of the Axon.ivy Engine (e.g. http://localhost:8080) by clicking on the link of the Demo Mode warning message.
On the first page use the Choose licence button to install your license file or drop it inside the field.
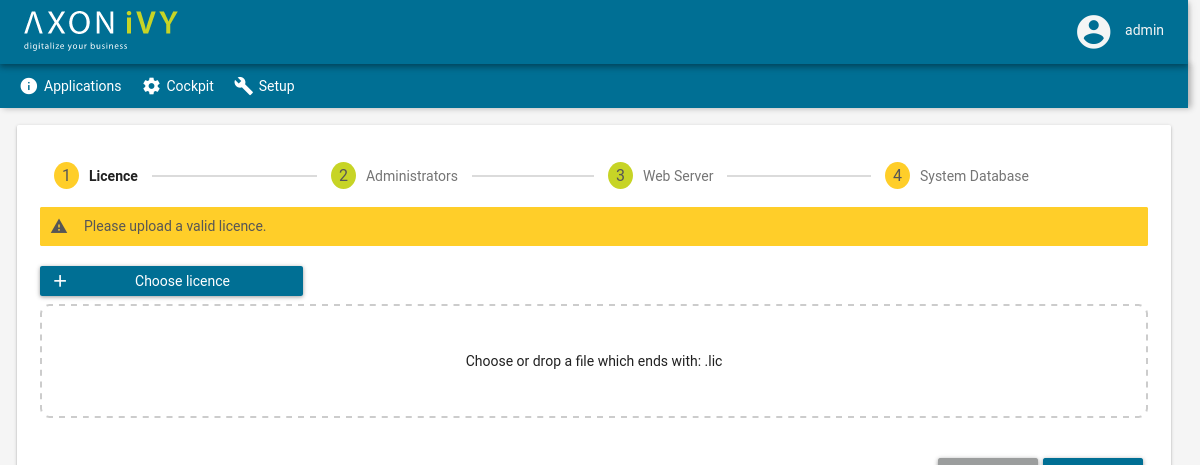
Your installed licence can be viewed if you click on the link at the top right. Press the Next button to continue.
On the next page, you can configure system administrators.
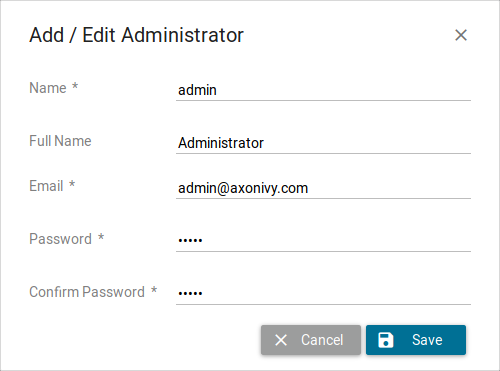
Click Add Administrator, fill in the form and press the Add Administrator button.
Note
Administrators can administrate the Axon.ivy Engine. For example, they can add or remove users, assign user to roles, deploy projects, etc. Therefore, you need at least one administrator to administrate the Axon.ivy Engine. The Email addresses of administrators are used to send mail notifications if license problems occur.
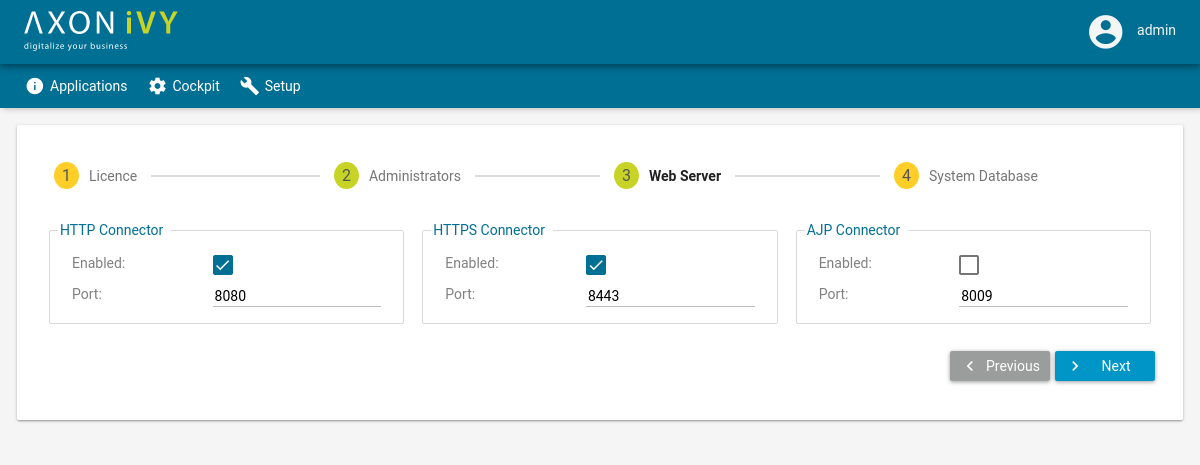
On the next page configure which protocol connectors and ports the Axon.ivy Engine internal web server should provide.
Note
The Axon.ivy Engine internal web server provides connectors for the following protocols:
- HTTP
Protocol used by web browser to communicate with a web server. This protocol is not secure since the communication is not encrypted. Axon.ivy Engine uses port 8080 by default.
- HTTPS
Like HTTP but secure. It uses TLS to encrypt the communication between the web browser and server. Axon.ivy Engine uses port 8443 by default.
- AJP
This protocol is used to communicate with a Microsoft IIS or Apache httpd front-end server. AJP means Apache Jakarta Protocol. Axon.ivy Engine uses port 8009 by default.
Have a look at the ivy.webserver.yaml to see what other parts of the webserver and its connectors can be adjusted for your needs.
Press the Next button.
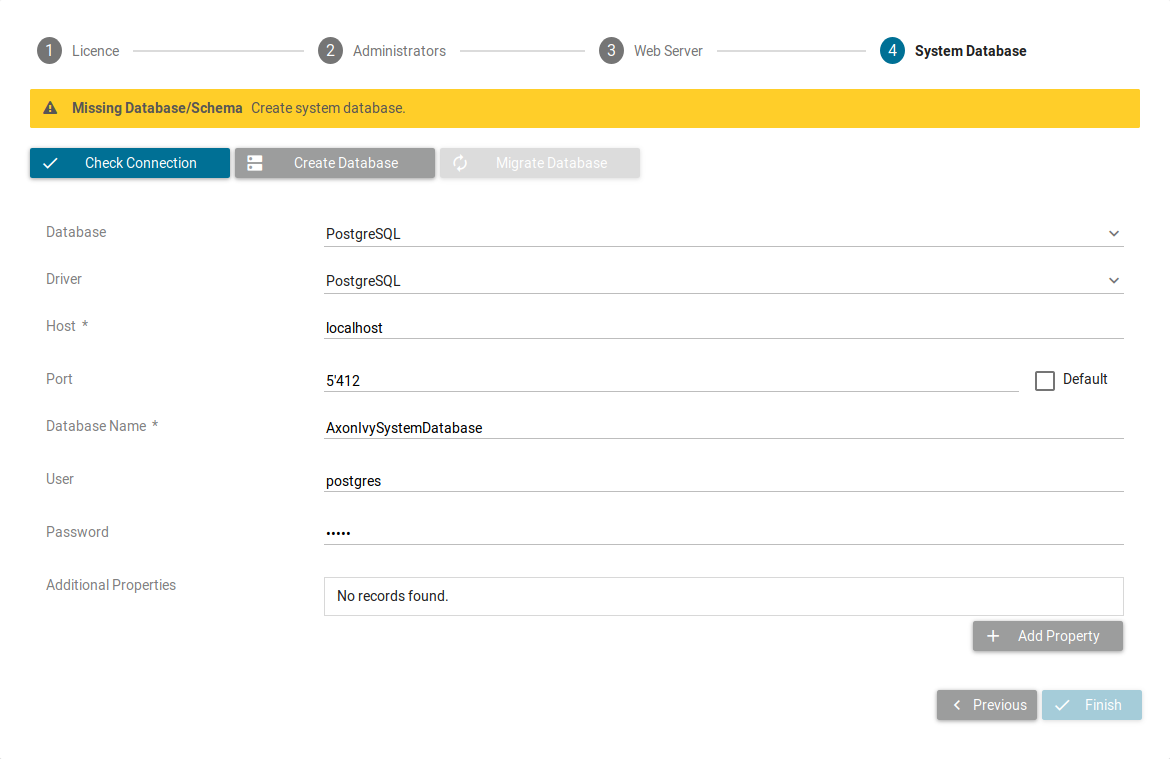
On the next screen choose the correct Database and Driver (in our case PostgreSQL). Configure the Host and Port where your database server is running and listening. Configure the Username and Password of a database user that has the right to create a new database on the database server. Press the Create Database button.
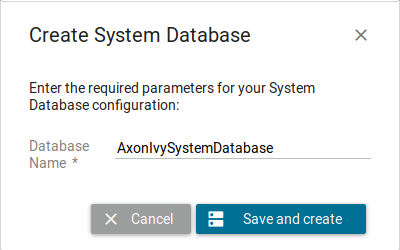
On the appearing dialog configure the name of the Axon.ivy system database. Press the Save and create button to save and create the system database.
As soon as the database creation is finished the following dialog appears:
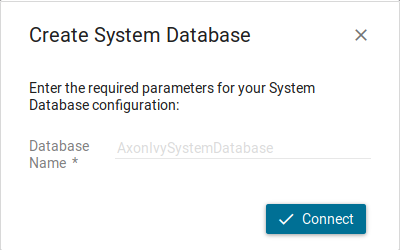
Press the Connect button to connect to the newly created system database.
Note
The system database is used by the Axon.ivy Engine to store configurations, users, roles, process instances, tasks and process data
Press the Finish button.
A dialog appears and you can click OK to go back to the main page.
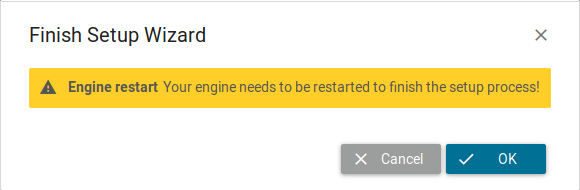
Switch back to the Control Center and restart the Axon.ivy Engine by stopping and starting it again.
Note, that the HTTP port of the Axon.ivy Engine may have changed. If you did change the HTTP settings. So open again a web browser and navigate to http://localhost:8080. Have you seen that the header with the Demo Mode message is gone? You now have a production ready Axon.ivy Engine.
Deploy a project
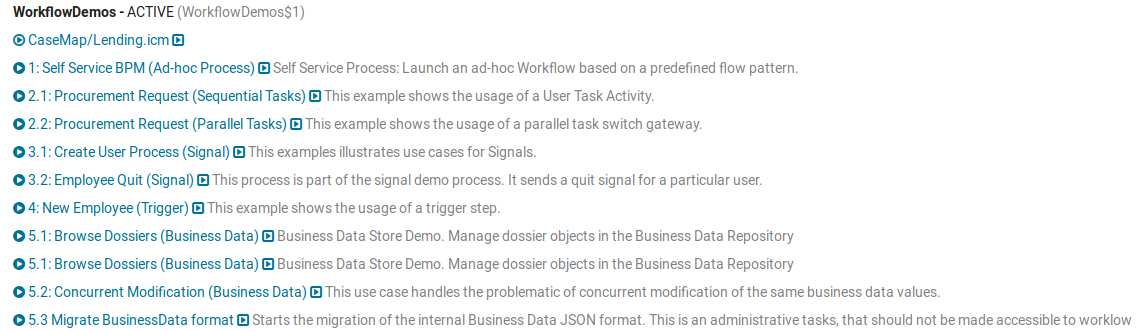
Let’s deploy an Axon.ivy project to the Axon.ivy Engine. Simply download
WorkflowDemos and drop it in [engineDir]/deploy folder. Refresh the
main page of the Axon.ivy Engine. There is now a new section called
WorkflowDemos available with new links to start processes.
Congratulations you have installed and configured your first Axon.ivy Engine and deployed your first Axon.ivy project.