CMS Manipulation
CMS View
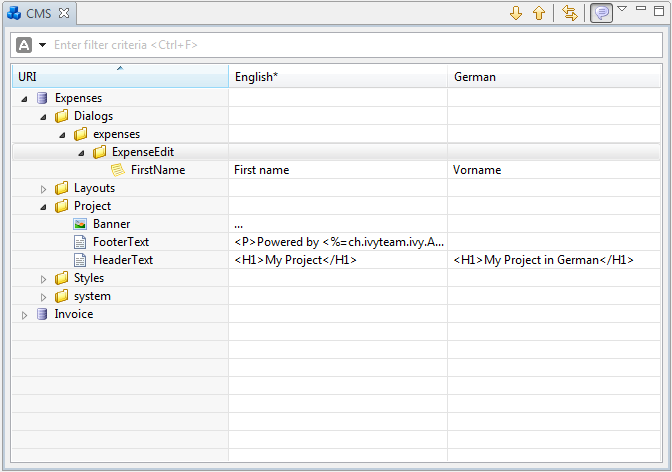
This view is the central UI element for the interaction with the CMS. It shows the CMS of all open projects in the workspace including all Content Objects and their values and offers multiple ways to perform actions on the CMS and the Content Objects.
Accessibility
Window -> Show View -> CMS
Features
Display Content Object values
The central element in the view is a table tree that shows the structure of the CMS in the first column (the tree column). Furthermore the table can display one column for every language that is available for at least one project in the workspace. In those columns the value of the corresponding Content Object in the corresponding language is shown.
If you want to focus on the CMS structure then you can hide all the
language columns so that only the first column is displayed. Just click
on  in the toolbar of the view to toggle between hiding and
displaying the columns for the languages.
in the toolbar of the view to toggle between hiding and
displaying the columns for the languages.
If you want to see the column for the values then you can configure for
which languages the table shows a column. By default the view shows a
column for the default language(s) of the project(s) in the workspace.
Click on the menu (![]() ) in the view to configure which columns are
visible.
) in the view to configure which columns are
visible.
Note
The * in the title of a language column indicates that the language is the default CMS language for a project. Because you can have multiple projects in your workspace, it may be that you have multiple default languages and therefore multiple columns with a *. You can define the default languages for every project in its Content Management System Settings.
Inline Editing
For some types you can edit the Content Object values directly. For (some) text based types you can edit the text directly in the view, just click in the cell of the value and type.
For file based types you can import a file for each value directly in
the cell. Just move your mouse over the cell of the value for which you
want to import a file and click on the  icon on the right.
Values for which already content is available show a … in their
cell.
icon on the right.
Values for which already content is available show a … in their
cell.
Filter the view
By using the CMS search you can filter the contents in the view according to your search string. Enter a filter expression and the CMS table tree will be reduced to only show the Content Object matching that expression. If there is no match, all Content Objects are shown.
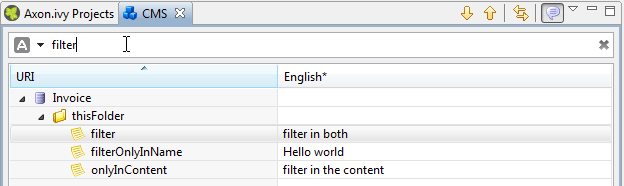
Use an asterisk * as wildcard to search for any sequence of characters:
E.g. the filter expression ivy*data would match
ivyMyFancyData, ivydata, ivy something else data, etc.
Use a question mark ? as wildcard to search for any single character:
E.g. the filter expression image?data would match imageZdata, image0data, etc.
Tip
An asterisk (*) is always added implicitly at the end of your filter
expression. So if you enter the string ivy, the filter expression
that is really used is ivy*.
Add new Content Objects
You have basically two options to create new Content Objects, either you do it kind of generic or you can create them from file(s). As a convenience method you can create folders in a more direct and simpler way than other Content Objects as a folder does not have value(s). You can execute all three actions only in the popup menu of the view.
Use Add… in the popup menu to create new Content Objects and enter the type, the name, the value and whether you want to create values for all languages in the CMS.
The default for the type is String. The Document types are not available for manual choosing, use Add from file(s)… if you want to create such Content Objects.
In the name column you can use a simple name, an absolute or relative path. If you do so, then Axon.ivy will check the corresponding path and create folder Content Objects where necessary.
For text based types you can edit the text directly in the value column.
For file based types you can import a file, just move your mouse over
the cell and click on the icon.
In the last column you can decide whether you want to automatically create one value for every CMS language or not. The default comes from the corresponding project property and is overwritten if changed.
If you choose to create the Content Objects from file (the Add from file(s)…) command in the popup menu, then first a file chooser dialog is opened. In there select the files that you want to have in the CMS and click OK. Then Axon.ivy will create a Content Object for each file. The type is detected automatically (if it cannot be detected then that file will be omitted), the name is set to the file name and the default value is the file content. After the file chooser, Axon.ivy opens the normal Add Content Object dialog so that you can revise the decisions before the Content Objects gets actually created.
You can add Content Objects too from the web. Just copy the URL and click on the Add from URL… command in the popup menu. In the next dialog, just enter the URl and continue to import the Content Object from the web.
Other actions
In the view you can invoke several actions from the popup menu:
 Rename
Opens a dialog where you can enter a new name for the currently selected Content Object.
Warning
When you rename a Content Object, the URI of all its children will change (e.g. from
/Labels/Common/Okto/Labels/Buttons/Ok). Any references to those objects (including the renamed object) will not be updated automatically and might be broken! Copy
CopyCopies the currently selected Content Object (including all of its children) to the clipboard. The copied Content Objects can be inserted somewhere else in the content tree with Paste.
 Paste
PasteInserts any Content Object(s) that was copied before to the clipboard with Copy. The copied Content Objects are inserted as children of the selected Content Object .
Note
Not all Content Object types are allowed as children of other Content Object types. In such a case the Paste menu entry might be disabled.
 Delete
Deletes the currently selected Content Object (including all of its children) from the CMS after requesting a confirmation from the user.
Warning
Deleting a Content Object will break all references to the object or its children!
- Copy URI
Copies the URI of the currently selected Content Object to the system clipboard. Use CTRL + v to insert the URI into any text fields or editors.
 Copy URI as IvyScript macro
Copies the URI of the currently selected Content Object as an IvyScript macro tag to the system clipboard. Use CTRL + v to insert the macro into a Macro Editor.
 Refresh Content
Refreshes (i.e. reloads) the content below the currently selected Content Object.
Drag and Drop
Content Objects (e.g. strings and images) from the CMS view can be dragged and dropped into the Html Dialog editor to be used for label texts or for images.
Content Object Editor
The Content Editor is used to manipulate Content Objects in the Content Management System (CMS) of a project.
Accessibility
Double click on a Content Object in the CMS view or select one and press the ENTER key.
Content Object header
The editor has a header with a title and buttons for the most important actions.
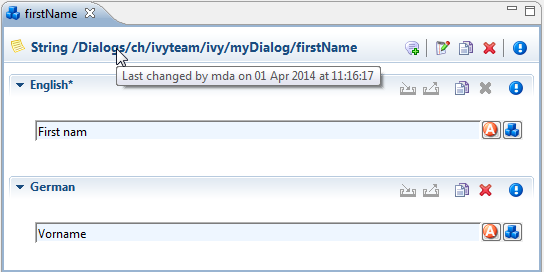
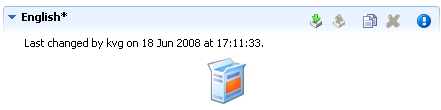
In addition to the Content Object type and the path in the title you can find more information about the Content Object in the tool tip of the title. There you see the date, time and the author of the last change. And the following actions are available on the right end of the header:
 Open page preview
Opens a preview of the Content Object in a web browser. This action is only available within a Page Content Object. If the Web Browser View is active it is used otherwise an external browser is opened to show the preview.
 Add new Content Object value
Adds a new value to this Content Object. A dialog is opened for the user to select the language of the new value.
- Rename Content Object
Opens a dialog where a new name for the this Content Object can be entered.
Warning
When you rename a Content Object, the URI of all its children will change (e.g. from
/Labels/Common/Okto/Labels/Buttons/Ok). Any references to those objects (including the renamed object) will not be updated automatically and might be broken!- Copy Content Object
Copies this Content Object (including all of its children) to the clipboard. The copied objects can be inserted somewhere else in the content tree with Paste.
- Delete Content Object
Deletes this Content Object from the CMS. A Content Object is deleted with all of its values and child Content Objects.
Warning
Deleting a Content Object will break all existing references to it or to any of its children!
Content Object Values area
Each of the values of a Content Object is shown with its corresponding value editor inside a collapsible section that is labelled with the language of the value. The default value is marked with a * (asterisk) after the language name. The date, time and author of the last change is also shown for each value in the tool tip of the title of the value. Like in the header for the Content Object you find some actions on the right side:
- Import value content
Opens a file dialog that allows to select a file with content to be imported.
Note
Not all content types allow to import content (e.g. strings do not). If the import is not supported, then the toolbar action will be disabled.
The file selection dialog will only show files that are suitable for import, depending on the standard extension for the required content type. i.e. you cannot select a .css file for import into a png Image Content Object.
 Export value content
Some content types allow to export the content of the value into a file. If the export is not supported, then the toolbar action will be disabled.
- Copy Content Object value
Copies this Content Object value to the clipboard. The copied objects can be inserted somewhere else in the content tree with Paste.
- Delete Content Object value
Deletes this Content Object value from the CMS.
Content Object Value Editors
The Content Object Values area of the CMS editor contains specific editors for values of the different Content Object Types. This section briefly introduces them.
String Editor

The string editor is simply a single-line text field; it does not accept line breaks. Content cannot be imported.
Text Editor

The text editor has two views: an Edit and a Source view. The Edit view is a WYSIWYG HTML text editor in which you can edit and format your text and the text appears like it will be at run-time. The Source view is a text only editor where you can edit the text directly in HTML. Both views are synchronized, if you edit text in the Edit view then the text in the Source View gets updated and vice versa. Content cannot be imported.
Image Editor
The image editor shows images of the types GIF, PNG and JPG. Content import is supported. For images that are larger than the available space just the top left corner is displayed.
Document Editor
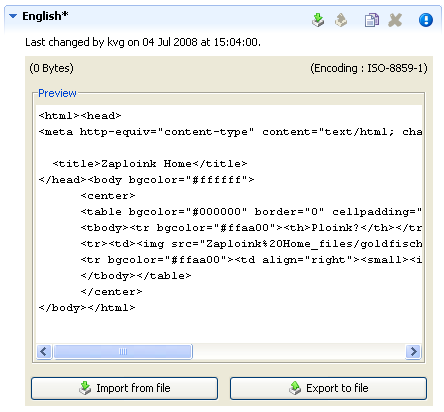
- Preview
The document editor is used for almost all document content objects (basically for binary data). The editor can show a preview of textual content and will also show information about the size and encoding of the displayed content. For binary document types (e.g. PDF, audio or video) a preview is not available.
- Import from File
Importing of content is supported. The import will try to infer the encoding of the imported document. If this is not possible, the user is asked to set the encoding.
Source Editor
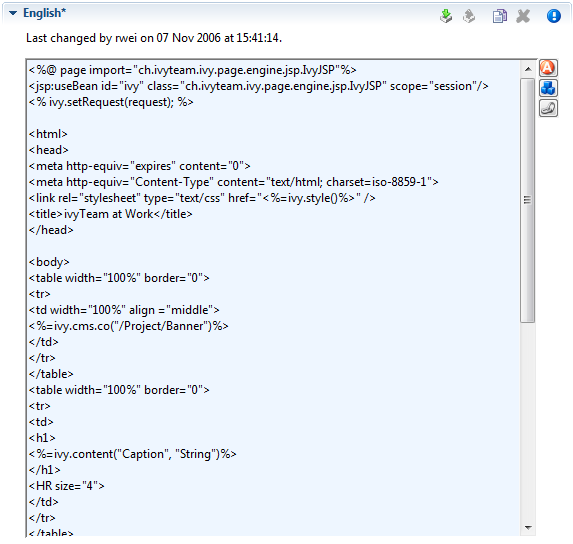
The source editor is used to edit any kind of source text like JSP, HTML or JavaScript.
By clicking on the  button, the attribute browser opens where
the user can insert process data. An optional condition may be
specified as well as a suitable format for the type of the selected
attribute (if available).
button, the attribute browser opens where
the user can insert process data. An optional condition may be
specified as well as a suitable format for the type of the selected
attribute (if available).
CSS Editor
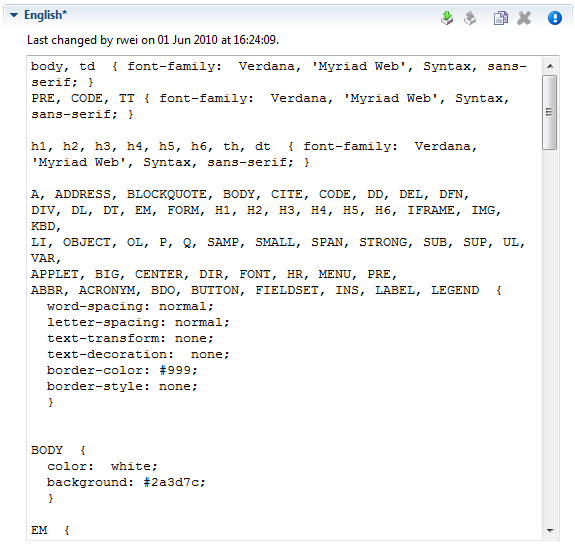
The CSS editor is a simple text editor. You can import the content from a file.
HTML Table Editor
The HTML Table Editor is explained in the HTML chapter.
HTML Link Editor
The HTML Link Editor is explained in the HTML chapter.
Result Table Editor
The Result Table Editor is explained in the HTML chapter.
HTML Page Editor
The HTML Page Editor is explained in the HTML chapter
HTML Panel Editor
The HTML Panel Editor is explained in the HTML chapter.
Smart Table Content Editor
The Smart Table Content Editor is explained in the HTML chapter.
JSP Editor
The JSP Editor is explained in the HTML chapter.
Layout Editor
The Layout Editor is explained in the HTML chapter.