Deployment
Bring your processes to life by deploying them on an Axon.ivy Engine. Deployment simply means to install an Axon.ivy project on an Axon.ivy Engine. Proceed as follows to deploy a project.
Get a prepared ivy project from your developer.
Deploy the project by e.g. simply dropping the file in the deployment directory.
Check the result of the deployment on the server info page.
Prepare
Before deployment, the Axon.ivy project must be available as ivy-archive (IAR) or packed as a zip-archive (ZIP). It is also possible to pack multiple Axon.ivy projects in one single zip-archive. All project dependencies must be resolved, either already installed in the application or part of the deployment.
We recommend to build a zip-archive, which contains all projects of an application.
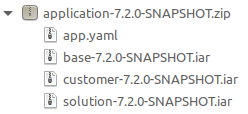
Sample full application zip-archive
You are able to configure the application within a full application zip-archive. Also, proper versioning is important.
Deploying
Our file based deployment mechanism makes the deployment very easy, just by dropping the file in the deployment directory, the deployment will be started immediately if the Axon.ivy Engine is running. Otherwise, the deployment is executed when the engine is starting.
There are subdirectories in the deployment directory for each application. The project can be copied to the corresponding subdirectory. It is also possible to create a subdirectory manually. In this case a new application will be created. Alternatively, the project can also be placed in the deployment directory itself. It is then deployed into the application with the same name as the filename.
We strongly recommend to automate the deployment in a CI/CD pipeline. For
this purpose we offer a REST API which is
accessible via HTTP/HTTPS. If you don’t have the possibility to connect to the
Axon.ivy Engine in this way you can use the file based deployment mechanism (e.g.
via SSH) as described above. For both scenarios you can use well-known command
line tools like curl or scp to build such an automated pipeline.
If you have Maven available in your environment, you can use our
Maven Plugin, which supports both deployment types. If you are
not interested in automation, you can also use the User
Interface.
Additionally, the deployment behavior can be influenced with deployment options.
Check the results
Go to the server info page, which is by default http://localhost:8080. You should see now your new processes available. If you think there is missing something you better check the deployment logs.
The engine cockpit provides direct feedback on the user interface, the REST API by the HTTP response and the deployment directory creates new files in the same directory where you have dropped the deployment file:
File suffix |
Description |
|---|---|
.deployed |
Last deployed file to the engine in case of a successful deployment |
.notDeployed |
Last not deployed file to the engine in case of error while deployment |
.deploymentLog |
Contains the log output which is written during the deployment |
.deploymentError |
Contains the error cause and is only written when the deployment fails |
Advanced Deployment
To fully automate your CI/CD pipeline, you may want to further configure your target application of your deployment and also influence the deployment behavior.
Configure Application
If you are deploying a full application zip-archive you can optionally add an app.yaml in the root of your zip-archive, which contains the configuration of the application.
1 2 3 4 | # sample app.yaml which can be part of the full application zip-archive
StandardProcess:
DefaultPages: ch.ivyteam.ivy.project.portal:portalTemplate
MailNotification: ch.ivyteam.ivy.project.portal:portalTemplates
|
This file should always contain configurations which are the same for all
installations of the application or serve as good defaults like configuration of
the StandardProcess.
The reason is that this app.yaml will be deployed in the root folder of the
application itself and serves as additional configuration for the application
but with a lower priority than the regular app-<APPNAME>.yaml
(e.g. app-myApp.yaml) in the configuration directory.
Versioning
It is highly recommended that you increase the version of your project each time you want to deploy a new version of your project on the engine. This ensures that you will not break currently running cases, and you have the possibility to go back to the previous version if the new version does not work as expected.
Even though overwriting an already deployed process model version with running cases is possible. It is at your own risk and should only be done if you are aware of the possible consequences and ready to accept them.
Deployment Options
With deployment options you can influence the deployment behavior:
1 2 3 4 5 6 7 8 9 10 11 12 13 14 15 16 17 18 | # Example of a deployment options file using YAML format.
# See http://axonivy.github.io/project-build-plugin/release/deploy-to-engine-mojo.html for
# more information about deployment options parameters.
# All parameters are set to their default values and listed in [brackets].
# Indicates whether project test users should be deployed to the engine or not.
deployTestUsers: AUTO # [AUTO], TRUE, FALSE
# Defines how project deployment should affect engine configuration.
configuration:
overwrite: false # [false], true
cleanup: DISABLED # [DISABLED], REMOVE_UNUSED, REMOVE_ALL
# Deployment target settings.
target:
version: AUTO # [AUTO], RELEASED, (version values, e.g. 2.5 or (2.0,3.0])
state: ACTIVE_AND_RELEASED # [ACTIVE_AND_RELEASED], ACTIVE, INACTIVE
fileFormat: AUTO # [AUTO], PACKED, EXPANDED
|
See the Axon.ivy Project Build Plugin deploy documentation for more information about the deployment properties.
There are multiple locations where you can put your options file:
Deployment specific options file - If you want to provide options for a single deployment simply create a file that has the same prefix as the file you want to deploy with a suffix of
.options.yaml. E.g. if the file you want to deploy ismyProject.iarthen create an options file that is calledmyProject.iar.options.yaml. Note, that after the deployment themyProject.iar.options.yamlfile will be removed automatically.Inside the file that you are deploying - Put a
deploy.options.yamlfile inside your project directory,*.iaror*.zipthat you want to deploy.
A specific deployment options file will take precedence over a packed options in the deployable file.
Maven Plugin
The Maven project-build-plugin makes automated continuous deployment to an Axon.ivy Engine possible. The Maven plugin can deploy projects file based or via HTTP. The file based mechanism is the default.
For the file based deployment the deployment folder must be available on the same machine on which the build is executed. You may use Windows-Shares or SMB-Configurations.
On the other hand the HTTP deployment is based on the REST API service of the Axon.ivy Engine. For the deployment you need the credentials of an administrator.
Command line deployment
The deploy-to-engine goal can be execute on the command line. The
following two examples deploys the project myProject.iar to the
application portal of the Axon.ivy Engine.
#  file based deployment to c:/axonivy/engine
mvn com.axonivy.ivy.ci:project-build-plugin:7.4.0-SNAPSHOT:deploy-to-engine \
  -Divy.deploy.file=myProject.iar \
  -Divy.deploy.engine.dir=c:/axonviy/engine \
  -Divy.deploy.engine.app=portal
# http based deployment to http://localhost:8080/
# default credentials admin/admin used for demo engine
mvn com.axonivy.ivy.ci:project-build-plugin:7.4.0-SNAPSHOT:deploy-to-engine \
  -Divy.deploy.file=myProject.iar \
  -Divy.deploy.method=HTTP \
  -Divy.deploy.engine.url=http://localhost:8080/ \
  -Divy.deploy.engine.app=portal
The http based deployment method uses the internal Deployment rest api.
Goal execution with POM
The deploy-to-engine goal can also be executed with a given pom.xml file.
The configuration where to deploy the project can then be configured in the pom.xml.
The following pom.xml snippet deploys the current project to the
application portal of the Axon.ivy Engine at c:/axonivy/engine.
1 2 3 4 5 6 7 8 9 | <plugin>
<groupId>com.axonivy.ivy.ci</groupId>
<artifactId>project-build-plugin</artifactId>
<extensions>true</extensions>
<configuration>
<deployToEngineApplication>Portal</deployToEngineApplication>
<deployEngineDirectory>c:/axonivy/engine</deployEngineDirectory>
</configuration>
</plugin>
|
Execute the deploy-to-engine goal in the directory where the pom.xml file is located:
mvn ivy:deploy-to-engine
The next example deploys the current project to the application portal to an
Axon.ivy Engine which is accessible at http://localhost:8080. You
need to configure the credentials of an administrator user in the maven
settings.xml file. Your custom defined serverId must match with
deployServerId.
1 2 3 4 5 6 7 8 9 10 11 | <plugin>
<groupId>com.axonivy.ivy.ci</groupId>
<artifactId>project-build-plugin</artifactId>
<extensions>true</extensions>
<configuration>
<deployToEngineApplication>portal</deployToEngineApplication>
<deployMethod>HTTP</deployMethod>
<deployServerId>serverId</deployServerId>
<deployEngineUrl>http://localhost:8080/</deployEngineUrl>
</configuration>
</plugin>
|
1 2 3 4 5 6 7 8 9 10 11 | <settings xmlns="http://maven.apache.org/SETTINGS/1.0.0"
xmlns:xsi="http://www.w3.org/2001/XMLSchema-instance"
xsi:schemaLocation="http://maven.apache.org/SETTINGS/1.0.0 https://maven.apache.org/xsd/settings-1.0.0.xsd">
<servers>
<server>
<id>serverId</id>
<username>admin</username>
<password>admin</password>
</server>
</servers>
</settings>
|
Bind to Maven Lifecycle
To deploy an ivy-archive (IAR) during it’s maven build lifecycle,
configure an execution which binds the deploy-to-engine goal to a lifecycle phase.
1 2 3 4 5 6 7 8 9 10 11 12 13 14 15 16 17 | <plugin>
<groupId>com.axonivy.ivy.ci</groupId>
<artifactId>project-build-plugin</artifactId>
<extensions>true</extensions>
<configuration>
<deployToEngineApplication>Portal</deployToEngineApplication>
<deployEngineDirectory>c:/axonivy/engine</deployEngineDirectory>
</configuration>
<executions>
<execution>
<id>deploy.to.engine</id>
<goals><goal>deploy-to-engine</goal></goals>
<!-- Bind goal to maven site-deploy phase -->
<phase>site-deploy</phase>
</execution>
</executions>
</plugin>
|
Execute the maven lifecycle in the directory where the pom.xml file is located:
mvn site-deploy
Further examples are documented on GitHub in the project-build-examples repository.