Microsoft IIS
Automatic Configuration
The script autoconfig.bat in folder [engineDir]/misc/iis
of your Axon.ivy Engine automatically installs and configures IIS.
This is the recommended way to integrate a new IIS Server with an Axon.ivy Engine. If you have an already existing IIS Server installation, follow the steps in chapter Manual Configuration.
After running the autoconfig.bat script, you need to set the IvyContextName
to “ivy”, as the script presumes this value and the default is “” since
version 9.1. See ivy.webserver.yaml on how to configure IvyContextName
and AJP settings.
# sample ivy.yaml with 'ivy' as context name
WebServer.IvyContextName: ivy
You can check if the integration is working by opening a web browser on address http://<your host>/ivy/
Manual Configuration
If your Microsoft Internet Information Server is not running on the same host as the Axon.ivy Engine then copy the integration directory to the host where your IIS is running. All next steps have to be done on the host the IIS is running on.
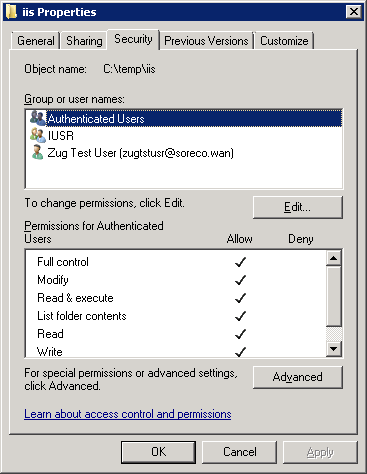
Allow the user groups Authenticated Users and IUSR to have Full control permission on the integration directory.
Install Features
Note
Instead of installing the features manually you can run the following command which ensures that all necessary IIS Features are installed:
PKGMGR.EXE /iu:IIS-WebServerRole;IIS-WebServer;IIS-CommonHttpFeatures;IIS-StaticContent;IIS-DefaultDocument;IIS-DirectoryBrowsing;IIS-HttpErrors;IIS-ApplicationDevelopment;IIS-CGI;IIS-ISAPIExtensions;IIS-ISAPIFilter;IIS-HealthAndDiagnostics;IIS-HttpLogging;IIS-RequestMonitor;IIS-Security;IIS-WindowsAuthentication;IIS-RequestFiltering;IIS-Performance;IIS-HttpCompressionStatic;IIS-WebServerManagementTools;IIS-ManagementScriptingTools;IIS-ManagementService
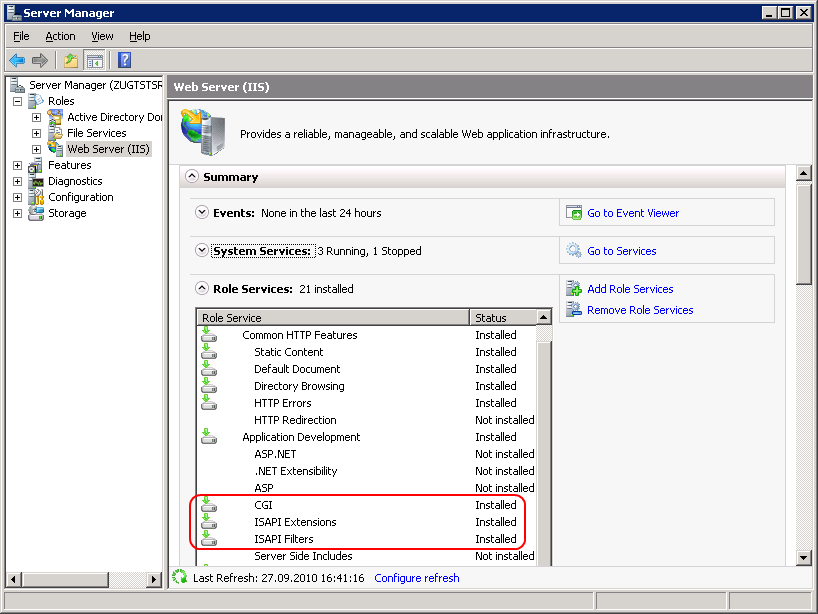
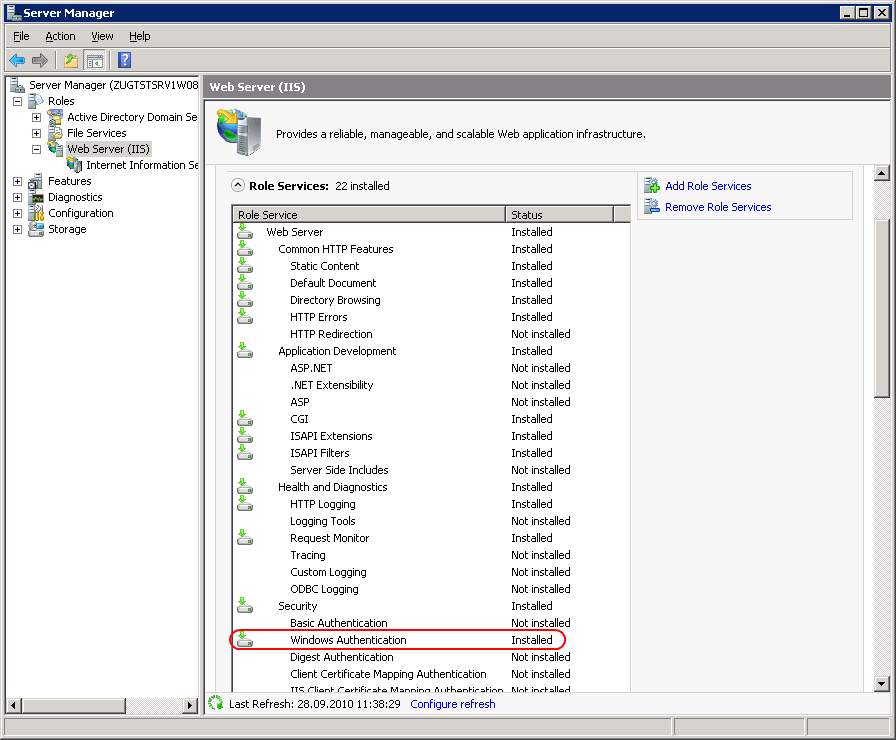
Open the Server Manager (Start > Server Manager). Select the Web Server (IIS). Validate that under the Role Services the services CGI, ISAPI Extensions and ISAPI Filters are installed. If this is not the case select the menu Add Role Services to install the missing services.
Feature delegation
Note
The following command automatically sets the feature delegation:
powershell -ExecutionPolicy unrestricted -ImportSystemModules Set-WebConfiguration //System.webServer/handlers -metadata overrideMode -value Allow -PSPath IIS:/
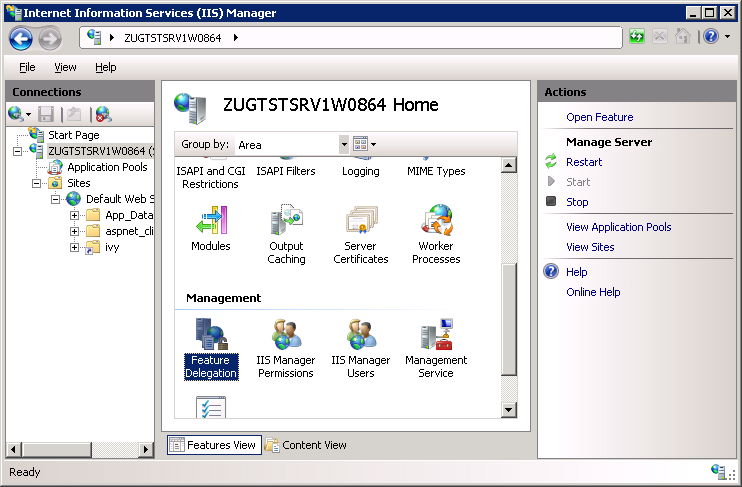
Open the Internet Information Services (IIS) Manager (Start > Internet Information Services (IIS) Manager). In the Connections pane select the node that represent your machine. In the Feature View open the Feature Delegation entry.
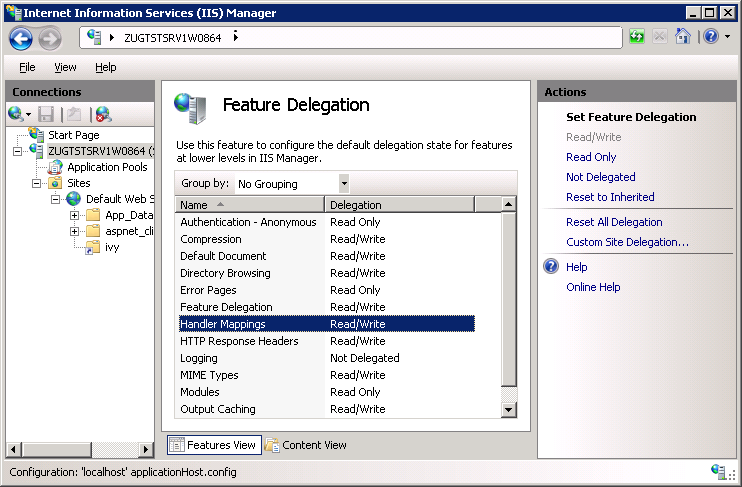
Ensure that the Delegation of the Handler Mappings are set to Read/Write. Use the menu Read/Write on the Actions pane to change the Delegation to Read/Write.
Virtual ivy directory
Note
The following commands automatically creates the virtual directory ivy:
set path=%path%;%windir%\system32\inetsrv
appcmd.exe add vdir /app.name:"Default Web Site/" /path:/ivy /physicalPath:<replace this with the path to the integration directory>
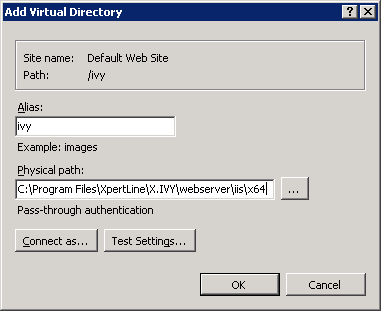
In the Connections pane navigate to the Web Site you want integrate the Axon.ivy Engine into. Use the context menu Add Virtual Directory … of the Web Site to add a new Virtual Directory. A dialog opens. Configure the Alias of the Virtual Directory with ivy and the Physical path of the Virtual Directory with the path of the integration directory. Click OK to close the dialog and create the Virtual Directory:
Handler Mapping Permissions
Note
The following command automatically sets the feature permission for the ivy virtual directory:
appcmd.exe set config "Default Web Site/ivy" /section:system.webServer/handlers /accessPolicy:Read,Write,Execute
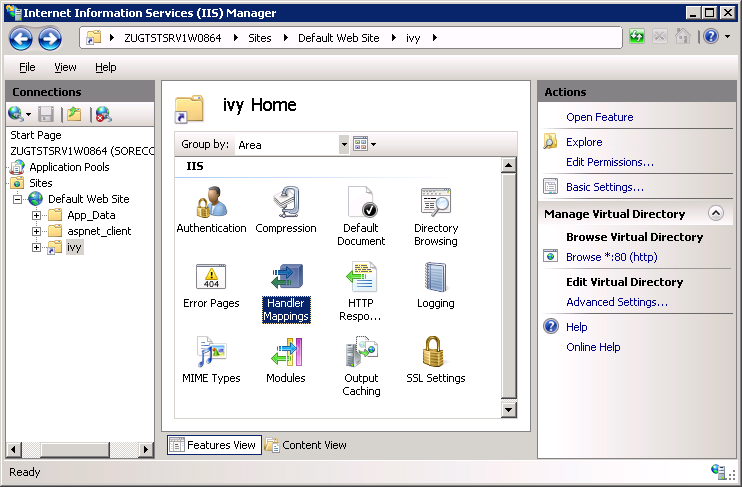
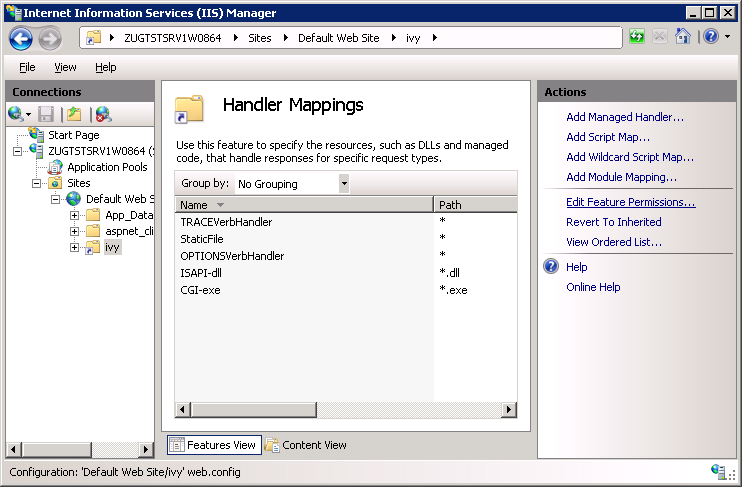
Select the new created Virtual Directory ivy in the Connections pane and open the Handler Mappings entry in the Feature View:
In the Actions pane select the Edit Feature Permissions … menu:
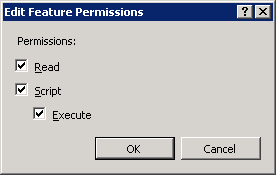
On the Edit Feature Permission dialog select all three permission and click OK:
Configure Error Page
Note
The following command automatically configures that the detailed error page of the Engine is shown:
appcmd.exe set config "Default Web Site/ivy" /section:system.webServer/httpErrors /errorMode:Detailed
Tip
See the web.xml for more information about this configuration.
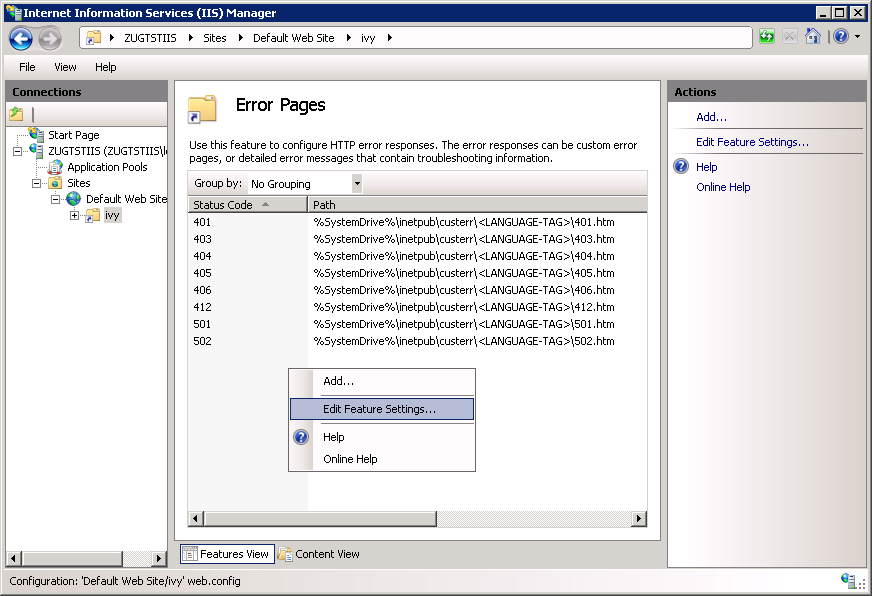
Select the new created Virtual Directory ivy in the Connections pane and open the Error Pages entry in the Feature View:
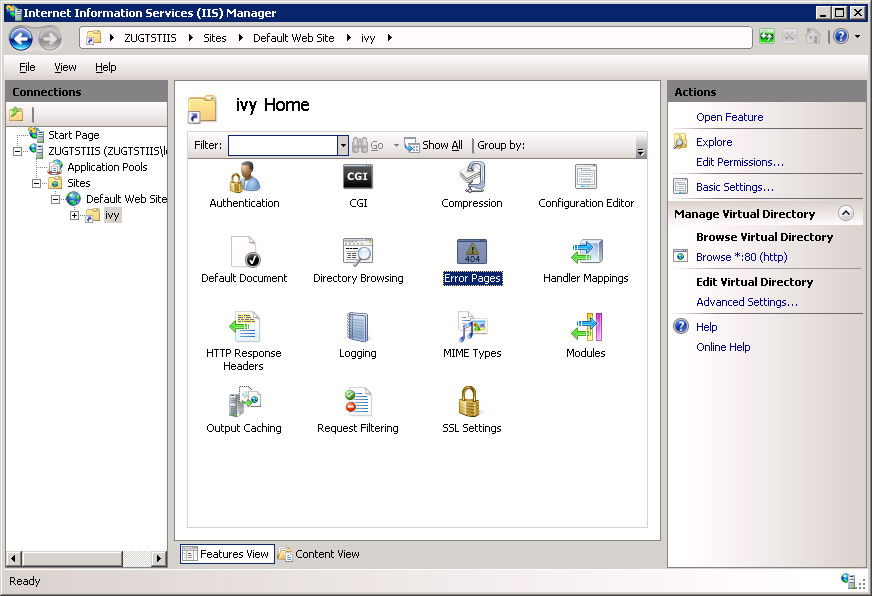
Right click and select Edit Feature Settings… or select the same from the Actions pane (in the right hand side)
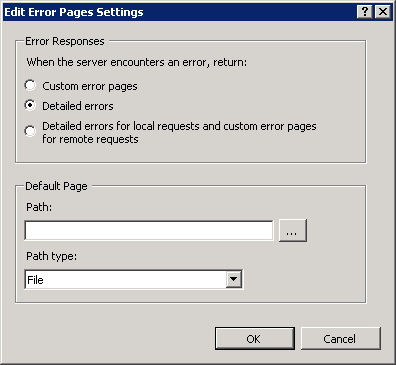
Select the Detailed errors radio button and click on OK
Install ISAPI filter
Note
The following command automatically adds the ISAPI Filter:
appcmd.exe set config /section:isapiFilters /+[@start,name='Tomcat',path='<replace this with the path to the integration directory>\isapi_redirect-1.2.42.dll']
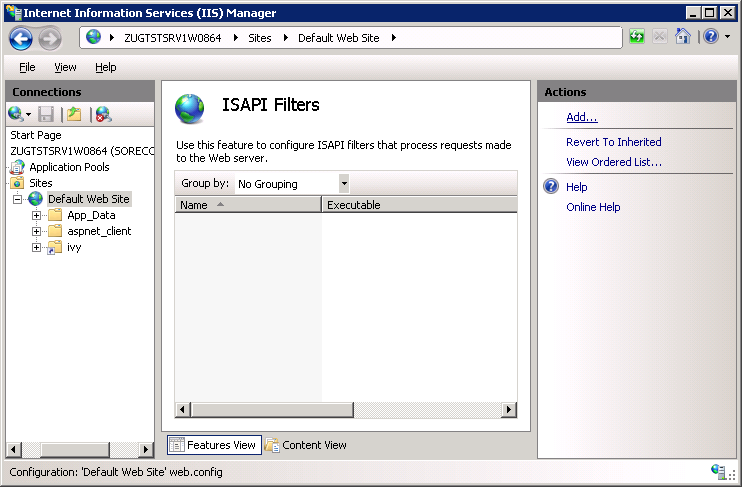
Select the Web Site in the Connections pane and open the ISAPI Filters entry in the Feature View:
In the Actions pane select the Add … menu:
On the Add ISAPI Filter dialog configure the Filter name with Axon.ivy Engine and the Executable with the path of the
isapi_redirect-1.2.42.dlllocated in the integration directory. Click OK to add the ISAPI Filter: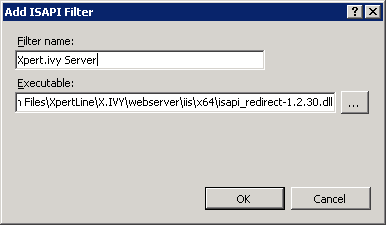
Change ISAPI filter restriction
Note
The following command automatically adds the ISAPI Restriction:
appcmd.exe set config /section:isapiCgiRestriction /+[@start,description='Tomcat',path='<replace this with the path to the integration directory>\isapi_redirect-1.2.42.dll',allowed='true']
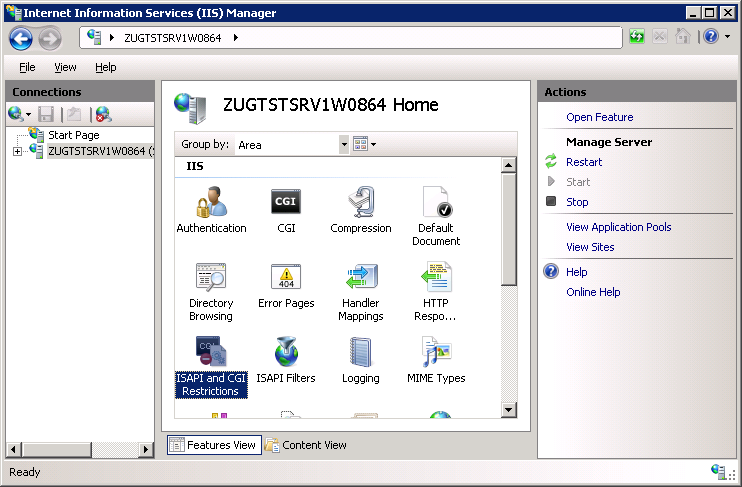
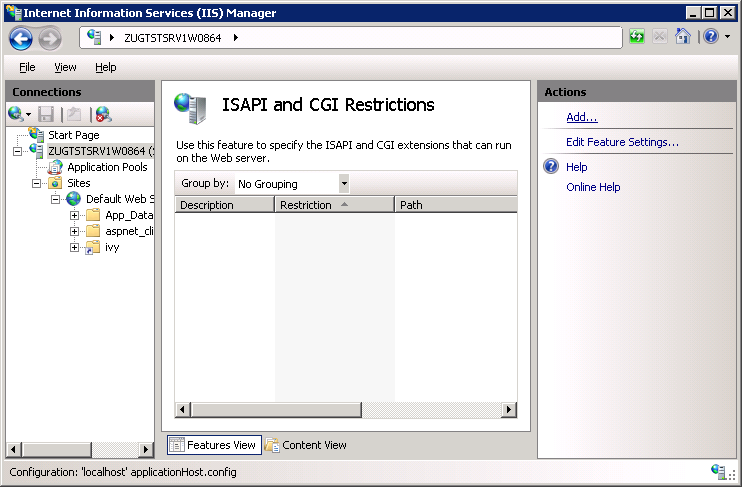
In the Connections pane select the node that represent your machine and open the ISAPI and CGI Restrictions entry in the Features View:
In the Actions pane select the Add … menu:
On the Add ISAPI or CGI Restriction dialog configure the ISAPI or CGI path with the path of the
isapi_redirect-1.2.42.dlllocated in the integration directory. As Description use Axon.ivy Engine. Select the Allow extension path to execute check box. Click OK to add the ISAPI or CGI Restriction: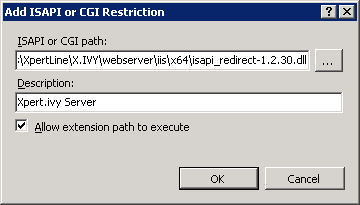
If your Microsoft Internet Information Server is not running on the same host as the Axon.ivy Engine or if you have changed the AJP port of the Axon.ivy Engine then open the file
worker.propertiesinside the integration directory in a text editor. Change the following line if you have changed the AJP port to another value than8009:worker.AxonIvyEngine.port=8009
Change the value
localhostin the following line to the host where your Axon.ivy Engine is running if your Microsoft Internet Information Server is not running on the same host as the Axon.ivy Engine:worker.AxonIvyEngine.host=localhost
Update the external base URL as shown in the ivy.webserver.yaml
Check if the integration is working by opening a web browser on the address http://<your host>/ivy/
Note
This Microsoft IIS integration documentation presumes you use “ivy” as IvyContextName. The default since 9.1 however is “”.
Change base URI /ivy/
You might like to make the Axon.ivy engine accessible under a custom context URI other than ‘/ivy’.
Change the context name of Axon.ivy as shown in the ivy.webserver.yaml
# sample ivy.yaml that configures a different context:
# so Axon.ivy will be accessible trough <a href="http://localhost/workflow">http://localhost/workflow</a>
WebServer.IvyContextName: workflow
Change the context name of the Microsoft IIS by changing the last line of the
uriworkermap.propertiesconfiguration file:#/ivy/* AxonIvyEngine /workflow/*=AxonIvyEngine
Access multiple Axon.ivy Engines through one IIS
Multiple Axon.ivy Engine instances can be accessed through a single IIS server. This is especially useful if multiple Axon.ivy versions must be accessible during a migration phase. The following explanation shows a solution for the scenario, where a legacy Xpert.ivy 3.9 Server and an Axon.ivy 5.x Engine must be accessible through a single IIS host.
Make the newer Axon.ivy Engine accessible through the IIS as if only one engine would be behind the IIS. For detailed instructions follow Microsoft IIS Integration.
In our scenario the integration directory from the Axon.ivy 5.x Engine was used to make the engine instance accessible under http://localhost/ivy.
The base URI of the Axon.ivy Engines must be unique. By default the base URI is set to /ivy/ (since 9.1 it is /). If different versions of ivy engines are accessed from the same IIS host, it’s useful to change the contexts so that it matches the ivy version. For detailed explanation see Change base URI /ivy/
In our scenario the base URI of the Axon.ivy 5.x Engine was changed to /ivy5/ and the Xpert.ivy 3.9 Server kept his default context /ivy/.
All Axon.ivy Engines, which are accessed from the same IIS, must listen on a different port for AJP communication. Therefore the AJP port must be changed. This can be configured as shown in the ivy.webserver.yaml.
In our scenario the AJP port of the Axon.ivy 7.x Engine was changed to 8010 and the Xpert.ivy 3.9 Server kept his default AJP port 8009.
# ivy.yaml with AJP enabled on 8010
AJP:
    Enabled: true
    Port: 8010
The Axon.ivy Engines must be declared in the
worker.propertiesfile of the integration directory. It’s important that each worker has a unique name and that they are listed in theworker.listproperty. In our scenario theworker.propertieslooks as follows:worker.XpertIvyServer3x.type=ajp13 worker.XpertIvyServer3x.port=8009 worker.XpertIvyServer3x.host=ivyhostname39 worker.AxonIvyEngine5x.type=ajp13 worker.AxonIvyEngine5x.port=8010 worker.AxonIvyEngine5x.host=ivyhostname50 worker.list=XpertIvyServer3x,AxonIvyEngine5x
The contexts of the Axon.ivy Engines must be registered in the
uriworkermap.propertiesfile of the integration directory. In our scenario we make Axon.ivy 5.x available under http://localhost/ivy5/ and Xpert.ivy 3.9 under http://localhost/ivy. So theuriworkermap.propertiesfile looks as follows:/ivy/*=XpertIvyServer3x /ivy5/*=AxonIvyEngine5x
Single Sign On
Axon.ivy Engine supports single sign on in Windows environments. The following preconditions must be fulfilled for single sign on:
The application on the Axon.ivy Engine must use an Active Directory Security System
The Axon.ivy Engine must be integrated into a Microsoft Internet Information Server (IIS)
Automatic Configuration
The script autoconfigSSO.bat in folder [engineDir]/misc/iis of
your Axon.ivy Engine automatically configures IIS with SSO.
This is the recommended way to setup SSO on a new IIS Server with an Axon.ivy Engine. If you have an already existing IIS Server installation, configure it manually, as described in the chapter below.
Manual Configuration
Install Windows Authentication
Note
The following command automatically installs Basic Authentication:
PKGMGR.EXE /iu:IIS-WindowsAuthentication
Open the Server Manager (Start > Server Manager). Select the Web Server (IIS). Validate that under the Role Services the service Window Authentication is installed. If this is not the case select the menu Add Role Services to install the missing service.
Deactivate Anonymous Authentication
Note
The following command automatically deactivates the Anonymous Authentication:
set path=%path%;%windir%\system32\inetsrv
appcmd.exe set config "Default Web Site/ivy" -section:system.webServer/security/authentication/anonymousAuthentication /enabled:"False" /commit:apphost
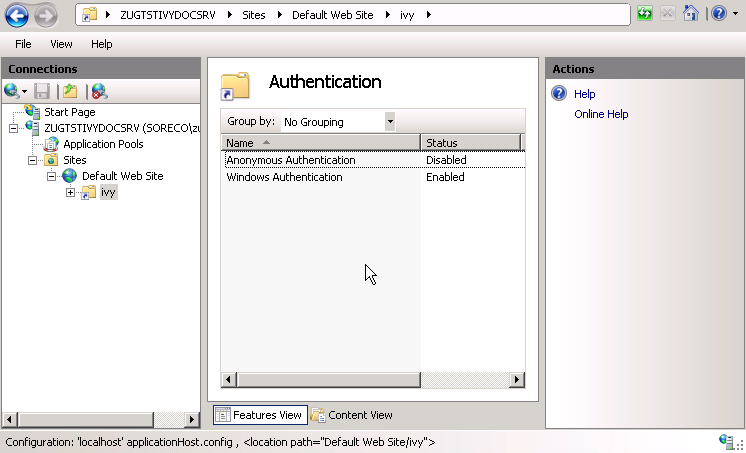
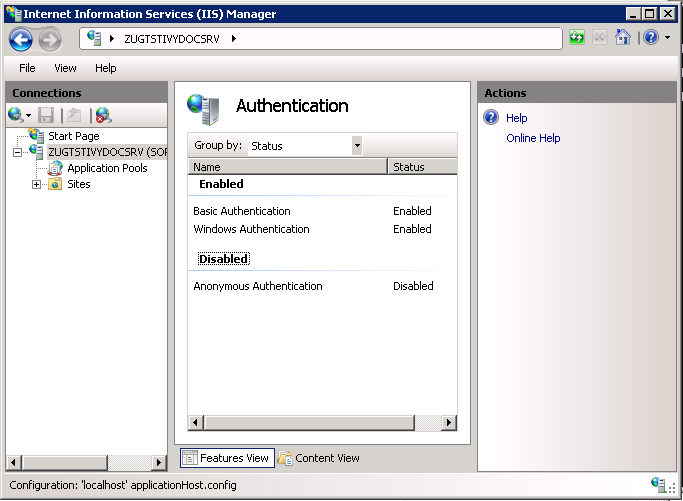
Open the Internet Information Services (IIS) Manager (Start > Internet Information Services (IIS) Manager). In the Connections pane select the ivy Virtual Directory node. In the Feature View open the Authentication entry. Select the Windows Authentication and use the menu Enable in the Actions pane to enable Windows Authentication.
Make sure that all other authentication modes such as Anonymous Authentication or Digest Authentication are disabled, otherwise IIS will use those authentication modes and Single Sign On will not work.
Activate Windows Authentication
Note
The following command automatically activates the Windows Authentication:
appcmd.exe set config "Default Web Site/ivy" -section:system.webServer/security/authentication/windowsAuthentication /enabled:"True" /-"providers.[value='Negotiate']" /commit:apphost
Basic Authentication
Basic Authentication is required in the following situations:
when using the Axon.ivy Mobile App
when providing REST services which require authentication
Automatic Configuration
The script autoconfigBasicAuth.bat in folder [engineDir]/misc/iis
of your Axon.ivy Engine automatically configures IIS with Basic Authentication.
This is the recommended way to setup Basic Authentication on a new IIS Server with an Axon.ivy Engine. If you have an already existing IIS Server installation, configure it manually, as described in the chapter below.
Manual Configuration
Install Basic Authentication
Note
The following command automatically installs Basic Authentication:
PKGMGR.EXE /iu:IIS-BasicAuthentication
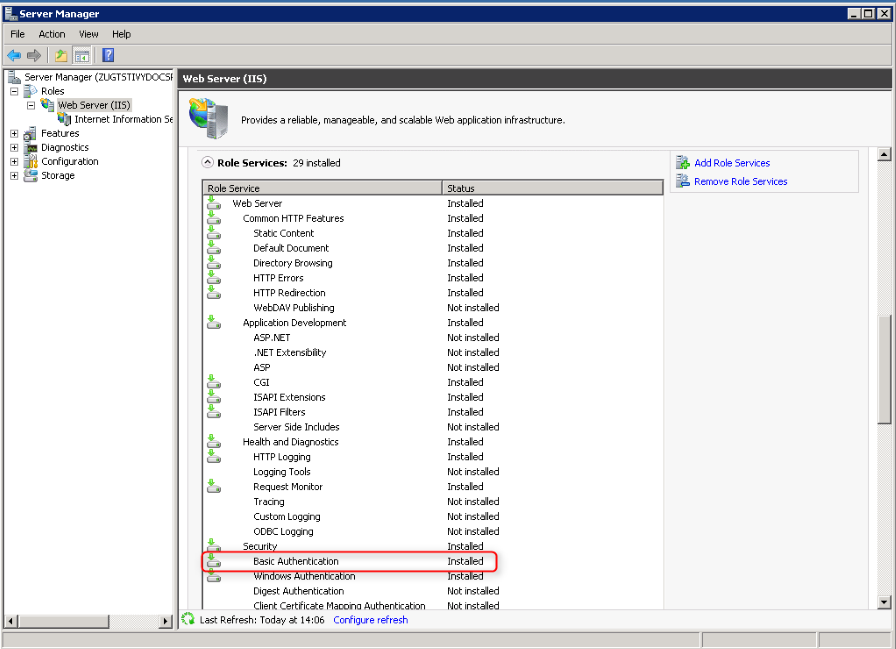
Open the Server Manager (Start > Server Manager). Select the Web Server (IIS). Validate that under the Role Services the service Basic Authentication is installed. If this is not the case select the menu Add Role Services to install the missing service.
Activate Basic Authentication
Note
The following command automatically activates the Basic Authentication:
set path=%path%;%windir%\system32\inetsrv
appcmd.exe set config "Default Web Site/ivy" -section:system.webServer/security/authentication/basicAuthentication /enabled:true /commit:apphost
Open the Internet Information Services (IIS) Manager (Start > Internet Information Services (IIS) Manager). In the Connections pane select the ivy Virtual Directory node. In the Feature View open the Authentication entry. Select the Basic Authentication and use the menu Enable in the Actions pane to enable Basic Authentication.
Error Handling
If the engine is running behind an IIS web server and an error occurs on the Engine, IIS shows its own error page and hides the error page coming from the Engine. This is the default IIS behavior.
The Axon.ivy IIS integration script configures the IIS to show the detailed error page of the Engine (see ‘Errors’ in ivy.yaml). IIS can be reset to its default behavior (e.g. because of security reasons) with the following steps:
Open the IIS manager
Select the virtual directory ivy and on its Features View, double click on Error Pages
Right click and select the Edit Feature Settings… or select the same from the Actions pane (on the right hand side)
Select the “Detailed errors for local requests …” radio button and click OK.