Settings
User Settings provide options for configuring Portal applications:

User needs to have role
AXONIVY_PORTAL_ADMIN
to see this menu item, it is used to configure Portal configuration,
see different Portal configurations in
General concept
Global settings for Portal can be set in Settings tab

| Keyword | Value | Description |
|---|---|---|
| HOMEPAGE_URL | http://PORTAL_SERVER:PORTAL_PORT /pro/Portal/portalTemplate /1549F58C18A6C562/PortalStart.ivp |
Portal administrator home page link. Note: Only valid if there are not any registered ivy applications. |
| HIDE_LOGOUT_BUTTON | TRUE/FALSE |
If
TRUE
(none case-sensitive), the logout button on top
menu will be hidden, otherwise it
will be
shown. If this
property is
not set, the logout
menu will be displayed by
default.
|
| SHOW_ENVIRONMENT_INFO | TRUE/FALSE | For switch on/off the display of environment information. |
| HIDE_TIME | TRUE/FALSE |
Set to
TRUE
to hide hours and minutes next to date.
|
| SHOW_TASK_BUTTON_LABELS | TRUE/FALSE |
Set to
TRUE
to show button labels from task list.
|
| HIDE_CHANGE_PASSWORD _BUTTON | TRUE/FALSE |
Set to
TRUE
(none case-sensitive), the change password option
in top menu will be hidden, otherwise it
will be shown. If this
property is not set, the change password option
will be displayed by
default.
|
| REFRESH_TASK_LIST_INTERVAL | Number | Task list refresh interval in seconds |
| CLIENT_SIDE_TIMEOUT | INTEGER |
Client side timeout in minute, must be more than 1 and less than server side timeout (e.g. 25).
If not set, default client side timeout is server side timeout minus 3 minutes.
|
| EXPRESS_END_PAGE | TRUE/FALSE | Display the custom end page at the end of each Express process. Default is true. |
| EXPIRY_CHART_LAST _DRILLDOWN_LEVEL | One of these values: HOUR/DAY/WEEK/MONTH/YEAR | Determine last drilldown level using in Task by expiry chart. Default value is HOUR. |
| ENABLE_SCRIPT_CHECKING_FOR _UPLOADED_DOCUMENT | TRUE/FALSE |
Set to TRUE to enable script checking for uploaded document. Currently this function supports checking for PDF, Excel, MS Doc.
|
| UPLOAD_DOCUMENT_WHITELIST _EXTENSION | Empty or List of allowed extensions when upload document in Portal, which are separated by comma |
Leave value empty if you allow all extensions.
If just allow some extensions, list out extensions here, separated by comma. Example:
If admin doesn't configure this setting, Portal will use the default extension list:
|
| HIDE_UPLOAD_DOCUMENT_FOR _DONE_CASE | TRUE/FALSE |
Set to TRUE to deny upload document after a case is done. By default, user can upload document independent of case status.
|
| HIDE_SYSTEM_TASKS_FROM _HISTORY | TRUE/FALSE |
Set to TRUE so that case/task note does not display any technical history entries for non-administrator users..
|
| HIDE_SYSTEM_TASKS_FROM _HISTORY_ADMINISTRATOR | TRUE/FALSE |
Set to TRUE so that case/task note does not display any technical history entries for administrator..
|
| HIDE_STATISTIC_WIDGET | TRUE/FALSE |
Set to TRUE to hide Statistic widget from homepage and application menu.
|
| DISPLAY_MESSAGE_AFTER _FINISH_TASK | TRUE/FALSE |
Set to
TRUE
to display a feedback message after finishing a task.
|
| DISABLE_CASE_COUNT | TRUE/FALSE |
Set to
TRUE
to disable calling the Case Count web service to improve performance in case of big database.
|
Table 6.1. Global settings
Warning
Multi applications on multi engines is not officially supported, only an experimental mode is available.Important
There is 2 ways to configure portals: two levels and single level
-
Two levels portal

-
Used for related applications where we need an overview of all tasks and cases.
-
There is default application Portal.
-
Create new applications: App1, App2, App3... Deploy portal (kit, template ..) to new applications.
-
Configure multi-apps Portal on single server: login by Portal Admin. Configure 1 server then configure applications: App1, App2, App3...
-
Note that,
do notadd default Portal application, the default application (Dashboard) is reserved for displaying all tasks/cases... from all configured applications. -
Dashboard menu only visible when login user exists in Portal application.
-
-
Single level portal

-
Used for independent applications.
-
Disable the default application Portal.
DO NOT DELETEthis application, it will be auto generated after engine restart. -
Create new applications: App1, App2, App3... Deploy portal(kit, template ..) to new applications.
-
Configure multi-apps Portal on single server: login by Portal Admin. Configure 1 server then configure applications: App1, App2, App3...
-
-
Add a new server
-
Open
Admin Settingsby selecting the item inUserMenuon the topbar, if your page using layout ofPortalTemplate.
Important
If your application does not use templates ofPortalTemplateproject, you have to create a page and useAdminSettingscomponent inside.Tip
To be able to open Admin Settings dialog, user needs to have roleAXONIVY_PORTAL_ADMIN. -
Click on
Newbutton to add new server.
Note
-
Server pathmust be the link of thePortalConnectorapplication (e.g.http://path-to-ivy:8080/ivy/ws/System/PortalConnector) -
Web services authentication of the built-in PortalConnector of the Axon Ivy engine are configured as
HTTP Basic. Therefore, when adding a new server using the built-in PortalConnector, use authentication typeHTTP Basic. -
The username, password are used by PortalKit to invoke the web services of PortalConnector.
These are accounts of the application that deploys PortalConnector.
The built-in PortalConnector are deployed to application System therefore use the
username/password of system administratorswhen connecting to built-in PortalConnector.To create system administrators, refer to the document
EngineGuide > chapter Configuration
														> Engine Configuration > System Administrators
. E.g. in the latest EngineGuide, refer to this guideline .
Tip
-
In multi-Portal mode, Portal uses the External Host value as host value for task or process starts URLs. If this value is empty, Portal will use the host value as configured in the server path field. For other mode, Portal will use the host value of the web address of the engine for the URLs.
-
External Host value is returned from configured server's system property
WebServer.ExternalHostName(you might want to change it via Engine'sAdminUI).You can sync this value by clicking
Test Connectionbutton, ifWebServer.ExternalHostNameis set the value would be updated, otherwise displaysAUTO_DETECT.Configured server information is needed for calling service to get this value.
-
-
-
Add a new application
Choose
Applicationtab onAdmin Settingsdialog and click onNewbutton to add new application. Here you can choose application type either as Ivy application or Third Party application.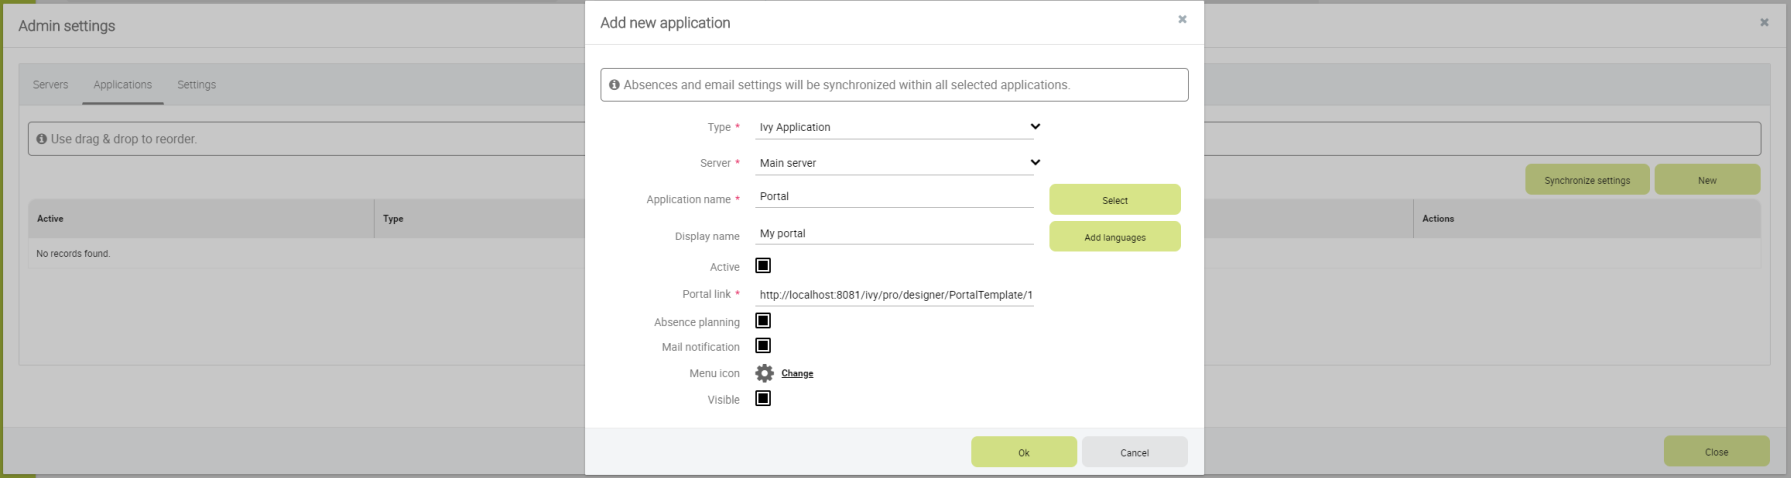
Tip
-
Application nameis the name of the application when you create it.Display nameis the name of the application to be shown on Portal UI. -
If
Activeis not checked, the application will be disabled on the application menu. To prevent its tasks, cases and processes to be shown, you must leave theVisiblebox unchecked. -
Portal linkspecifies the link will be redirected when selecting the application on the application menu. It could be an absolute link (e.g. http://10.123.1.30:8000/ivy/pro/.../PortalStart.ivp) or relative link (e.g. /ivy/pro/.../PortalStart.ivp). If your application could be accessed from multiple domains, use relative link so that you can access the link from different domains. -
Absence planningif checked will enable absence feature for the application. -
Mail notificationIf checked will enable email setting feature for the application. -
For multiple languages of application display name, you need to create the "AppInfo/SupportedLanguages" CMS which defines how many languages your application supports. See the below "Language settings" for more details.
-
-
Synchronize data
After adding new settings (server, application), click on
Synchronize Settingsto synch new settings and information about users to registered servers. Close dialog (logging out may be required) and check if newly created application is available on left menu.
Tip
In single mode, Portal detects the applications that have the login user in the current engine. Based on that, Portal will collect tasks, cases of those applications. In multi-portal mode, Portal will only collect on registered applications.By default, Portal will automatically synchronize user settings to registered servers at 5AM everyday. You can change the time when the synchronization start by going to AdminUI and change the value of the global variable
PortalStartTimeSynchUserExpressionof the application that will run the synchronization process.
Important
Synchronization process is needed to run on one application each server. If there are multiple applications registered per server, only one application needs to run this process. Select one application as you wish and set value for global variable
PortalStartTimeSynchUserExpression. On other applications, set this value empty.
Open the "Design" tab and you can upload new logos or change new colors.

Tip
If you work in Designer, refresh PortalStyle project after change color to see the effect.
Warning
You can only upload PNG image type for logos.
If you change colors on Google Chrome browser, please reload page with no cache to get new colors.
-
Choose
AbsencesfromUser Settingsoptions. -
To create new Absence, click
New Absenceto open the dialog as below:
-
till/from datemust not be empty. -
till datemust be greater than or equalfrom. -
till datemust not be in the past (greater than or equal today).
-
-
User can edit or delete Absences by click edit/delete on the Absences list.
-
Deputies area will display all the information of deputy on each application.

-
User cannot set deputies for hidden roles.
-
All the items will be saved after click Save button.
-
To configure mails of Portal applications, select
Email SettingsinUser Settings. -
You can configure one email setting for all applications or each application separately.
-

-
All the items will be saved when click save button.
-
Language setting precedence:
If user email language setting is application default, language would be applied by application email language setting.
If user selects a language in email setting, language would be appplied by this selection.
-
To configure languages of Portal applications, select
Language SettingsinUser Settings. -
UI reads current languages settings for all applications.
-
To change language for application, select one in the languages dropdown list of application. When the change is saved, the language will be set for application (Click on the application in header menu to reload application and see the change of language).

-
For multiple languages, the CMS key
/AppInfo/SupportedLanguagesmust exist in your application. From Portal 7.1, this CMS entry is moved to Portal Style. It contains list of all languages supported by your application, separated by comma.- Must not contain spaces
- Same as display name of Locale
- Separated by comma
- Process model version, which has this CMS, must active
-
To add new language to Portal, what you have to do is
- Add new language locale to cms entry of Portal Style
/AppInfo/SupportedLanguages - Export all CMS entries of Portal Style to excel file
- Add translation of new language for all CMS entries
- Import file excel back, then redeploy Portal Style
- Add new language locale to cms entry of Portal Style