Process Modeling
This chapter introduces Axon.ivy processes and how to work with them. The creation and logical organisation of processes is explained as well as the functionality of the Process Editor and the different kinds of processes.
Process Kinds
There are different kinds of processes. Their use and capabilities are explained in the sections below.
Business Process
Business processes are the regular kind of processes that are used to implement business cases. Business processes contain starts that can be selected by any user from his/her workflow list or from the list of star table processes.
Embedded Subprocess
An embedded subprocess is essentially a syntactical collapse of elements into a single element to hide details from process design. They are available in all other process kinds. The hierarchy of embedded subprocesses is potentially indefinite, i.e. you can create further embedded subs inside an already existing subprocess.
Since embedded subprocesses are simply a structural means for process diagram simplification, no mapping of data is required when entering or leaving this kind of subprocess (i.e. inside an embedded subprocess the same data is available as inside the caller process).
Warning
Wrapping process elements into an embedded subprocess does not influence the functionality of most process elements. But the wrapping influences the way process elements are addressed by Axon.ivy. This may cause incompatibilities with older versions of the process and will hinder you to deploy such a process over an already deployed older version of the process. The process elements that may cause such incompatibilities are:
Independent Subprocess (Callable)
An independent subprocess (callable) is a process, that can be called from any other process with the call subprocess element. Independent subprocesses can be used to factor out frequently used functionality which can then be reused by any other process.
Because callables are independent implementations of processes (or parts of process logic) they have an own Data Class which might not match the caller’s data. Therefore parameters need to be mapped in both directions when entering and leaving an independent subprocess.
To create an independent subprocess, select the callable process option from the New Process Wizard. The created process will contain special start and end elements that must encompass the process implementation.
Web Service Process
Web Service processes are a special case of independent subprocesses. A Web Service process can be started (i.e. called) from any other application (or from another process) by using the Web Service call element or any other SOAP web service compatible client..
A web service process will provide a web service with one or more operations, which are defined by the Web Service Process Start elements within the process. Each of these start elements have their own input and output parameters that will be mapped to and from the process data.
Due to the nature of web services, which are intended to be called by other applications and not by a user directly, no user-interaction (HTML or User Dialogs) is allowed within such a process. If the process does contain user-interaction an exception will be thrown.
To create a web service process, select the Web Service Process option from the New Process Wizard. The created process will contain special start and end elements that must encompass the process implementation.
User Dialog Logic
User Dialog logic processes are the implementation of the behavior of User Dialogs, the controller in the MVC pattern. A whole new set of elements is available for this kind of processes (from the User Dialog drawer on the process editor palette), while other elements (such as task switch or HTML page) are not available for conceptual reasons.
A User Dialog logic process is invoked with an User Dialog element inside a business process. Its execution starts with an init start element and ends with a dialog exit element. The two elements do not need to have a direct connection (in fact they never have). Once a User Dialog process is running, it is driven by user interface events which will trigger individual sub processes.
Note
Calling a process based User Dialog (and thus executing its logic) can (or rather should) be seen as equivalent to calling of a callable process with the sole difference that the User Dialog offers a user interface that allows a user to interact with the process logic directly.
However, from an abstract point of view, a User Dialog is nothing else than a function call. It is invoked with a list of (optional) arguments and returns a list of result values. This is exactly the same behavior as a callable process offers.
New Process Wizard
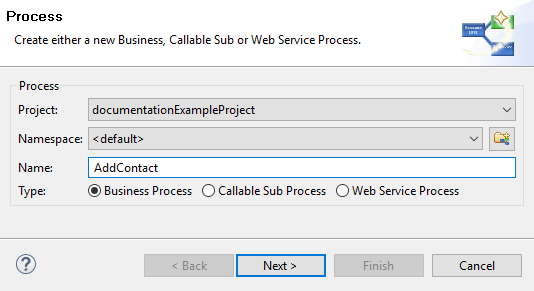
The New Process Wizard lets you create a new Business, Callable Sub or Web Service Process.
Accessibility
File > New > Process
Process Definition (page 1)
New Process Wizard
- Project
Choose the project where the new process should be created.
- Namespace
Select a group where the new process will be inserted (this is roughly equivalent to a namespace). Select the
<default>process group to create a process directly below the project’s processes folder (i.e. equal to “no group”). You can click on the group folder button to open the New Process Group Wizard, if you want to create a new group “on the fly”. The process groups are listed relative to the project’s process folder.- Name
Enter the name of the new process.
- Type
Business Process: This option is the default option an creates a normal standard business process. Use this option to implement your business logic.
Callable Sub Process: This option creates a callable sub process including a process-call-start element and a process-call-end element. You need to implement your process between those two elements. It is allowed to have multiple Process Starts and Process End elements in a callable process.
Web Service Process: This option creates a web service process which can be called from other systems. WS Start and WS End elements will be created automatically and you can implement your process between these elements. Please note that no user interaction may occur in a web service process.
Process Data (page2)
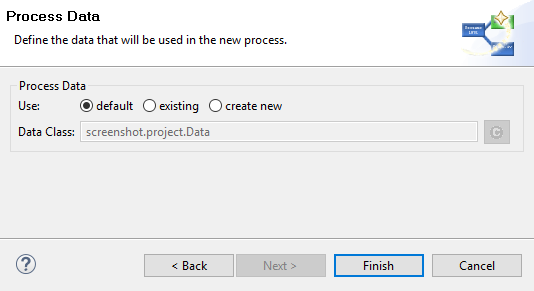
Simple Process Data selection on page 2
- Process Data
default: Select this option to use the project’s default data class as data structure for the new process.
existing: Select this option to choose an already existing data class as data structure for the new process. Any existing Data Class can be chosen with the class selector button on the right side. It is strongly recommended to select a data class from the project where the process will be created in order to avoid dependencies on the implementation of another project.
create new: Select this option to create a new, empty data class that will be associated with the new process. Enter the name of the new data class to create (including namespace). Initially a data class name that is based on the new process’ name and group will be suggested, but you’re free to change it.
Process Data with simple mapping (page2)
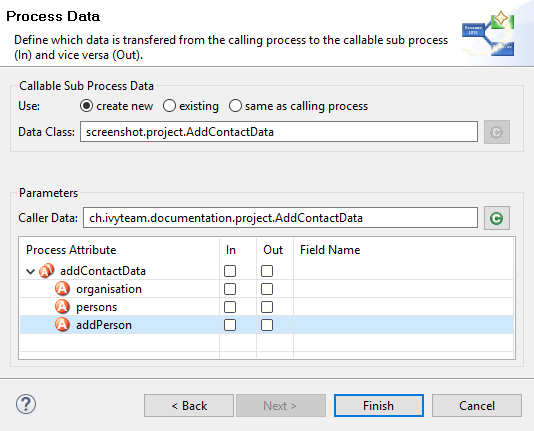
Process Data selection with auto data Mapping
Callable Sub Processes often consume or return data from a high level process. The data which is passed to and given back to the caller process can be easily mapped within this page.
- Callable Sub Process Data
Defines the Data Class which is used within the Process to create. The simple mapping parameters below are only available if a new Data Class is created or when the Callable Sub Process uses the same Data Class as the caller Process.
- Parameters
The Caller Data references the Data Class from the Caller Process. The fields of this Data Class can be automatically mapped to the Callable Sub Process Data.
In the mapping table below the Caller Data the In and Out arguments for the new Process can be defined. If any mappings are chosen, the Wizard will automatically configure the Call Sub Start Event, its internal input mapping (param > in) and its output mapping (out > result). The calling process element of the high level process will also be inscribed with input- & output mappings, if the new Process Wizard was opened from the Call Sub inscription step.
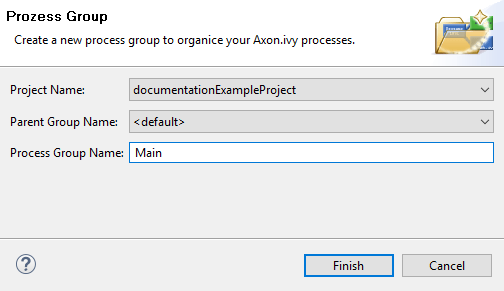
New Process Group Wizard
The New Process Group wizard lets you create a new grouping folder for business processes. Process groups can be nested.
Note
The process group is just used to categorize similar processes. A process is always treated independent from its parent process group(s)
New Process Group Wizard
Accessibility
File > New > Process Group
Features
- Project Name
Choose the project that your group belongs to.
- Parent Group Name
Select a group that is the parent of your new creating group.
- Process Group Name
Enter the name of the group that you want to create.
Process Properties
Like the process elements that are used inside a process, the process itself has an inscription that allows to specify and edit a processes properties. To open and show a the inscription mask of a process you simply select the process in the Ivy Project View, right-click and select inscription from the pop-up menu.
Name and Description
The common Name Tab allows to specify name, description and associated documents for each process.
Process Data
The Process Data tab allows to specify the data class that will be used to define the process’s data structure.

Each process must be associated with a data class, otherwise the tab will show an error. The used data class is initially specified with the New Process Wizard, but you may change this association at any later time.
You can use the (C) button next to the data class field to select any existing data class that is visible to the edited process. Please note that it is strongly recommended that you only set data classes that are defined in the same project as the process in order to avoid dependencies on the specific implementation of another project.
It is legal for two processes to specify the same data class. This can be desired if the processes operate on the same set of data (e.g. sub processes) and it may facilitate the mapping in some cases.
Web Service Process
The Web Service Process tab is only available on web service processes and allows to specify the web service configuration.

The Fully qualified Web Service name will be used to generate the web service class and the WSDL. The namespace part will be used as targetNamespace in the WSDL. Choose this name carefully since it should not be modified anymore as soon as clients start using the web service.
The Web Service authentication options allows you to specify how clients are authenticated when invoking the web service. You can select one of the following available authentication methods:
- None/Container
Authentication is not handled by the web service element. However, if the web container (Tomcat) or a web server (Microsoft IIS/Apache) handles user authentication, the user is passed through to Axon.ivy (e.g. Single Sign On).
- WS Security
UsernameToken with Password will be sent in clear-text to the ivy engine.
Warning
Only use this option in a trusted network or over a secure connection (e.g. HTTPS).
- HTTP Basic
Username and Password will be sent in clear-text to the ivy engine using standard HTTP Basic authentication mechanism.
Note
HTTP Basic is the only authentication option that is supported by Web Service processes and Web Service process elements in common. It can therefore be used to call a Web Service process from a Web Service process element if authentication is required.
Warning
Only use this option in a trusted network or over a secure connection (e.g. HTTPS).
If the web container (Tomcat) or a web server (Microsoft IIS/Apache) already handels user authentication, the user is passed through to Axon.ivy without doing an additional HTTP Basic authentication.
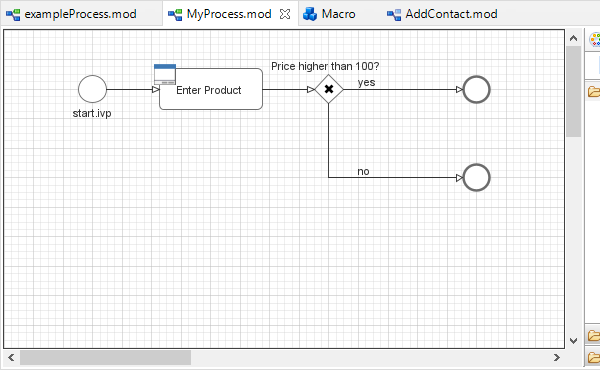
Process Editor
The Process editor is used to design and edit the different process kinds (mostly business and User Dialog logic processes). The Process editor consists of two parts:
the Editor Area where the process logic is constructed element for element and
the Palette where the elements that are to be placed inside the process are selected
Accessibility
Axon.ivy Project Tree > double click on a process node inside the
project tree ( )
)
Palette
The palette shows the process elements that are available for a specific process kind. The set of available process elements may vary for different process kinds.
Tip
The purpose and configuration of all available process elements are described in detail in the Process Elements Reference.
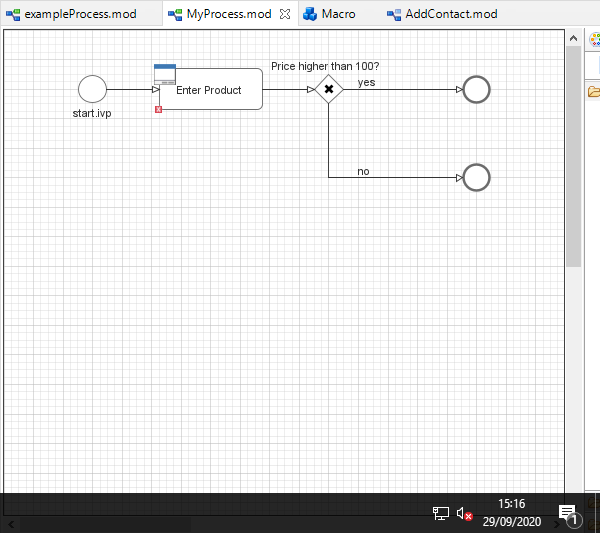
Editor Area
Processes are designed, drawn and modified in the process editor area. Select an element from the palette, then click in the process editor area to place it. Click and drag elements to replace them.
Arrows are drawn between two elements by clicking on the first element, then holding the left mouse button down until releasing on the second element.
You have four context menus available in the Process editor: the editor menu, the element menu, the arrow menu and the selection menu.
Shortcut Keys
Some of the entries in the context menus are available with shortcut keys. To use them, place the mouse over a process element and press the according key.
Swimlanes
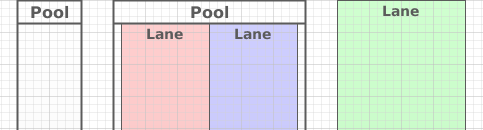
Processes can be visually structured by using pools and lanes. Pools and lanes are colored background swimlanes with a label that is placed behind the process logic. Swimlanes can have a horizontal or vertical orientation.
Swimlanes are available for all process kinds and are typically used to visualize organisations, roles, responsibility assignments or systems for process elements or sections of process logic.
A pool or lane can be widened or narrowed by dragging it’s border/edge
with the mouse. By default, the position of process elements lying
outside the modified lane are adjusted accordingly. By pressing the
Shift-Key during the drag, you can omit the automatic adjustment of
process elements.
Note
Please note, that pools and lanes do not have any syntactical meaning whatsoever; their purpose is purely semantical. A pool or lane is not a container that elements are placed in or associated with. They are simply a structured “coloring” of the process’ background; they do not grow or shrink when you change the processes logic and need to be adjusted manually.
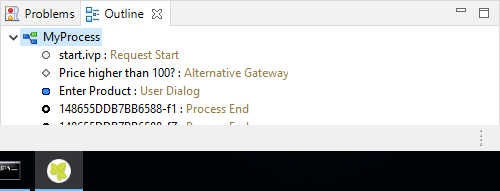
Process Outline View
The outline view displays all elements of the process which is currently opened in the process editor.
Accessibility
Window > Show View > Other… > General > Outline View
Features
The outline view has the following features:
- Selection
Process elements which are selected in the outline view are selected in the process editor and vice versa, which helps to search and manipulate elements, especially in large processes.
- Classification
Elements are grouped by their BPMN type, where the element type is visualized with an icon in front of the element name. The element categories are start events
 , intermediate events
  ,
end events
,
end events  , gateways
  and tasks
  .
.
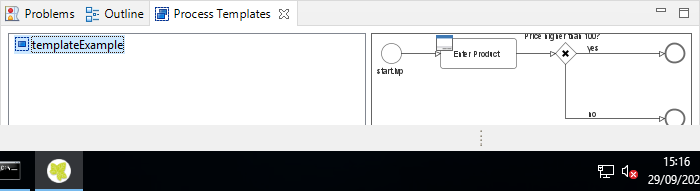
Process Template View
The process template view displays the currently defined process templates. A process template is essentially a selection of process elements which are stored under a specific name. Once defined, process templates can be inserted into any existing process, either by drag and drop or by selection from a dialog. New process templates can be added to the template store by pressing ‘t’ on a selection of elements in the Selection Menu.
Accessibility
Window > Show View > Axon.ivy > Process Template View
Features
The process template view has the following features:
- Preview
A preview for each selected template will be shown on the right-hand side of the process template view, showing its structure in detail.
- Drag-and-drop
Templates can be dragged and dropped on the process editor. Press and hold the mouse down over a template name and drag it over to the process editor to insert the template.
- Context menu
Selected templates can be renamed and deleted using the context menu or by pressing ‘R’ or ‘DEL’ keys, respectively.
Export / Import
Process templates are stored per workspace. To export a set of process templates from a workspace use File > Export… > General > Preferences > Process Templates. To import a set of template into a workspace use File > Import… > General > Preferences.
Problems View
The problems view displays errors and warnings (problem markers) that exists in yours projects. You can double click an error or warning in the view to open the associated editor.
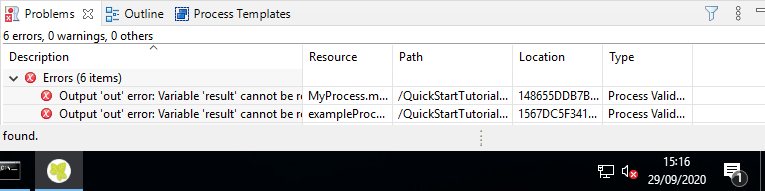
In the process editor process elements that have errors are marked with an error overlay icon.
Accessibility
Window > Show View > Problems
Features
This view is a standard Eclipse IDE view. More information about the Problems View can be found in the Online Help: Workbench User Guide > Reference > User interface information > Views and editors > Problems View.
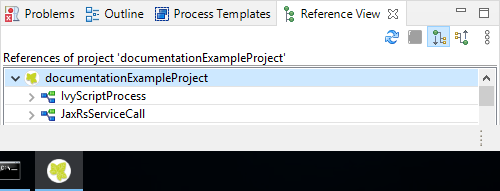
Reference View
The Reference view shows the references between the various Axon.ivy project artifacts. A reference of an artifact is everything which is used/called from the artifact (e.g. call to a callable process or User Dialog) or which is embedded in the artifact (e.g. embedded sub element in a process or processes inside a project). Inverse references are the opposite of references. This means an inverse reference of an artifact is everything which uses/calls the artifact or which contains it.
Tip
To work with references of process elements, there are also some useful features on the Process Editor Element Menu.
Accessibility
Window > Show View > Reference View
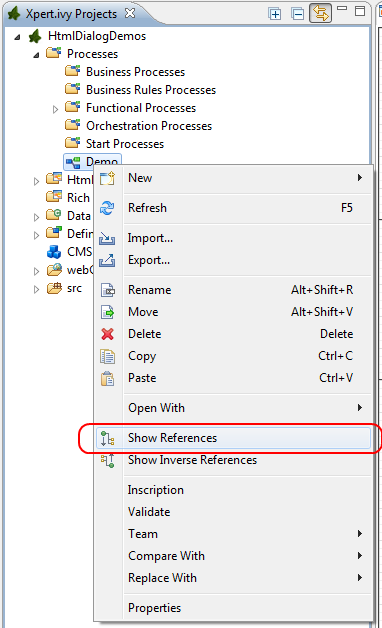
Right click on a project, process, User Dialog or embedded sub element in the project tree > Show References or Show Inverse References
Reference Menus
Features
The Reference view has the following functions:
- Refresh (
 )
) This function reloads the actual showed references.
- Stop (
 )
) This function stops the calculation of references.
- Show References (
 )
) This option shows the references of the actual root object.
- Show Inverse References (
 )
) This option shows the inverse references of the actual root object.