Data Modeling
This chapter deals with the Axon.ivy Data Classes. In general, a Data Class holds the data that flows through your business or User Dialog process. You can build complex data structures out of your Data Classes. Use composition to split up your data if the amount of your data is getting bigger.
There are four kinds of Data Classes in Axon.ivy.
- Global Data Classes
-
The global Data Classes are placed in the Data Class node in your project tree. They are accessible all over your project and the extending projects.
- User Dialog Data Class
-
Each User Dialog has its own Data Class. This class holds the data that flows through your User Dialog processes. In your User Dialog Data Class it is possible to define fields with a type of a global Data Classes. The User Dialog Data Class is not visible at any other place except the User Dialog Processes.
- Web Service (WS) Data Classes
-
The Web Service Data Classes are automatically generated if you define a Web Service configuration. The Web Service Data Classes are as well as the global Data Classes accessible from all over the project and the extending projects. Use this Data Classes to communicate with your Web Services.
- Entity Classes
-
Entity Classes are like Global Data Classes but with additional information where and how to store the data of a class and it's attributes to a relational database. See chapter Entity Classes for more details.
Tip
The properties of a Rich Dialog's data class can be dragged from the Ivy Outline View and dropped onto a widget on the Rich Dialog's panel to add a data binding.
The New Data Class wizard lets you create a new global Data Class.

- Project Name
-
Chose the name of the project the new Data Class should belong to.
- Namespace
-
Chose a namespace for your Data Class. The name space lets you create a structure to organise your data. Use the dot character '.' to separate the folders from each other. The namespace will be visible in the Axon.ivy project tree.
- Data Class Name
-
Enter the name of your Data Class. Do not use the names twice in your project, its getting confusing if you do so.
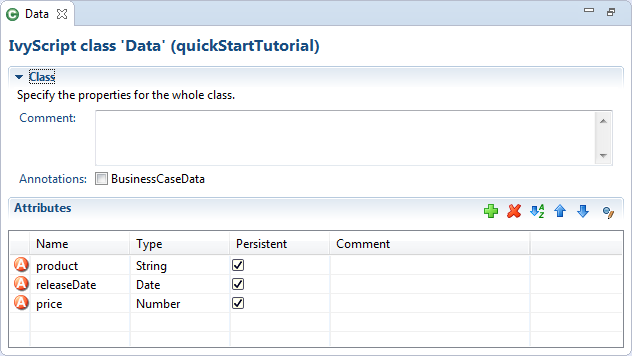
The Axon.ivy Data Class editor lets you configure the process data objects of Axon.ivy. The process data is the data that "flows" through your processes. It represents the state of the respective process.
Use this editor to add new data fields to your process data class, to change the type of a field or to document your Data Class or Data Class Field.
1. Axon.ivy Project Tree > double click on a Data Class entry in the tree.
2. New > Data Class > then the editor opens if the class was created successfully
The attributes table specifies the Data Class contents.
- Comment
-
Use this field to document your data class
- Annotations
-
Annotations can be set to control certain behaviours:
- BusinessCaseData
-
Objects of the data class are stored in the Business Data Store (
ivy.repo) in the context of the current business case. See Business Case Data for more information.
- Table actions
-
 Adds a new attribute to the table. Alternatively the
new attributes can be added by clicking on an empty row.
Adds a new attribute to the table. Alternatively the
new attributes can be added by clicking on an empty row. Deletes the selected attribute.
 Re-orders the selected attributes. The order influences
just the presentation and has no logic implication.
Re-orders the selected attributes. The order influences
just the presentation and has no logic implication. Toggles the value change breakpoint for selected
attribute. The attribute icon
Toggles the value change breakpoint for selected
attribute. The attribute icon  shows that a breakpoint is installed on an attribute.
More information about value change breakpoints can be found in chapter
Breakpoints.
shows that a breakpoint is installed on an attribute.
More information about value change breakpoints can be found in chapter
Breakpoints. - Name column
-
Enter the name of your attribute. The name should not contain any special characters or spaces.
Tip
You may already specify the type of the attribute here by adding a colon ':' to the attribute name, followed by the desired type (e.g. myDateAttribute:Date).

The entered type is used as search filter. The following examples using a data or java class with the name
ch.ivyteam.demo.Person:-
person:Personresults inperson,ch.ivyteam.demo.Person. -
personList:List<Person>results inpersonList,List<ch.ivyteam.demo.Person>. -
javaPersonList:java.u.List<Person>results inperson,java.util.List<ch.ivyteam.demo.Person>(Here a prefix of the package namejava.uis used as filter instead of the full qualified namejava.util). -
timestamp:Timestampresults in displaying the type selection dialog because there are mutliple types matching the type nameTimestamp.
-
- Type column
-
Enter the type of the attribute or press the
 to bring up the data type selection
dialog.
to bring up the data type selection
dialog. - Persistent column
-
Decide if the data should be persistent between a task switch. If the data is not set to be persistent, then you loose all information if the execution of the process passes a task switch process element.
Note
This flag can be removed on attributes if the value is stored in the business data repository or using persistence or the data is only used temporary within a task.
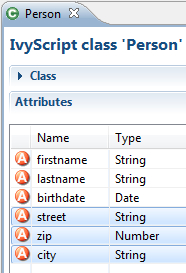
The Data Class editor supports Data Class attributes refactoring.
Over time the amount of attributes in a Data Class may become excessive. This decreases the maintainability and reusability of your process logic. Therefore the editor allows you to extract multiple attributes from an existing Data Class into a new Data Class. The extracted attributes will be replaced with a delegate field for the new Data Class.
E.g. if you have a Data Class that describes a person you could extract the attributes that belong to the address part into an extra address Data Class.
| Before refactoring | After refactoring |
|---|---|
 |  |
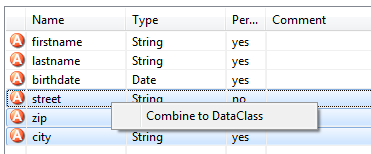
Start Refactoring
Select the attributes to extract in the Data Class attribute table. Open the context menu of the selected attributes. Choose Combine to Data Class to open the refactoring wizard.
Wizard Page 1 - Define the new Data Class
The first refactoring wizard page lets you define the location and name of the
Data Class.  The checkbox 'Include non type safe
refactorings within Web Pages (CMS)' enables the refactoring of JSP
(macro) expressions within Web Pages. But Web Page modifications are not type safe.
This means that attributes that are collected as change candidates may be wrong. So
these changes should be inspected in detail in the refactoring preview (page 2) and
tested manually.
The checkbox 'Include non type safe
refactorings within Web Pages (CMS)' enables the refactoring of JSP
(macro) expressions within Web Pages. But Web Page modifications are not type safe.
This means that attributes that are collected as change candidates may be wrong. So
these changes should be inspected in detail in the refactoring preview (page 2) and
tested manually.
Wizard Page 2 - Preview modifications
The second page previews all changes that will be applied to your artifacts. You can inspect most of the changes within the textual compare view on the lower part of the page.

The refactoring will modify all programmatic references to the attributes. This means that statements written in Java, ivyScript, JSP or El-Expressions could be changed by this refactoring.
The Business Data feature allows to store and load business data in a built-in repository without defining a schema. Compared to other features like database steps and JPA no additional database, database connection, schema or tables are needed
The business data structure can be defined by declaring normal data classes. When storing a business data object all objects that are referenced from the root object are stored as well. Loading a business data object will recreate the whole object tree again. The data is stored in a schema less JSON based data format in the ivy standard System database. This allows to add fields to data classes over time and still be able to load old business data without migration.
Moreover, the business data feature allows to search the stored data by defining field based filters.
Basically the Business Data Store implements a document store. Beside the stored value, the repository stores additional information about the Business Data, like an identifier, a version and the creation / update date.
A value data class can have fields of complex types, which allows to create an object hierarchy or tree. The storage mechanism can handle recursions and will respect objects of same instances. So if the same instance of an object is referenced in a field and in a list - after storing and loading the value - the loaded value will have the identical structure, the field and the list entry will reference the same instance.
A Business Data value is identified by an identifier given by the repository and its data class.
A unique id is generated if a Business Data value is stored the first time. If
there is a field of type String with the name id
in the Business Data class, the generated id will be stored into this field
too.
It is also possible to use your own id if you set the id to the Business Data value before saving it for the first time.
The handling of identifiers of Business Data values is complex because you have to
manage the identifiers in the process data manually. Therefore the Business Data
Store can store data in the context of a business case. You can activate this by
annotating a data class with the @BusinessCaseData annotation. On the
Data Class Editor simply check the BusinessCaseData checkbox in the Annotations section. Now, all values of the annotated data class are
automatically associated with the current business case. You can use the
get method to load the value associated with the current business
case. If no value is associated it simply returns a new object.
It is allowed to add and remove fields in the value data class hierarchy. New fields will be initialized with null, when old values get loaded. Deleted fields will no longer be available. The information will still be persisted until the value gets stored with the new information - which will override the old information.
Business Data supports optimistic locking. It is possible to check if the current version is up to date and save only if this is the case. It is possible to update a value partially so that multiple participant can work on different parts of the same Business Data value. See the Concurrent Modification demo in the WorkflowDemos project for a practical example.
The Business Data feature methods like get, save,
find and delete are accessible under ivy.repo
in IvyScript.
Annotate the main data class of the business case with the
@BusinessCaseData annotation:
@BusinessCaseData
public class BusinessCaseDossier
{
...
Get (load or create), modify and save a dossier value in the context of the current business case:
BusinessCaseDossier dossier = ivy.repo.get(BusinessCaseDossier.class);
dossier.getPerson().setLastName("Polo");
ivy.repo.save(dossier);
Note, that the method get either loads the dossier if there is
already a dossier associated with the current business case or creates a new
dossier.
Create and save:
Dossier dossier = ...
out.businessDataId = ivy.repo.save(dossier).getId();
Tip
It is recommended to only store the Id of the business value in the process data. After a Task Switch you must load the business data value from the repo with the stored Id. This is required, because the business data repo does not keep the reference to the instance on the Task Switch.
Load, modify and save:
Dossier storedDossier = ivy.repo.find(in.businessDataId, Dossier.class);
storedDossier.getPerson().setLastName("Polo");
ivy.repo.save(storedDossier);
The search capabilities of the Business Data Store are based on Elasticsearch and therefore fast and powerful.
There is a fluent API to search stored business data. The API supports filtering, ordering and limiting of the results:
List<Dossier> result = ivy.repo.search(Dossier.class)
       .allFields().containsAnyWords("Polo Columbus")
       .execute()
       .getAll();
Also fuzzy search and search engine like query strings are supported:
List<Dossier> result = repo.search(Dossier.class)
       .score()
       .allTextFields()
       .query("Baldwin~1 -Alec")
       .execute()
       .getAll();
Warning
By default the search result is limited to 10 entries. Use the method
limit if you want to get more than 10 entries.
Create and save with own Id:
Dossier dossier = ...
String yourId = ... // generate your own id, be sure it is unique!
dosser.id = yourId; // set your id to the Business Data value
ivy.repo.save(dossier);

ivy.repo.find(yourId, Dossier.class) // get your Business Data value
Warning
Be aware that the id can not be changed later and the maximum length of the identifier is 100 characters.
The WorkflowDemos sample project of the Axon.ivy Designer contains examples on how to use the Business Data Store.
See Public API of BusinessDataRepository for more code
samples.
- Size
-
The Business Data store is not designed for storing huge binary objects like PDF's.
- Types
-
The ivy scripting types
XML, andTreeare not serializable.Collection types like an
ArrayListcan be stored in a field, but not as root object. Always use a simple DataClass or plain old Java objects as root object to store and load in the repository.Public API objects like
IUser,ITaskor similar should not be stored into the Business Data repository. As workaround its better to store the Id of a Task or User and re-load it via this identifier.The type of a stored field should never be changed (E.g. from
NumbertoString). The already stored data de-serialization could fail and more likely Business Data with the new type can no longer be found via the search API as the search index is strongly typed. - Project Dependencies
-
When using the same Business Data value type in multiple projects 'a' and 'b' it is best to define the data classes for the business data in a own project 'base'. Then define a dependency from projects 'a' and 'b' to project 'base'.
Warning
If you use an object of a type that is defined in project 'a' inside the business data value (e.g. add it to a list) then the business data value cannot be loaded in project 'b'. This is because project 'b' is not dependent to project 'a' and therefore cannot load objects of classes that are defined in project 'a'.
The BusinessData store serializes Java objects to schema-less JSON by using the Jackson. Ivy DataClasses are predestinated to be serialized with Jackson. However, Jackson is able to store and load any Java object hierarchy. The following customizations could help to store your special plain old Java objects, which might can not be serialized by default.
Warning
Jackson is not only used for BusinessData serialization, but also to provide and consume “REST Services”. If you customize the serialization of Jackson, it will very likely also affect the serialization of Java objects which are used as input or return parameter of any REST service. If a serialization behaviour must only be applied for the BusinessData serialization, declare it as “Own module”.
The de-serializer expects an empty default constructor to re-create a Java object. If you have a non default constructor (with parameters) or a factory method to create instances of your object, Jackson annotations are required so that the de-serializer knows how to re-create the object.
For a sample see: https://github.com/FasterXML/jackson-databind/#annotations-using-custom-constructor
The ObjectMapper will only store fields as JSON which are public accessible either by getter method or its field visibility. The re-creation of such field will fail if no setter is public accessible. Via annotations either the serialization of this field can be avoided or the re-creation can be enabled.
Avoid the serialization of a field:
public class MyCar{
    private List<Wheel> wheels;

    @JsonIgnore
    public List<Wheel> getWheels(){
        return wheels;
    }
}
Enable re-creation of a setter-less field:
public class MyCar{
    @JsonProperty
    private List<Wheel> wheels;

    public List<Wheel> getWheels(){
        return wheels;
    }
}
If simple annotations do not solve a serialization task, it's possible to write a
completely custom serializer and de-serializer for Jackson. To do so implement a
class that extends com.fasterxml.jackson.databind.module.SimpleModule
and add your customization code into it. Register the class via SPI: create a file
META-INF/services/com.fasterxml.jackson.databind.Module and store
the qualified name of your module implementation in this file.
However, if you need to serialize instances of a popular library there could already be a Jackson module available that handles its serialization. See https://github.com/FasterXML/jackson#third-party-datatype-modules
If a module is already public available, simply add its JAR to the classpath of your project.
This chapter introduces the Persistence Configuration and the Persistence API of Axon.ivy. The persistence framework is based on the Java Persistence API, aka JPA) and provides support for storing and loading business objects from and to a database in an easy way.
In order to use automated persistence in your business or User Dialog processes you need to define some Entity Classes first. An entity class is similar to a data class (i.e. a business object) but holds additional information that is necessary to map the class to a database table and it's attributes to database columns.
Once you have created entity classes, you need to define at least one persistence unit configuration. A persistence unit is responsible for managing all or a subset of your entity classes and defines the database where those entities are stored. Once you have configured one or more persistence units you can use them in your process steps with the Persistence API to load/update entity objects directly from the database or save/update them to the database.
Entity Classes are like global Data Classes but with additional information where and how to store the data of a class and it's attributes to a relational database. An Entity Class is mapped directly to a database table and the attributes of an Entity Class are mapped directly to the fields of a database table. Therefore the database schema can be generated directly out of an Entity Class. It is possible to load, save, and update entity objects with the Persistence API.
Entity Classes are created with the New Entity Class Wizard and can be edited afterwards in the Entity Class Editor. Both of those are similar to the wizard and editor for regular Data Classes, but allow to specify additional settings, that are necessary for automated persistence.
The New Entity Class wizard lets you create a new global Entity Class.

- Project Name
-
Chose the name of the project the new Entity Class should belong to.
- Namespace
-
Chose a namespace for your Entity Class. The name space lets you create a structure to organise your data. Use the dot character '.' to separate the folders from each other. The namespace will be visible in the Axon.ivy project tree.
- Entity Class Name
-
Enter the name of your Entity Class. Do not use the names twice in your project, its getting confusing if you do so.
- Entity DB Table Name
-
Enter the name of the database table name of your Entity Class. If empty the name of your Entity Class is used. This name is used if the database table of this Entity Class is generated.
The Axon.ivy Entity Class editor lets you configure the process data objects of Axon.ivy similar to the Data Class Editor. The process data is the data that "flows" through your processes. Additionally an Entity Class has information where and how to store the data of a class and it's attributes to a relational database.
Use this editor to add new data fields to your Entity Class, to change the type of a field or to document your Entity Class or Entity Class Fields.
Axon.ivy Project Tree > double click on a Entity Class entry in the tree.
New > Entity Class > then the editor opens if the class was created successfully
Enter your text here to describe in prose what kind of data your Entity Class represents.
Enter a list of attributes into the table. Use the  icon to add a new attribute or just click on the next empty
cell in the "Name" column of the table.
icon to add a new attribute or just click on the next empty
cell in the "Name" column of the table.
If you want to reorder your entries in the table, then you can use the
 icons to do so. The order influences just the presentation and
has no logic implication.
icons to do so. The order influences just the presentation and
has no logic implication.
Use the  icon to toggle the value change breakpoint for the currently
selected attribute. The attribute icon
icon to toggle the value change breakpoint for the currently
selected attribute. The attribute icon  shows that a breakpoint is installed on a attribute. More
information about value change breakpoints can be found in chapter Breakpoints.
shows that a breakpoint is installed on a attribute. More
information about value change breakpoints can be found in chapter Breakpoints.
- Name
-
Enter the name of your attribute. The name should not contain any special characters or spaces.
Tip
You may already specify the type of the attribute here by adding a colon ':' to the attribute name, followed by desired type (e.g. myDateAttribute:Date). When only adding a colon to the name without a type, the data type selection dialog will appear.

- Type
-
Enter the type of the attribute (fully qualified) or press the
 to bring up the data type selection
dialog.
to bring up the data type selection
dialog. - DB Field
-
The name of the field in the database table of this attribute. If you generate the database from this Entity Class for this attribute the DB field name is used as database field.
- Persistent
-
Decide if the data should be saved in the database if you use the persistence API and if the data should be persistent between a task switch. If the data is not set to be persistent, then you loose all information if the execution of the process passes a task switch process element.
- Length
-
You can specify the length of the field in the database. This can only specified if the type is a String, BigDecimal or BigInteger. The default length for string fields is 255 and for decimal fields 19,2 on the database. Changes of the length has only an effect if the database schema is created new.
- Properties
-
- id
-
Specifies the primary key field of an entity. Every Entity Class must have exactly one primary key.
- generated
-
Specifies if the primary key should be generated automatically.
- not nullable
-
Whether the database column is not nullable.
- unique
-
Whether the field should be a unique key in the database.
- not updateable
-
Whether the column is not included in SQL UPDATE statements generated by the persistence provider.
- not insertable
-
Whether the column is not included in SQL INSERT statements generated by the persistence provider.
- version
-
Specifies the version field of an entity that serves as its optimistic lock value. The version is used to ensure integrity when performing the merge operation.
- Association
Defines the association to another Entity Class. The actual configuration is done in the embedded Association Editor.
- Comment
-
Describe the means of your attribute here.
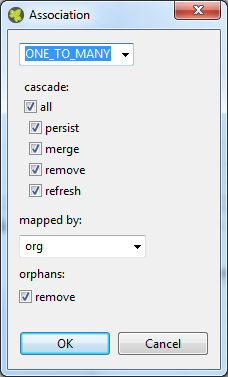
Defines the association to another Entity Class and are only allowed to them and not other types of classes.
- ONE_TO_ONE
-
Defines a one to one (1:1 on the database) association to another Entity Class. Can only be used if the type of the attribute is an Entity Class.
- MANY_TO_ONE
-
Defines a many to one (n:1 on the database) association to another Entity Class. Can only be used if the type of the attribute is a List or Set of an Entity Class. The inverse association of a MANY_TO_ONE is a ONE_TO_MANY association.
- ONE_TO_MANY
-
Defines a one to many (1:n on the database) association to another Entity Class. Can only be used if the type of the attribute is a List or Set of an Entity Class. This type of association needs always a mapped by specification, because this is always the inverse side of an MANY_TO_ONE association.
Defines the cascadable operations which are propagated to the associated Entity. E.g. if persist is enabled then the associated object will be persisted automatically if an instance of this class is persisted.
- persist
-
If enabled the associated object is persisted automatically if an instance of the class is persisted. See persist operation.
- merge
-
If enabled the associated object is merged automatically if an instance of the class is merged. See merge operation.
- remove
-
If enabled the associated object is removed automatically if an instance of the class is removed. See remove operation.
- refresh
-
If enabled the associated object is refreshed automatically if an instance of the class is refreshed. See refresh operation.
The field that owns the relationship on the specified type which must be an Entity Class. This element is only specified on the inverse (non-owning) side of the association. Mapped by can only be used for ONE_TO_ONE and ONE_TO_MANY associations. The inverse side of the association must be also the inverse association (ONE_TO_ONE inverse ONE_TO_ONE, ONE_TO_MANY inverse MANY_TO_ONE)
If orphans remove is enabled and an entity that is the target of the relationship is removed from the relationship (either by removal from the collection or by setting the relationship to null), the remove operation will be applied to the entity being orphaned. If the entity being orphaned is a detached, new,or removed entity, the semantics do not apply.
If orphan remove is enabled and the remove operation is applied to the source entity, the remove operation will be propagated as defined in the cascade section.
The remove operation is applied at the time of the flush operation. The orphans removal functionality is intended for entities that are privately "owned" by their parent entity.
Example:
A 'Basket' entity holds a list of 'Product' entities. What happens if
basket.getProducts().remove(..) is called?
-
orphan remove enabled: the product is removed from the list of referenced products even if the entity is reloaded or refreshed.
-
orphan remove disabled: the product stays in the list of referenced products if the entity is reloaded or refreshed.
The Persistence Configuration Editor lets you configure the persistence units you use in your project and the extending projects.
Usually you only need a single persistence unit that manages all of your project's entity data classes. In this case you can simply create a new persistence unit, associate it with a data source (i.e. data base) and you're done. All of the project's entity classes will then automatically be managed by this unit.
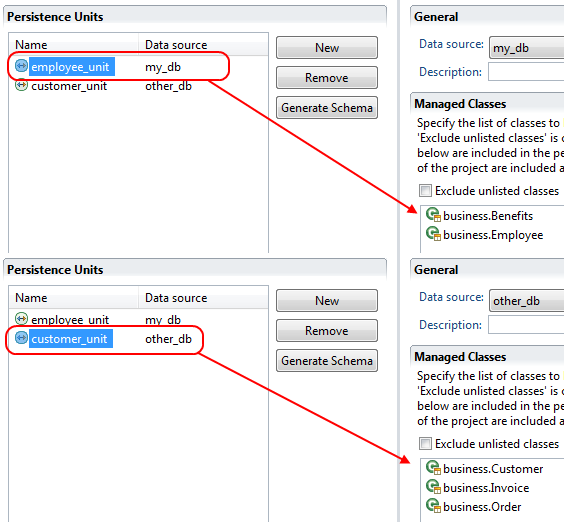
However, if you wish to do so, you can divide your entity data classes into subsets and manage each subset through an individual persistence unit. In this case you need to specify multiple persistence units and then define an explicit list of managed entity classes for each unit.
Warning
Although it is theoretically possible to have the same entity class managed by two or more persistence units, you should be aware of the consequences. Once you have generated/attached an object of a specific class through a specific persistence unit, you must ensure that it is managed uniquely by that unit afterwards.
Example: Assume that you have two different objects of the same entity class, e.g.
Person, generated through different persistence units, e.g.
employee through employee_unit and
customer through customer_unit. In this case you must
absolutely avoid to mix persistence units and objects. For the above example,
handing over employee to customer_unit (or
customer to employee_unit) will consequently result in
errors.

- New
-
Add a new persistence unit configuration
- Remove
-
Remove the selected persistence unit(s)
- Generate Schema
-
Generates the database schema out of the entity classes who belong to the selected persistence unit. See Generate database schema from persistence unit for details.
- Data source
-
Here you have to choose a database configuration which will be the data source of this persistence unit. Means all the data are loaded and stored within this database. Go to the Database Configuration Editor to configure available datasources.
There is also an
IvySystemDatabasedatasource which points to the current System Database. Normally you would prefer your own database to split valuable customer data from the system data. - Description
-
You can give your persistence unit any description here.
- Managed Classes
-
Specify the list of classes to be managed in this persistence unit. If 'Exclude unlisted classes' is checked, only the entity classes which are defined in the list are included in the persistence unit. Otherwise all entity classes of the project are included automatically plus the entity classes defined in the list.
- Properties
-
Specify some properties for the persistence unit. You do not have to specify something here except you now what you are doing.
On the first wizard page you can specify the environment and the type of the schema generation.
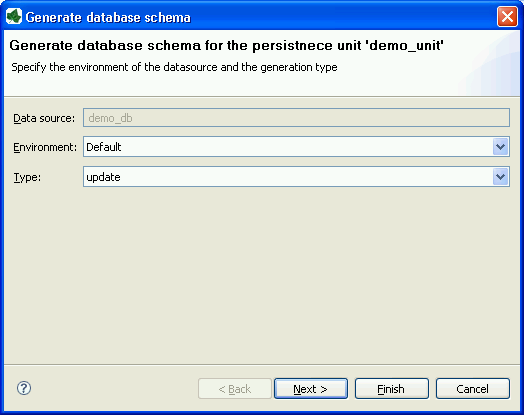
- Data source
-
For the schema generation the data source of the persistence unit is used.
- Environment
-
Specify the environment on which you like to generate the database schema.
- Type
-
Specify the type of the schema generation. You can choose between update and create.
-
update: Does update the current available schema on the database.
Warning
The update does not refactor any changed table names, field names or field types. If a table or field does not exist in the database a new one is created even if the same table or field with another name exists.
-
create: Does drop the current schema on the database and create a new one.
Warning
This option does delete all data which is stored in the database.
-
The second wizard page shows a preview what will be executed on the database.

The Axon.ivy Persistence API is used to load entity objects directly from the
database or save/update them on the database. The Persistence API can be accessed by
IvyScript anywhere scripting is supported. The Persistence API can only deal with entity
objects, means objects of type Entity Classes.
The Persistence API can be found under ivy.persistence.<persistence unit>. Here you find all the methods for
finding, persisting, updating and querying entity objects. See IIvyEntityManager fore more information. Replace <persistence unit> with the name of a persistence unit.
The persistence units can be configured with the Persistence Configuration
Editor.
To persist (save/create object on the database) you can use the persist()
method of the Persistence API.
Warning
This method only works properly if the entity object and all the associated objects are not jet persistent. Otherwise you have to use the merge method.
Example (Product is an Entity Class):
// persist new created product
Product product;
product.name = "Product name";
product.nr = 12;
ivy.persistence.<persistence unit>.persist(product);

// get id of new created product
Number newProductId = product.id;
To find an entity object by id (select object on the database) you can use the
find() method of the Persistence API.
Example (Product is an Entity Class):
// load product with id 1 from the database
Product product = ivy.persistence.<persistence unit>
.find(Product.class, 1) as Product;
To merge (update or save/create object on the database) you can use the
merge() method of the Persistence API.
Warning
Only the returned entity object of this method is the really updated or saved/created object. The object given to this method is not changed.
Example update (Product is an Entity Class):
...
// change before loaded product
product.name = "New product name"
Product updatedProduct = ivy.persistence.<persistence unit>
.merge(product) as Product;
Example save/create (Product is an Entity Class):
// save new created product
Product product;
product.name = "Product name";
product.nr = 12;
Product savedProduct = ivy.persistence.<persistence unit>
.merge(product) as Product;

// get id of new created product
Number newProductId = savedProduct.id;
To remove (delete object on the database) you can use the remove() method
of the Persistence API.
Example (Product is an Entity Class):
...
// delete the product from the database
ivy.persistence.<persistence unit>.remove(product);
To refresh (reload object from the database) you can use the refresh()
method of the Persistence API.
Example (Product is an Entity Class):
...
// change before loaded product
product.name = "New product name"
// reload object from the database and revert local changes
ivy.persistence.<persistence unit>.refresh(product);
With the Persistence API it is possible to execute Java Persistence API Query Language
(JPA QL) statements. See IIvyQuery for more information about the Query API. The query
language based around the objects that are persisted but with syntax very similar to
SQL. You have always to use the names of the Entity Class and the attributes and not the
names from the database.
Queries are case-insensitive, except for names of Java classes and properties. So
SeLeCT is the same as sELEct is the same as
select but PRODUCT is not product and
foo.barSet is not foo.BARSET. This manual uses
lowercase JPA QL keywords.
To execute a JPA query where you are expecting a single value to be returned you
would call getSingleResult(). This will return the single Object. If
the query returns more than one result then you will get an Exception. This should
not be called with "UPDATE"/"DELETE" queries.
Example (Product is an Entity Class):
Product product = ivy.persistence.<persistence unit>
.createQuery("select p from Product p where p.id = :id")
.setParameter("id", 1)
.getSingleResult() as Product;
Warning
Calling this method in automatic transaction mode (by default) will close the
recordset automatically. Consequently you can not invoke this method multiple
times or in combination with getResultList() on the same query.
To execute a JPA query you would typically call getResultList(). This
will return a List of results. This should not be called with "UPDATE"/"DELETE"
queries.
Example (Product is an Entity Class):
List<Product> products = ivy.persistence.<persistence unit>
.createQuery("select p from Product p where p.price > :price")
.setParameter("price", 10)
.getResultList();
Warning
Calling this method in automatic transaction mode (by default) will close the
recordset automatically. Consequently you can not invoke this method multiple
times or in combination with getSingleResult() on the same query.
To execute a JPA UPDATE/DELETE query you would call executeUpdate().
This will return the number of objects changed by the call. This should not be
called with "select" queries.
Example delete (Product is an Entity Class):
// delete all products
Number deletedRows = ivy.persistence.<persistence unit>
.createQuery("delete from Product p")
.executeUpdate()
Example update (Product is an Entity Class):
// update product name
Number updatedRows = ivy.persistence.<persistence unit>
.createQuery("update Product set name = :newName where name = :oldName")
.setParameter( "newName", "New Product Name" )
.setParameter( "oldName", "Old Product Name" )
.executeUpdate();
The JPA Queries supports named and numbered parameters and provides methods for setting the value of a particular parameter.
Tip
You should always use parameter binding and do not build the query with string concatenation, because of performance reasons.
Example with named parameter:
ivy.persistence.<persistence unit>
.createQuery("select p from Product p where p.price > :price")
.setParameter("price", 10)
Example with positional parameter:
ivy.persistence.<persistence unit>
.createQuery("select p from Product p where p.price > ?1 and p.amount <= ?2")
.setParameter(1, 10).setParameter(2, 80)
To specify the range of a query you have the two methods
setFirstResult() and setMaxResults() available. The start
position of the first result, numbered from 0.
Example (Product is an Entity Class):
List<Product> products = ivy.persistence.<persistence unit>
.createQuery("select p from Product p where p.price > :price")
.setParameter("price", 10)
.setFirstResult(40)
.setMaxResults(20).getResultList();
The call to setFirstResult(40) means starting from the fortieth
object. The call to setMaxResults(20) limits the query result set to 20
objects (rows) returned by the database.
JPA QL provide an ORDER BY clause for ordering query results, similar to SQL.
Returns all Products ordered by name:
from Product p order by p.name
You specify ascending and descending order using asc or desc:
from Product p order by p.name desc
You may order by multiple properties:
from Product p order by p.name asc, p.description desc
When you use a select clause, the elements of the result are no longer guaranteed to be unique.
DISTINCT eliminates duplicates from the returned list of product descriptions.
select distinct p.description from Product p
JPA QL support the same basic comparison operators as SQL. Here are a few examples that should look familiar if you know SQL:
Binary comparison (=, <>, <, >, >=, <=, [NOT] BETWEEN, [NOT] IN):
from Product p where p.amount = 100
from Product p where p.amount <> 100
from Product p where p.amount > 100
from Product p where p.amount <= 100
from Product p where p.amount between 1 and 10
from Product p where p.name in ('Product A', 'Product B')
Null check (IS [NOT] NULL):
from Product p where p.name is null
from Product p where p.name is not null
Arithmetic expressions (+, -, *, /):
from Product p where ( p.amount / 0.71 ) - 100.0 > 0.0
The LIKE operator accepts a string value as input parameter in which an underscore (_) stands for any single character, a percent (%) character stands for any sequence of characters (including the empty sequence), and all other characters stand for themselves:
from Product p where p.name like 'A%'
from Product p where p.name not like '_a_'
Logical operators (NOT, AND, OR):
from Product p
    where p.name like 'A%' and p.price > 10
Expressions with collections (IS [NOT] EMPTY, [NOT] MEMBER [OF]):
from Product p where p.customers is not empty
from Product p, Category c where p member of c.products
| Operators | Description |
|---|---|
| . | Navigation path expression operator |
| +, - | Unary positive or negative signing (all unsigned numeric values are considered positive) |
| *, / | Regular multiplication and division of numeric values |
| +, - | Regular addition and subtraction of numeric values |
| =, <>, <, >, >=, <=, [NOT] BETWEEN, [NOT] IN, IS [NOT] NULL, [NOT] LIKE | Binary comparison operators with SQL semantics |
| IS [NOT] EMPTY, [NOT] MEMBER [OF] | Binary operators for collections in JPA QL |
| NOT, AND, OR | Logical operators for ordering of expression evaluation |
Table 3.1. JPA QL operator precedence
An extremely powerful feature of JPA QL is the ability to call SQL functions in the where and HAVING clauses of a query.
Lower cases or upper cases a string (LOWER(string), UPPER(string)):
from Product p where lower(p.name) = 'product name'
from Product p where upper(p.name) = 'PRODUCT NAME'
Another common expression is concatenation, although SQL dialects are different here, JPA QL support a portable concat(string1, string2) function:
from Product p where concat(p.name, p.description) like 'A% B%'
Size of a collection (SIZE(collection)):
from Product p where size(p.customers) > 10
| Function | Return | Description |
|---|---|---|
| UPPER(string), LOWER(string) | string | Lower cases or upper cases a string value |
| CONCAT(string1, string2) | string | Concatenates string values to one string |
| SUBSTRING(string, offset, length) | string | Substring string values (offset starts at 1) |
| TRIM( [[BOTH|LEADING|TRAILING] char [from]] string) | string | Trims spaces on BOTH sides of string if no char or other specification is given |
| LENGTH(string) | number | Gets the length of a string value |
| LOCATE(search, string, offset) | number | Searches for position of search in string starting at offset |
| ABS(number), SQRT(number), MOD(dividend, divisor) | number | Returns an absolute of same type as input, square root as double, and the remainder of a division as an integer |
| SIZE(collection) | integer | Size of a collection; returns an integer, or 0 if empty |
Table 3.2. JPA QL functions
The aggregate functions that are recognized in JPA QL are count(),
min(), max(), sum() and
avg().
This query counts all the Products:
Number productCount = ivy.persistence.<persistence unit>
.createQuery("select count(p) from Product p").getSingleResult() as Number;
This query calculates the average the sum, the maximum and the minimum from the amount of all products:
select avg(p.amount), sum(p.amount), max(p.amount) min(p.amount) from Product p